how to use patch tool in photoshop
how to use blur tool in photoshop
how to use gradient tool in photoshop
how to use brushes in photoshop
how to use perspective warp in photoshop
how to use the brush tool in photoshop
how to use the stamp tool in photoshop
how to use mask in photoshop
how to use overlays in photoshop
how to use photoshop brushes
how to use clone stamp tool in photoshop cs6
how to use photoshop for free
how to use patterns in photoshop
photoshop how to use clone stamp
how to use magnetic lasso tool in photoshop
how to use the clone stamp tool in photoshop
how to use quick mask in photoshop
how to use 3d in photoshop cc
how to use huion tablet in photoshop
how to use filters in photoshop
how to use marquee tool in photoshop
how to use perspective in photoshop
how to use liquify tool in photoshop
how to use artboards in photoshop
how to use ruler in photoshop
how to use crop tool in photoshop
how to use a clipping mask in photoshop
how to use clone stamp tool in photoshop cc
how to use paths in photoshop
how to use google fonts in photoshop
how to use nik collection in photoshop
how to use smudge tool in photoshop
how to use mask tool in photoshop
how to use photoshop express
how to use actions in photoshop cs6
how to use fonts in photoshop
how to use gradient in photoshop
how to use photoshop tools
how to use perspective tool in photoshop
how to use curves to edit photo in photoshop
how to use color range in photoshop
how to use photoshop mockups
how to use a downloaded font in photoshop
how to use photoshop overlays
how to use the pen tool in photoshop cs6
how to use paint bucket tool in photoshop
how to use pantone colors in photoshop
how to use photoshop cc 2015
how to use photoshop color replacement tool
how to use brush in photoshop
how to use gradients in photoshop
how to use glyphs in photoshop
how to use levels in photoshop
how to use lens flare in photoshop
how to use patch tool photoshop
how to use the quick selection tool in photoshop
how to use photoshop brushes in gimp
how to use healing brush tool in photoshop cc
how to use the refine edge tool in photoshop
how to use overlays in photoshop cc
how to use scroll wheel to zoom in photoshop
how to learn to use photoshop
how to use nik collection in photoshop cc
how to use adjustment layers in photoshop
how to use photoshop without signing in
how to use photoshop for photography
how to use paintbrush in photoshop
how to use photoshop liquify
how to use photoshop layer mask
how to use color balance in photoshop
how to use perspective warp on photoshop
how to use photoshop on android
learn how to use adobe photoshop
how to use screentones in photoshop
how to use the marquee tool in photoshop
how to use color picker in photoshop
how to use magic eraser photoshop
how to use the lasso tool in photoshop cs6
how to use lasso tool in photoshop cc
how to use digital backgrounds in photoshop
how to use the selection tool in photoshop
how to use the sponge tool in photoshop
how to use green screen photoshop
how to use adobe photoshop 7 pdf
how to use pattern stamp tool in photoshop cs6
how to use the magic wand tool photoshop
how to use actions in photoshop cc 2018
how to use ps photoshop
how to use magnetic lasso tool in photoshop cs6
how to use pixlr like photoshop
how to use photoshop cs6 tutorials
how to use perfect resize in photoshop
photoshop how to use patterns
how to use patch tool in photoshop cc 2018
how to use gimp to photoshop someone into a picture
photoshop how to use magic wand
how to use touchscreen with photoshop
how to use adobe photoshop elements
how to use gifs in photoshop
how to use clone tool in photoshop elements 10
how to use photoshop 2015
adobe photoshop lasso tool how to use it
how to use select color range photoshop
how to use adobe photoshop cs3
how to use wacom tablet in photoshop
how to use mixer brush tool in photoshop
how to use channels in photoshop
how to use plugins in photoshop cs6
how to use mask in photoshop cs6
how to use the magnetic lasso tool in photoshop
how to use blend tool in photoshop
how to use the clone tool on photoshop
how to use adobe kuler in photoshop
how to use color dropper in photoshop
how to use layer mask in photoshop cc
how to use vanishing point in photoshop cs6
how to use nik software in photoshop
how to use photoshop brush
how to use the gradient tool in photoshop cs6
how to use gaussian blur in photoshop
how to use layers in adobe photoshop
how to use photoshop elements 10
how to use adobe photoshop lightroom
how to use the slicing tool in photoshop
how to use adobe photoshop beginners
how to use move tool in photoshop
how to use tpl file in photoshop
how to use a smart object in photoshop
how to use quick select tool in photoshop
how to use a font in photoshop
how to use pattern stamp tool photoshop
how to use adobe photoshop cs3 extended
adobe photoshop lightroom how to use
photoshop how to use pen tool to cut out
how to use adobe fonts in photoshop
how to use photoshop video
how to use photoshop brushes in manga studio 5
photoshop 7 how to use
how to use template in photoshop
how to use quick mask in photoshop cs6
how to use ai file in photoshop
how to use layers in photoshop cs5
how to use magic eraser in photoshop
how to use alpha channel in photoshop
how to use refine edge in photoshop cs6
how to use photoshop elements 9
photoshop how to use curves
how to use photoshop to put a face in another body
how to use dual brush in photoshop
how to use red eye tool in photoshop
how to use background eraser in photoshop
how to use photoshop tutorial
how to use kuler in photoshop
how to use a pat file in photoshop
adobe photoshop cs how to use
how to use brush photoshop
how to use guides in photoshop cs5
how to use layer masks in photoshop cs6
how to use the color replacement brush in photoshop
how to use double exposure in photoshop
how to save a pattern swatch in photoshop to use in illustrator
photoshop how to use color filter
how to use photoshop elements to make a memory mate template
how to use pen tool with wacom photoshop
how to use png files in photoshop elements
how to use smudge tool photoshop
photoshop how to select a color and use it in brush tool
photoshop cc how to use patterns
how to use free form pen tool in photoshop
how to use pngs in photoshop
how to use photoshop to join two images
how to use photoshop to make a 360 degree view
how to use a typekit font photoshop cs6
how to use brushes photoshop
how to use dll crack photoshop
how to use optimize in photoshop
how to use photoshop to make gifs
how to use html in photoshop
how to use clipping mask with brush tool in photoshop
how to use exact measurements when resizing placed images in photoshop cc
photoshop surface pro how to use pressure
how to use photoshop cs6 to scann from my scanner
how to use camera raw in photoshop classic cc
surface pro 4 photoshop cc how to use pressure pen
how to use unhow to use unify layer visibility in photoshop
how to use exact measurements in photoshop
how to use my light ray brushes photoshop cc
how to use photoshop patch tool cc
how to use gradients in photoshop in digital painting
how to remove white background from logo in photoshop to use in indesign
how to use vectors in photoshop elements
how to use photoshop to design wireframe
how to use onion skin whenever photoshop
how to use sponge tool photoshop elements 15
how to use affinity designer to photoshop
how to use the magic wand tool in photoshop elements 15
how to use luminosity in photoshop digital painting
how to use photoshop cs2 scripts
how to use a layer a s a mask photoshop
how to use photoshop to create an animated face from photograph
how to use web font in photoshop
how to use shape tool in photoshop to fill
youtube how to use refine edge in photoshop
how to use photoshop 2014
how to use select and mask in photoshop cc 2017
how to use pen tool in photoshop tablet mode
how to use smudge tool for rendering in photoshop
how to use exact measurements when resizing in photoshop
how to use a json file in photoshop
how to use bamboo tablet with photoshop
how to use a website template without photoshop
how to use photoshop to make thinner in a crowded photo
how to use a clone stamp tool in photoshop cs5
how to use custom font in adobe photoshop
how to use a layer mask in photoshop cc
youtube how to use online photoshop to crop
how to use svg text in photoshop elements
how to use the paint bucket tool in photoshop elements without it looking ugly
how to use folders in photoshop
how to use layer comps photoshop
how to use liquify tool photoshop
how to use custom style in photoshop
how to use an art board in photoshop
how to use photoshop mockuips
how to use burn tool in photoshop elements
how to use smart blur in photoshop
how to make photoshop not use windows ink
how to use photoshop generate
how to use adobe photoshop raw viewer
how to use my samsung 360 device to make images for photoshop.
adobe photoshop cs6 how to use eraser tool without leaving checkerboard pattern
how to use a shape as perspective lines in photoshop
how to use pressure to control opacity photoshop
how to use the blur tool on photoshop elements
how to use grany textures in photoshop tumblr
how to use dry brush in photoshop portrait
how to use adobe photoshop elements 12 as digital art
photoshop cc 2018 how to use auto align layers
i don't know how to use photoshop
how to use vingette in photoshop cs6
how to use a vector in photoshop cs6
how to use face-aware liquify in photoshop c6
how to use cliping masks in photoshop
how to use icc profile monitor calibrated photoshop
how to use fix eraser tool in photoshop
how to use masks with text photoshop
how to use photoshop cc histogram
how to use transparent images on photoshop 2019
how to use color checker photoshop
photoshop how to use pen tool to draw lines
how to use a photoshop file as a mask in after effects
how to use a gradient map in photoshop
how to use usc cutter in photoshop
how to use style in photoshop
how to use quick selection tool photoshop youtube
photoshop cc how to use non adobe stock templates
how to use photoshop as a beginner
how to use video animation in photoshop
how to use atn in photoshop
how to use a tiff file in photoshop
how to use photoshop in catalina
how to use brush on shape outline in photoshop
how to use displace in photoshop to make dirt text
how to use negative colors in photoshop
how to use vanishing[pint tool photoshop
adobe photoshop how to use the color replacement tool to change a color to white 2019
how to use photoshop to remove spot
how to get photoshop to use nvidia graphics card
how to use pin tool in photoshop cc
how to use a gradient mask in photoshop
how to use psd file in photoshop
instructions on how to use photoshop cs6
how to use the blur tool in photoshop 9
how to use adobe photoshop on mobile
how to use photoshop for lifetime using amtlib
how to use adobe bridge with cs6 photoshop
photoshop how to use device central
how to use photoshop groups
how to use security guidelines photoshop
i know how to use photoshop illustartor and lightroom can i work freelance
how to use content aware scale in photoshop cs3
how to use web cam in photoshop
how to use color range masking in photoshop
how to use surface touchscreen for photoshop
how to use trsnparnert background in photoshop cs6 mac
how to use pantone color in photoshop
how to use standard mode in photoshop
how to use brushes on circles photoshop
photoshop cc how to use content aware fill
how to use the clone tool in photoshop 2018?
how to use a paint brush in photoshop to adjust color
how to use watcom with photoshop
how to use the filter in photoshop
how to use a layer template in photoshop cs6
how to use photoshop to make an image larger
how to use photoshop brush extensions
how to use optical flares in photoshop
how to use corel plug in photoshop
how to use 3d function in photoshop
how to use mini bridge in photoshop cs5
how to use a photoshop picture as a desktop background
how to use adjustments on a layer photoshop cc
how to use photoshop to make photos look professional
how to use hard erasor photoshop
how to use the quick select tool in photoshop elements
photoshop how to make a brush rotate as you use it
photoshop how use pen tool to create shapes
how to use ruler guides in photoshop
how to use the measurement tool in photoshop
how to use system fonts in photoshop cs
how to use adobe photoshop elements editor 15
how to use photoshop skin brushes
photoshop how to use png images
how to use photoshop with sawgrass virtuoso
photoshop how to use the lasso
how to use photoshop adjustment layer to bring down highlights in part of an image
how to use the cone tool in photoshop
photoshop elements how to use paint bucket
how to use transparent gradient in photoshop
how to use curves in photoshop 4
how to use avery templates in photoshop
how to use gradient colors photoshop
virtual photoshop plugin+ how to use
how to use brothers ot word logo in photoshop
how to use photoshop brushes in photoshop elements
how to use photoshop cs 5
photoshop cs3 how to use color sampler
how to use adobe photoshop to add a picture
how to fix photoshop "could not use stamp clone"
how to use photoshop face
how to use photoshop to make numerous pages
how to use punch tool in photoshop
how to use interlocking geometric image mask with photoshop
photoshop cs5 how to use selection made with pen tool
how to use bezier curves in photoshop
how to use fontspace.com in photoshop
how to use shape in photoshop
how to use the vanishing point in photoshop
how to use photoshop hue saturation
how to use photoshop the ultimate guidebook
how to use a color fill in photoshop
how to use overlay in photoshop as a sharpening tool
how to use the extract tool in photoshop 7
how to use mask animation photoshop cs5
how to use marker in photoshop
how to make brush change as you use it photoshop
how to use 3 colors in a gradient photoshop
how to use perspective wrap on photoshop cs 6
how to use photoshop to make forum signatures
how to use adjustment brush photoshop
how to use the add an image photoshop paint brush
photoshop how to use skin tone from one photo to recolor the other
how to use rightfont with photoshop
how to use pen tool in photoshop for curves
how to use an extra hard drive as a photoshop scratch disk
how to use adobe typekit in photoshop
how to use gradient tool photoshop eleemtns
how to use eraser in photoshop cs6
how to use guides in photoshop to create
how to use the intuos art with photoshop
photoshop how to use the stam tool
how to use krita like photoshop
how to use ellipse tool in photoshop cs3
how to use photoshop draw business process
how to use photoshop to remove background
how to use hue saturation in photoshop to get a specific color
how to use photoshop to design your own fabric images
how to use guides to set up an a4 page spread in photoshop
how to use color swatches in photoshop to change color
how to use patterns in photoshop cc
how to use 32 bit hdr in photoshop
how to use the photoshop and make pictures
how to use plug in air photoshop ce3
how to use layer mask photoshop elements 1028
how to use backgrounds in photoshop
how to use layer in photoshop to crop
how to use clouds add on filter in photoshop cs6
how to use z depth map in photoshop
how to use photoshop in stop animation
how to use gradient map in photoshop cc
how to use adobe photoshop android
how to use the gradient editor to make a new gradient in photoshop
how to use the stroke tool on photoshop elements
how to use photoshop for ecommerc
how to use line brush photoshop
how to use the blur tool in photoshop 2015
photoshop how to use pressure
how to use photoshop to draw measurement
how to use photoshop plugins in gim
how to use pen tool in photoshop for lineart
how to use an ai file without illustrator or photoshop
how to use color filters in photoshop
how to use background remover in photoshop
how to use content aware move tool in photoshop cs6
how to use left click on tablet pen for eyedropper photoshop cs6
how to use path in photoshop cs6
how to use image in text photoshop
how to use adobe photoshop rectangular marquee tool to crop
how to use a overlay with a black background in photoshop
how to use asl text effects in photoshop
how to use photoshop to save highest quality png
how to use the background blur brush in photoshop
how to use shift an image with out disturbing the background in photoshop
how to use a pattern in photoshop that was made in illustrator
how to use the magic pen tool in photoshop
how to use free transform in photoshop cc
how to use hand drawn dividers in photoshop
how to use photoshop masking to crop paintings
how to use a graphic tablet in photoshop
how to use gimp2 to photoshop faces onto other images
how to use a background of a picture for another picture on photoshop
how to use layers fro different light exposure in photoshop elements
how to use photoshop cs5 secondlife
how to use one image to punch out another image in photoshop
how to use only two spot colors in photoshop
tutorials on how to use adobe photoshop elements 14
how to use the burn tool in photoshop cc
how to use photoshop to overlay a cloudy sky
how to use gears in photoshop
how to use the color sampler tool in curves vs eye dropper in photoshop
how to use photoshop to make face look thin?
artboard photoshop how not to use
how to use the lightmap channel in photoshop
how ro use a mask to extract a section from image photoshop
how to use smudge brush for realistic shading photoshop
how to use layer via cut in photoshop
how to use a brush to selectively light photo photoshop
how to use mojo in photoshop
how to use photoshop to select all objects
how to use 3d in photoshop cc 2018]
how to use ctrl t on photoshop
how to use topaz labs in photoshop cs4
how to use fill button in photoshop
how to use button maker photoshop
how to use the stamp tool in photoshop 2019
how to use fonts you have added to the fonts folder in photoshop
how do i use layers on photoshop to erase layers individually
how to use glyph tool photoshop
how to use quick mask mode in photoshop cc
how to use blur effect in photoshop
how to use the vanishing point filter photoshop
how to use custom shape in photoshop
how to use sss render from zbrush in photoshop
how to use a piece of a picture to fill in picture in photoshop
how to use a clipping mask in photoshop elements
how to use photoshop custom fonts
how to use render elements in photoshop
how to use the match color in photoshop
how do i get photoshop to use pen pressure
how to use font alternates in photoshop
how to use 3d features in photoshop
how to use red eye removal tool in photoshop
how to use ruler guides in photoshop elements
how to use watercolor mixed artistic photoshop
how to use icc profile in photoshop cs6
wot how to use photoshop to make skins
how to use photoshop to make stickers
how to use 3d in photoshop cracked
how to use watercolor texture photoshop
how to use photoshop to make a comic book
how to use transitions photoshop
how to use typekit on photoshop
how to use actons in photoshop
how to use color replacement tool photoshop cc to replace brush color
how to photoshop what does pewdiepie use
how to use clone tool in photoshop cc
how to use organization in photoshop elements
photoshop how to make text use a pattern as fill
photoshop cs4 how to use the clone stamp tool
how to use the blue brush tool in photoshop
how to use photoshop cs2 to crop image to just content
how to use photoshop color picker replacement tool
how to use tilted pen in photoshop
adobe photoshop cc 2015 how to use
use a photo to figure out how to style a photo using photoshop
photoshop how to use auto align layers layers dont overlap enough
how to use black & white layers in photoshop
how to use the magnetic lasso in photoshop cs3
how to use tuck tool in photoshop effieciently
photoshop how to use perspective warp
how to use brush to make selection in photoshop cs6
how to use different styles on image photoshop
how to use photo for type on photoshop
how to download and use fonts on photoshop
how to use sharpen tool in photoshop cs6
how to use adobe photoshop for mac
how to download and use a new font on photoshop
how to use photoshop brushes in paint shop pro
how to use brushes on photoshop
how to use color replacement tool in photoshop cc 2018
how to use photoshop curves presets
how to use photoshop cc to watermark multiple photos
how to use photoshop express for android
how to use shadow maps in photoshop
how to use the radial gradient tool in photoshop
how to use photoshop to remove green cast
how to use brush font in photoshop
how to use fontea fonts in photoshop
how to use photoshop for drawing and tools and sja\\hading
how to use text styles in photoshop
how to use clipping mask in photoshop cc 2018
how to use a cavity map in photoshop
photoshop how to use secondary color on paintb ucket
how to use adobe photoshop with microsoft surface book
how to use color palettes painting in photoshop
how to use clarity slider in photoshop
how do i use a shape to confine text in photoshop
how to use photoshop history brush tool
how to use clone stam to remove spot in adobi photoshop cs5
how to use adobe photoshop creative suite
how to use actions photoshop cs3
how to use the mixer brush tool in photoshop cs6
how to use luminar in photoshop
how to use curves in photoshop cs5
how to use a photoshop picture as a thumbnail
how to use line tool in photoshop cc
"how to use \"adobe photoshop express\" to clear a blur"
how to use adobe photoshop new layer
how to use photoshop for vfx
how to use photoshop magic wand and then color in area
how to use photoshop fore free
how to use photoshop for rust game
how to fix not enough ram to use brushes in photoshop
how to use color range photoshop
how to use custom shapes photoshop cc
how to use the pencil tool in photoshop to make closed shapes
how to use the spot healing brush tool in photoshop
how to use a signature in photoshop elements
how to use fractalius in photoshop mac
how to use mbl for photoshop cc 2017
how to use history stamp tool in photoshop
how to use level layers at photoshop
how to use transparency in photoshop cs2
how to use the pen on photoshop
how to use ccmaker to get photoshop 2019
how to use photoshop template
how to use whiten teeth in photoshop
how to use photoshop bridge youtube
how to use photoshop elements to remove green cast
how to use photoshop 2016 to blend
how to use diskmaker files in photoshop cc
youtube how to use graident yool photoshop cc 2017
how to use photoshop cc crop
how to use content aware fill photoshop cs4
how to use chinese fonts in photoshop
how to use layer mask in photoshop elements 13
how to use chrome filter in photoshop
how do i use layers on photoshop to erase layers indivigually
how to use close stamp photoshop 9
how do i use photoshop to use a photograph for screenpronting
how to use the line yool om photoshop 2016 cc
how to use the wand in photoshop to select multiple parts
how to use grid photoshop
how to use the fill tool in photoshop cs6
how to use photoshop in use it like pastels
how to fix could not use the move tool in photoshop
how to remove an object in illustrator for use with transperent background in photoshop
how to use photoshop brushes with paint tool sai
how do i qualify to use photoshop elements student retail
how to use the slice tool in photoshop cs6
how to use manip shade in photoshop
how to use cracked key photoshop cs5
how to use gradient tool in photoshop layer
how to use a photoshop gradient
how to use the paragraph symbol in photoshop
how to use photoshop to unblur text
how to use consolas font in photoshop
how to use select mask in photoshop
how to use two monitors for photoshop
how to use eraser tool in photoshop cs6
how to use photoshop cs2 text
how to use photoshop with sure cuts a lot
how to use vsco mobile presets with adobe photoshop
how to use a photoshop action file
how to add and use brushes in photoshop
how to use the perspective crop tool in photoshop cs6
how to use lasso tool in photoshop to remove background cc
how to use tools on photoshop cs6
how to use a photoshop text template
how to use hex code in photoshop
how to use photoshop to restore altered pictures
how to use differnt fonts in photoshop
how to use photoshop to edit ai assets
how to use a psd on photoshop
how to use a grey card in photoshop
"how to use sharpen edges in photoshop cc"
how to use install photoshop actions site:youtube.com
how to use photoshop to send pictures to the computer from your phone
how to use patch tool in new layer photoshop
how to use a repeating pattern on photoshop
how to use your own textures in photoshop cc
how to use the radial symmetry tool photoshop
how to use photoshop for advertising
how to use image as brush in photoshop
how to use shapes in adobe photoshop
how to use the 3d tool in photoshop
how to use crack for adobe photoshop cs5
how to use lens correction in movies photoshop
how to use pattern overlay in photoshop
how to use the surface blur tool in photoshop elements
adobe photoshop express editor how to use
how to use photoshop to draw pool
how to use illustrator template in photoshop
how to use color gradient in photoshop
how to use the property tab in photoshop 2017
how to use paper textures in photoshop
how to use the clone stamp tool in photoshop elements
how to use photoshop to make your photos look great
how to use smart objects in photoshop 17
how to use saturation and vibrance in photoshop correctly
how to use a color replacement tool in photoshop
youtube photoshop how to use color and tone on old photos
how to use stack mode in photoshop cs6
how to use color control photoshop
how to use the sdaptive wide angle filter in photoshop
how to use vector cdr in photoshop cs6
how to use pixel tiles in photoshop
how to use ipad pro pencil with photoshop
how to use free trial for adobe photoshop
how to use the patch tool in adobe photoshop
how to use perspective warp in photoshop cc youtube for text
how to just use mouse in photoshop
how to use japanese text in photoshop
how to use photoshop off a flash drive
how to use photo filter layer layers at photoshop
photoshop how to use installed brush
how to use muse and photoshop for web design
how to use custom shape tool in photoshop cs6
how to use patch tool photoshop cc
how to use photoshop to create an ad
how to use shape in photoshop cs5
how to use the new timeline panel in photoshop cs6
how to use healing brush tool in photoshop 2017
how to use photoshop express for windows 10
how to use cmyk on mask photoshop
how to use an abr file in photoshop
how to use photoshop senior pictures
photoshop 2015 how to use
how to use the slice tool in photoshop cc 2017
photoshop cs6 how to use pen path
photoshop how to use the brush to take of stains
how to use clip studio paint files in photoshop
how to use photoshop to remove clothes
how to use alpha channel to mask effects in photoshop
how to use the liquify tool in photoshop gor things other than faces
how to use version 13.0x64 of photoshop
how to use adobe photoshop 2018
how to use photoshop on android without signing
how to use photoshop cs6 line tool
photoshop how to use clone tools
how to use photoshop to improve ebay photos
how to use photoshop to make cool things
how to use pat file on photoshop
how to use photoshop for games
how to use ipad as graphics tablet for pc photoshop
how to use curve in photoshop for scan record
how to use luxe lens presets photoshop
how to use downloaed brushes in photoshop cc
how to use photoshop to design newsletter hearer
how to use color replacement brush in photoshop
how to download a font and use in adobe photoshop
how to use my brush tool in photoshop to add white highlights on to water
how to use the pen tool in photoshop to cut out a circular object
how to use the pen path tool in photoshop
how to use photoshop to get fuzzy out of photo
how to use vector textures in photoshop
photoshop how to use pattern stamp tool
how to use custom photoshop actions
how to use the burn and dodge tool photoshop
how to use recolor tool in photoshop
how to use filters only to the selection edge in photoshop
how to use photoshop add titles on premiere
how to use photoshop gfx
how to use cmky mode in photoshop
how to use grany patterns in photoshop tumblr
how to use photoshop cc 2017 for icon
how to extract and use refine edge in photoshop cc
how to use the block eraser in photoshop cs3
how to use photoshop cc beginners guide
how to use adobe photoshop 6
how to use a piece from one picture on another in photoshop
how to use 3d text in photoshop cs6
how to use the lasso tool on photoshop
how to use a square brush in photoshop
how to use photomask in a template on photoshop
how to use a background image as a color in photoshop
how to use photoshop to slim face down
how to use color separation chart in photoshop
how to use clone tool photoshop cc
how to use stylish font name in photoshop
how to obtain graphics to use in photoshop
photoshop how to use curvatuve pen tool
how to use photoshop if you are poor
how to use font glyphs in photoshop elements on a macbook pro
how to use nik collection 2018 with photoshop elements 2018
how to use old photoshop on new computer
how to use crop tool in photoshop elements 15
how to use alliptical took on photoshop
how to use pixel patterns in photoshop
how to use photoshop on silhouette design studio
how to use teeth whitening on adobe photoshop 13
how to use style and opasity in photoshop
how to use magic wand tool for sky in photoshop cc
how to use photoshop cc 3d tool
photoshop how to use clone tool
how to use photoshop for photographers
how to use cookie cutter tool in photoshop elements
how to use keyframes in photoshop cs6
photoshop how to use intersect selection
how to use bamboo ink pen in photoshop
how to use pantone with photoshop
basic tutorial learning how to use layers in photoshop cs3
how to use photoshop to get rid of background
how to use bandaid on photoshop
how to use photoshop on outdoor photos
how to use camera raw filter in photoshop cc multiple items
how to use fireworks to photoshop
how to use photoshop cs5 animation
how to use paper texture in photoshop
how to use 3d repousse in photoshop cs5
how to use photoshop cs3 to trace a drawing
how to use photoshop for beauty
how to use vector brush adobe photoshop
how to use hand drawn logo in photoshop
how to use photoshop to put two images side by side
how to use photoshop cc mac
how to use color themes that are in my library in photoshop 2015
how to use two photos to remove an item in photoshop
how to use dds plugin with photoshop portable
how to use gfx packs in photoshop
how to use rectangle marquee tool photoshop 16
how to use blendable in photoshop elements
how to use the gradient tool in photoshop cc 2017
how to use the retouch tool on photoshop
how to use custom font in photoshop
how to use contact sheet photoshop inreal life scenario
how to use photoshop to take out background
how to use dodge and burn tool in photoshop cs6
photoshop how to use opacity brush tool
how to use photoshop to put two photos side by side
instructions on how to use adobe photoshop express
how to use the ancor tool in photoshop
how to use crack photoshop cs5
how to use lsso tool on photoshop
how to use saved actions in photoshop cs5
how to use the pen tool shape layers in photoshop
how to use adobe photoshop cs5 premier
how to use shapemaker in photoshop
how to use majic wand photoshop 7.0
how to set photoshop to use radeon graphics card
how to convert rgb 300 ppi from camera to cmyk cannot use photoshop
how to use photo copied from online in photoshop
how to use fonts in photoshop adboe fonts
how to use a video noise sample to remove noise from an image -neat -photoshop -adobe
teach yourself how to use adobe photoshop cs5
how to use the smudge brush in photoshop effectivly
how to use photoshop to remove pimples
how to use blur tool in photoshop youtube
adobe photoshop elements 10 how to use layers
how to use tone mapping in photoshop
how to use photoshop to put pictures together
how to use color halftone filter in photoshop
how to use vector files in photoshop with good resolution
how to use bokeh overlays in photoshop
how to use multiple pictures photoshop
how to use watercolor action in photoshop cs5
how to use histogram in photoshop elements
how to use photoshop brushes to distress
how to use pen tool in photoshop cut
how to use free transform on a watermark in photoshop cc
i don't know how to use photoshop meme\
is are there a free photoshop type product to learn how to use
how to use timeline in photoshop cs6
how to use magic wand tool in photoshop to remove background
photoshop how to use clone stamp windows 10
how to use paint bucket tool in photoshop elements
how to use photoshop ruler
how to use emboss filter in photoshop
photoshop how to use marta dahlig brocade brush
how to use photoshop layer styles
how to use svg image in photoshop
how to use vector in photoshop drawing
how to use photoshop to make t shirt designs
how to use the eraser tool in photoshop cs6
how to use adobe cs6 photoshop history
how to use graduated filters in photoshop
how to use an action brush tool in photoshop
how to use arabic numbers in photoshop
how to use brushes in photoshop cs2
photoshop atn file how to use
how to use photoshop to reconstructur 2d crosssections into 3d
how difficult is photoshop to use
photoshop how to use custom shapes
how to use hex color values in photoshop
how to use masks in photoshop cc
how+to+use+photoshop+cc+2017
how to use the splatter effect in photoshop
how to use vector tools in photoshop
how to use replace color feature in photoshop
how to use android screen to control photoshop in teamviewer
how to use adobe photoshop 7.0
how to use liquify photoshop sims
how to use magins in photoshop 10
how to use keyboard shortcuts for photoshop actions
how to use layers in photoshop to add new eyelashes to existing eye
how to use magnetic lasso tool in photoshop and get transparent background
how to use photoshop to make a photo look old
how to use a transparent image in photoshop
how to use green chroma for photoshop
how to use photoshop action file
how to use picture tubes in adobe photoshop
how to use blank avery 5160 template for photoshop
how to use photoshop overlays fonts
how to use star brushes in photoshop
how to use boughy action scripts in photoshop
photoshop how to use cut tool
how to use photoshop presets in lightroom
how to use photoshop airbrush tool
how to use camera raw photoshop
how to use photoshop elements 7 to select one item in photo
how to use odanan templates in photoshop
how to use photoshop for fliers
how to use font photoshop
photoshop how to use reduce noise
how to use passport photo template in photoshop cs6
tumblr photoshop cs5 how to use fronts
how to use photoshop to edit videos
how to use photoshop to outline part of an image and copy it
how to take a part of image out of photo and use photoshop
how to use storyboard templates in photoshop
how to use bordered text in photoshop
how to use curves layer photoshop 6.0
how to use photoshop to illustrate
how to use the photoshop cc blur tool
how to use shadow in photoshop without affecting other files
how to use photoshop on pc
how to use templates for brochures in photoshop cc
how to use preset shapes in photoshop
how to use adobe media encoder to import movie and it's audio into photoshop
how to use the brush tool in photoshop video
how to use the trace tool in photoshop
how to use psds in photoshop alternative
how to use adobe photoshop student
how to use photoshop to remove something from photo
how to use dafont on photoshop mac
how to use brush presets in photoshop cc
how to use color luts in photoshop
how to use a color blend in photoshop
photoshop how to use character styles
how to use a mask to lighten a photo in photoshop cc
how to use perspective tool photoshop cs5
how to use photoshop for tshirt design
how to use vectors in photoshop macbook pro
how to use photoshop to make a youtube icon
how to use adobe photoshop cs3 extended for beginners
how to use perspective warp photoshop cc
how to use photoshop for home design
how to use photoshop to lighten pictures partial
how to use photoshop brushes as website elements
photoshop how to use brush to remove backgroud
how to use photoshop paint brush to make evenly spaced dots
how to use stabilizer photoshop
how to use photoshop cc with dual monitors
how to use photoshop cs5 animation timeline
how to use eraser tool photoshop
how to use photoshop timeline for animation
how to use blending mode in photoshop
how to use photoshop essentials clone tool
statistics on how many people know how to use photoshop
how to use a multi color font in photoshop
how to use a woff font photoshop
how to use fibonacci in adobe illustrator or photoshop
how to install a new font to use in photoshop
how to use dafonts on photoshop
how to use painters wheel in photoshop cc
how to use the pinch tool photoshop
how to use created text from photoshop cc in after effects cc
how to use adobe photoshop windows 10
how to use contrast to select in photoshop
how to use the polygon lasso tool in photoshop cc
how to use custom brushes in photoshop cs6
how to use import brushes in photoshop
mac how to use downloaded fonts in photoshop 2018
do you need to know how to use photoshop for html
how to use content aware in photoshop elements 12
how to use photoshop cc 2019 select tool
how to use gradient map in photoshop 2019
how to use pen and vector on photoshop
how to use fill tool photoshop
how to use refine edge in photoshop elements 14
how to use magnetic lasso photoshop cs6
how to best use a huion drawing tablet with photoshop
how to use photoshop in lego stop motion
how to use the mask in photoshop
how to use the lasso tool in photoshop to make transparent background
how to use photoshop youtube guide
how to use sharpen tool on photoshop
how to use icons sets photoshop
watercolor soft painting photoshop action how to use
how to use photoshop to add a limb
how to use logo in photoshop
how to use photoshop to make text look old like it came from an old typewriter 2017
how to use opacity in photoshop fix app
how to use blend mode in photoshop to smear
how to use histograms in adobe photoshop
how to use photoshop to texture
how to use smart filters in photoshop cs6
how to use antialiasing in photoshop
how to use the pet red eye removal tool in photoshop cc
how to use masks to adjust brightness in photoshop cc
how to add flarm to picture use adobe photoshop
how to use fluid mask 3 with photoshop
how to use photoshop to clean up blurry text
how to use photoshop with pdf file
how to use fill to remove someone touching the subject photoshop
how to use 3d material drop tool in photoshop
photoshop solarize how to use
how to use photoshop atn files
how to use gradient tool in photoshop elements
how to use my product code for adobe photoshop elements 7?
how to use image as selection photoshop
photoshop how to use history brush tool
how to use library colors in photoshop
how to use photoshop with premiere por
how to use pantone colors in photoshop cs6
photoshop cc how to use caw raw grad filter
how to use the clone tool in photoshop witha selection
how to use the cymk feature in photoshop
how to use a uvw template in photoshop
how to use photoshop to create art
how to use photoshop for flower arrangements
how to use pc photoshop owith a touchscreen
how to use a vintage filter in photoshop
how to use liquify filter in photoshop cs6
how to use photoshop to create a beautiful background
how to use the pen tool to trace in photoshop
how to use photoshop to interchange two faces
how to use straight line tool in photoshop
how to use drop shadow tool photoshop elements 13
how to use arrow brush in photoshop
how to use a gif as a layer on photoshop
how to use adobe photoshop plugins
how to use photoshop to create handwriting
how to use photoshop to open tif cs2
how to use bracketed images to create an hdr image in photoshop
how to use the beat anyliser in photoshop elements
how to use photoshop online without download
how to use old tablet driver instead of new one on photoshop
how to use paintbucket in photoshop
how to use vector sparkles in photoshop
how to use photoshop on other laptop adober cloud
how to use photo filter layers at photoshop
how to use repair tool in photoshop
how to use photoshop batch command
how to use photoshop shake reduction
how to use a gray card in photoshop
how to use a diamond geometric figure in photoshop
how to use the magnetic lasso tool in photoshop cs5
how to use photoshop express mac
how to use photoshop adaptive wide angle
how to use actions in photoshop that you've downloaded
how to use paper color in photoshop
how to use two photos together in photoshop
how to use the lasso tool in photoshop to create mountains
how to use quotation marks with helvetica in photoshop
how to use paths photoshop
how to use photoshop generator
how to use a shape to create a layer mask photoshop cc
how to use photoshop to improve sfm image
how to use eye drop tool on photoshop
how to use special characters in photoshop
how to use the mask tool in photoshop cs6
how to use a picture as a texture in photoshop
how to use krita as photoshop
how to use photoshop to make warhol pop art
how to use presets in photoshop elements 6
how to use pen for selection in photoshop cs2
how to use the clone tool in photoshop on a mac
how to use inverse in photoshop to clip out background in photoshop
photoshop how to use a layer mask
how to create a filter in photoshop and use in lightroom
how to use the gradient map in photoshop
how to use photoshop as painting program
how to use photoshop cc and lightroom
how to use photo textures in photoshop
how to use photoshop cc to make a funeral program
how to use abr in photoshop elements
how to use photoshop to prepare jpg for high resolution printing
how to use photoshop to draw on your tablet
photoshop how to use pen tool to delte background
how to use downloaded actions in photoshop
how to use photoshop to remodel a house exterior
how to use brush in photoshop elements 13
how to use selective color in photoshop tumblr
how to use a drawing tablet with photoshop
how to use new brusehs in photoshop
how to use photoshop elements 15 crop
how to use plugin in photoshop cc
how to use photoshop to make photo banners
how to use the path tool in photoshop cs6
how to use photoshop eyedropper tool
how to use photoshop rar file
how to use gradient tool when layering sunset images photoshop
how to use photoshop to design a tattoo
how to use 16 bits in photoshop
how to use gamut in photoshop
how to use photoshop to make your cock look bigger
how to use photoshop with out the internet
how to use a color swatch in photoshop
how to use greem screem in photoshop
photoshop how to use rainbow color with brush
how to use a color in an image as a brush in photoshop
how to use mixer brush tool in photoshop cs5
how to use photoshop in graphic design
how to use photoshop to create a website
how to use green screen photoshop elements 10
how to use photoshop comps
how to use stamps in photoshop
how to use the genorator in photoshop
how to use mirror mirrow photoshop
how is it necessary to use clip adjustment mask in photoshop
photoshop how to use selective color
how to use action file in photoshop
how to use photoshop for editing photos
how to use interpolation in photoshop cc
how to use color replacement tool brush in photoshop
how to use basic photoshop to make tshirt design
how to use lab color in photoshop blend mode
how to use photoshop cs4 tutorials
how to use opacity in photoshop on solid edge
how to use the magic wand tool in photoshop version 7
how to use an action in photoshop cs4
how to use polygonal lasso tool photoshop cc
how to use photoshop burn tool
how to use photoshop on macbook air
how to use countdown photoshop template
how to use transparent imaes in illustrator and photoshop
how to professionally use photoshop
how to use onion skin on on only 1 group photoshop
how to use corel photoshop to edit image
how to use in photoshop
how to use tire pressure pen in photoshop
how to use marquee tool and cut out in photoshop
photoshop how to use pattern
how to use bucket tool in photoshop cc 2015
photoshop how to use mask as selection
how to use photoshop express on windows 10
how to use uv maps in photoshop
how to use sharpen actions in photoshop cc
how to use key frames in photoshop
how to use otf fonts in photoshop
tutorial on how to use photoshop cc
how to use a photoshop file on gimp
how to use a scanned sketch for lineart in photoshop star fox
how to use the shape tool in photoshop cc
how to use photoshop to turn images into cartooms
how to get photoshop cs6 to use surface pen
how to use gimp to photoshop pictures
how to use background eraser tool in photoshop cs3
how to use photoshop on android to fix blemished
how to use a layer to cut another layer in photoshop
how to use spot colors pantone photoshop
how to use fonts from premier pro in photoshop
how to use action files in photoshop
how to use select buttons in photoshop
photoshop cs5 how to use pen tool
how to use photoshop to remove background on iphone
how to use photoshop to make pixel art
how to use color photos to blain photoshop elements
how to use photoshop multiple brush sets
photoshop how to use a pat
how to use the clone stamp tool in photoshop cc 2019
how to use photoshop and lightroom
how to use the crystalize tool in photoshop
how to use cout out tool and turn it photoshop
adobe photoshop how to use color swatch palette
adobe cs6 photoshop tools how to use pdf color
how to use huion wh1409 with photoshop
how to use gradient in photoshop cs6
how many photos to use photomerge photoshop
photoshop 2017 how to use clone tool
how to use deblur in photoshop
photoshop cc how to use pn tool
how to use photoshop patch tool to remove glare from eyeglasses
how to use downloaded fonts in photoshop cs2
how to use photoshop elements15
how to use photoshop to swap colors
how to use paint brush on a picture in photoshop
how to use utorrent to get photoshop
how to use amtemu photoshop 2017
cs5 photoshop how to use new fonts
how to use ambient occlusion map in photoshop
how to use overlays in photoshop cs5
how to use diagonal ruler photoshop
how to use photoshop cc 2018 to design
how to use adobe photoshop cc 2017 after free trial
how tdo i use #006a36 to make color photoshop
how to use psd photoshop
how to use keyframe in photoshop cc
how to use photoshop for collage
how to use lasso took to change color in photoshop
how to use photoshop to create a pinterest quote
how to use a mask in photoshop cs6 to keep part of an image
how to use photoshop to make art
photoshop how to use paint bucket drawing
how to use photoshop layer styles in illustrator
how to use digimark in photoshop elements
how to use the scissor tool in photoshop
how to use fonts from font book in photoshop
how to use airbrush photoshop 2018
how to use adobe photoshop 3.0 - lesson files - classroom in a book
how to use an artist pad photoshop
how to use color halftone channels in photoshop
adobe photoshop elements 14 how to use
how to use special characters text in photoshop
how to use preview like photoshop
how to use vertical text in photoshop
how to use new downloaded brushes in photoshop
how to use adobe photoshop to merge two pictures
how do i find photos to use legally for photoshop
how to use raw photos in photoshop
how to use raw images in photoshop
how to use adobe photoshop online
how to use photoshop elements to reduce the resolution of a photo
how to use vector illustration in photoshop
how to use photoshop for a bridge shot
how to save a gif and use it in photoshop
how to use photoshop erasing text
how to use topaz clean in photoshop
how to use photoshop cs5.1
how to use the photoshop magic wand
how to use a production jig in photoshop
how to use the quick selection tool to hide shadows in photoshop elements 14
how to use crop tool photoshop cc 2015
how to use preview to photoshop
how to use paintbrush tool in photoshop
how to use bokeh brush in photoshop
how to use gradient tool in photoshop for vignette
how to use photoshop to make vector logo
how to use gradients to paint in photoshop
how to use a java script in photoshop
how to use photoshop cc 2017 to put pictures in a collage for dummies
how to use photoshop color balance on a single layor
how to use noise ninja in photoshop
photoshop how to use magic wand to only select text
how to use abstract brushes in photoshop
how to use refined edge photoshop
how to use photoshop to make lines in a png thicker
how to use photoshop acr
how to use canoscan 9000f and photoshop cc
how to use concept mix in photoshop
how to use photoshop to color manga
how to use photoshop curves to process milky way
how to use wacom pressure sensitivity photoshop
how to use the ruler tool in photoshop to straighten
how to use a wacom intuos pro in photoshop
how to use the replace color tool in photoshop cs6
how to use photoshop on secondlife pictures
photoshop how to use silver color
how to use graphics photoshop elements
how to use photoshop for digital illustration
how to use chroma key in photoshop express editor
how to use color replacement tool in photoshop elements
how to use main image as a background in photoshop
how to use photoshop fonts
how to use on1 resize 2018 in photoshop
how to use lasso tool in photoshop mac
how to use a photoshop action for a folder
how to use an email template in photoshop
how to use adobe photoshop for vector
how to use photoshop brushes with affinity designer
how to use photoshop to cover the edge
how to use words to make a shape photoshop
how to use photoshop pro
how to use quick selection tool then move object to own layer smart object photoshop
custom brushes photoshop how to use
photoshop how to use tablet pressure
photoshop how to use images
how to use photoshop like pewdiepie
how to use photoshop to see how something will look before i paint it
how to use gaussian blur photoshop
how to use brushes on lettering in photoshop
how to use pen tool to bold outline on photoshop
how to use magic selection tool photoshop css 2018
photoshop windows how to use
photoshop cs5 how to use plugins
how to use epson 1990 with photoshop 2017
photoshop how to use make pressured lines
how to use photoshop cs color splash 2003
adobe photoshop lightroom 6 how to use
how to properly use the spot healing brush tool in photoshop
how to use the refine edge tool on a selection in photoshop 2018 cc
how to use perspective wrap tool in photoshop
how to use straighten tool adobe photoshop cc
how to use more than one image photoshop
how to use mypaint for photoshop
how to use eraser on a pen in photoshop
how to use bamboo ink with photoshop
how to use photoshop uf
photoshop how to use color paillette in library
how to use multiple channels to create a masks in photoshop
how to use photoshop for landscape design
how to use photoshop you tube
how to use photoshop on lenovo 710 display issue
how to use 3d photoshop cs6
adobe photoshop how to use clone stamp
how to use fog in photoshop cs6
how do i use photoshop to grow missing pieces in an image
photoshop how to use layer mask to control adjustments
how to use overlays in photoshop 2018
how to use majic wand photoshop
how to use photoshop to make dino paint schemes for ark
how to use photoshop for idiots
how to use icc profile photoshop printer
how to use analog efex pro 2 with photoshop cc
how to use sharpen in photoshop
how to use photoshop to enhance beauty
how to use layer mask in photoshop cs5
how to use lasso tool in photoshop elements 9
how to use the eraser on photoshop
how to use ruler tool photoshop
how to use silk embroidery effect photoshop action
how to use the magic eraser in photoshop to remove the background
how to use graphic burger templates in photoshop
how to use adobe photoshop on lego
how to use photoshop to measure surface area
how to use adobe photoshop 2018 to edit text
how to use vector lines to draw in photoshop
how to use curved pen tool in photoshop
how to sync onedrive folder to use files in adobe photoshop bridge
how to use edit photos in photoshop through light room
how to use granit photoshop
how to use an action in photoshop on a gif
how to use a photoshop file on premiere pro that has transparent effects
how to use photoshop photo with instagram
how to use touchscreen in photoshop 2018
how to use photoshop to lighten photos
how to use pun in photoshop
how to use clone stamp in photoshop cs4
how to use photoshop with star g640
photoshop how to use history brush
how to use brush tools photoshop creative.uscloud
how to use paint.net to edit photoshop
how to use cut and paste photoshop
how to use a pen with photoshop
how to use styles on text in photoshop
how to use 4k monitor with photoshop
photoshop how to use brush blend in
how to use the pen tool for inking in photoshop
how to use refine edge in photoshop cs2
how to use my ipad like a mouse for photoshop
how to use presets in photoshop for phtoos
how to use bridge without photoshop
how to use overlays in photoshop elements
how to use pen in photoshop cc
how to use the point tool in photoshop
how to use photoshop on a macbook pro
how to use liquify tool in photoshop on multiple faces
how to use photoshop to avoid copyright infringement
how to use adobe photoshop clone
how to use inverse in photoshop
how to use a template in photoshop 15
how to use ts in photoshop
photoshop how to use selection tool in photoshop 2016
how to use a 8 bit photo in photoshop
how to use older version of photoshop
how to use a photoshop pattern
how to use photoshop as a bitmap editor in coreldraw
how to use a different background in photoshop
how to use photoshop to put pictures in a collage for dummies
how to use the pen tool in photoshop to draw a line
how to use photoshop to change the colors of images
how to use multiply layers in photoshop painting
how to use black and white layer like an alpha in photoshop
how to use photoshop to add photos to illustrator
how to use magnetic lasso in photoshop elements 10
how to use photoshop to make colors more vivid
how to use a dollar bill in photoshop 2018
how to use the liguify tool in photoshop elements 14
how to use gpu in photoshop
benefits of knowing how to use photoshop
how to turn off windows.ink use for photoshop in surface pro
how to use vector mask in photoshop cc
how to use saved color tables photoshop
how to use the pen tool in photoshop cs5
how to use photoshop youtube.com
how to use photoshop to make photo banners for volleyball players
how to use photoshop to trim arms look thinner
photoshop cc how to use a vector for background
how to use topaz in photoshop cc
how to use patterns files in photoshop
how to use adobe photoshop premiere
how to use live trace in photoshop cs6
how to use photoshop mask tool cs6 for beginners
how to use curves on all layers photoshop
how to use adobe photoshop to tell if its a lensflare in image
photoshop cs5 how to use the pen tool
how to use the magic eraser tool in photoshop cs4
how to use photoshop to fix glazing
how to use tilt shift on photoshop
how how to use swatches in photoshop
how to use layer masks in photoshop tutorial
how to use pattern photoshop
how to use magic lasso photoshop
how to use a ui designed in photoshop
how to use photoshop to make classroom posters
how to use interlocking letters in photoshop
how to use the gradient tool in photoshop elements
how to use photoshop and illustrator together
how to use stock photos in photoshop
how to use the expand tool in photoshop?
how to use pencil tool in photoshop cs6
how to use photoshop 6 for photography
how to use the lasso tool to clear the background of an image in photoshop
how to use color balance to change color in photoshop
how to use grayscale card in photoshop
how to use field blur in photoshop cc
how to use oil paint in photoshop cc
how to use hue saturation and gradient map photoshop
how to use gradient tool in photoshop elements 14
how to use photoshop cc terry white
how to best use photoshop elements
how to use internet based photoshop
how to use "q" in photoshop 2018
photoshop how to use a background as an outline
how to use the peen tool to make swoops in photoshop
how to use colored pencil filter in photoshop
how to use photoshop as a filter in unity
girls learn how to use photoshop
how to use vsco on photoshop
how to use photoshop brushes in krita
how to use quick selection tool photoshop elements 13
how to use backgrounds in photoshop elements 10
how to use all layers in photoshop
how to use an image as a photoshop texture
how to create vector brush in photoshop to use in illustrator
how to use photoshop to make art look better
how to use the rectangle shape tool in photoshop
how to save a logo in photoshop and use it as a file
how to use the color sampler tool in photoshop
how to use cutout filter in photoshop
how to use gif actions in photoshop
how to use photoshop for gfx roblox
how to use static lasso tool in photoshop
how to use photoshop actions cs5
how to use label template in photoshop
photoshop cc beginners move tool how to use
how to use hue and saturation on black and white photoshop
photoshop how to use text mask
how to use layer styles stroke in photoshop cs6
how to use focus in photoshop cs6
how to use downloads for photoshop
how to use cover action pro in photoshop
how to use template photoshop
how to use brush tool in photoshop cc with layers
how to use color table in photoshop
how to use warp brush in photoshop
how to use leaf overlays in photoshop
how to use flam filter in photoshop
photoshop how to use erase 1 pixel
how to use corel knockout plug in photoshop
how to use photoshop brushes in clip studio
how to use a different shade in photoshop
how to use the offset tool in photoshop
how to use the paint bucket tool without white outlines photoshop
how to use photoshop to make a picture of paper white again
how to create patterns in photoshop and use in illustrator
how to use ipad pro with windows photoshop
how to use a photoshop crack
how to use color correction photoshop
how to use resolution on photoshop cc
how to use to tool presents in photoshop
how to use font file from computer on adobe creative cloud photoshop
how to use photoshop to stretch background
how to not use interpolation when scaling images photoshop
how to use eye drop tool in photoshop
how to use straighten tool in photoshop elements 13
how to properly use photoshop overlays
how to use otf in photoshop
how to use photoshop on a 2 in 1 laptop
how to use grid layout photoshop
photoshop how to use an image as a brush?
how to use straight line photoshop
photoshop how to use layer mask to make text color of background
how to use ruler and grids in photoshop
photoshop how to use shapes
how to use vector artwork in photoshop elements
how to use photoshop cs6 layer mask
how to use photoshop to make somone look like they evaporate
how to use photoshop to onvert files to cricut
how to use the rotation tool in photoshop
how to use horizontal type mask tool in photoshop cs6
how to use 2 monitors in photoshop
how to use duet display with photoshop
how to use warp photoshop cc
how to use touch screen laptop in photoshop
how to use photoshop to create t shirt design
how to use material patterns photoshop
how to use same path in photoshop for different objects
how to use pen tool in photoshop cc for pic cutting
how to use the eraser tool in photoshop elements?
how to use photoshop to make figures
how to use the cut out tool in photoshop
how to save a gradient in illustrator to use in photoshop
how to use photoshop collage template cc 2017
how to use the pen tool to make shapes in photoshop
how to use digital backgrounds in photoshop cc
photoshop how to use color swatches
how to use photoshop to create watercolor art
how to use polygonal lasso tool on photoshop
how to use photoshop in windows 10 for free
how to use acr with photoshop
how to use squijoo templates in photoshop cs6
how to use photoshop to use pixels instead of the paint brush
how to use shake reduction photoshop cc
how to use photoshop brush texture
how to use photoshop in design websites
how to use photoshop to enhance photo of sunset
how to remove an object in photoshop and use content aware
how to use paint to photoshop
how to use a gradient package in photoshop
can i designan app if i know how to use photoshop
how to use color picker on pattern in photoshop
how to use soft bruch in adobe photoshop
how to use dds plugin in photoshop
how to use the shake reduction in photoshop
how to use mockup photoshop
how to create a monster use google image in photoshop
how to use distort tool in photoshop
how to use pen on photoshop
how to use moveable light in photoshop elements
how to use the remote connection to photoshop
how to use healing brush tool in photoshop cs5
how to use bridge in photoshop cs6
how to use filters in photoshop 7
how to use photoshop to create concept art
pattern photoshop how to use
how to use high pass in photoshop
this is how we use to clipping mask photoshop tutorial tree tumblr
how to use adobe photoshop without paying
how to know whether to use photoshop or illustrator
how to use an existing shape to make a border with quick mask in photoshop
how to save something in illustrator to use in photoshop
how to use photoshop custom brushes
how to use frame vectors in photoshop
how to use rubber stamp photoshop
how to use photoshop and indesign together
how to use ascii image code in photoshop text
how to use google fonts with photoshop
how to use a reference photo in photoshop
how to use phone for laptop in photoshop
how to use brush styles in photoshop cs6
how to use slate on photoshop
how to use photoshop to use a full size banner
how to use portarit pro plug in with photoshop
how to use the gradient tool in photoshop to fade edges
how to use the fill tool in photoshop 2017
how to use surface pro 4 photoshop
photoshop how to use video layers to transform
how to use actions for photoshop
how to use adobe illustrator to photoshop something out
how to use photoshop to cut out an image
how to use custom shapes photoshop
how to use illustrator images in photoshop
how to use vector tools in photoshop cc
how to use the opacity tool in photoshop
how to use text on adobe photoshop elements 11
how to use a dark frame to remove burnt pixels photoshop
how to use selection tool in photoshop cs6
how to use the pen tool in photoshop 2018
how to use anti aliasing in photoshop eraser
how to use a photoshop whcc template
how to use filters photoshop elements
how to use a photoshop file outline in illustrator
how to use photoshop cc to create book jacket
how to use light brushes in photoshop
how to use smudge on photoshop cc 2017
how to use texture brushes photoshop
how to turn off windowsink use for photoshop in surface pro
how to use adobe photoshop elements 11
how to use new brush tool in photoshop
how to use photoshop psd
how to use an image as a mask photoshop
how to use photoshop sketchup
how to use smart select in photoshop hotkeys
how to use the lightning brush on products in photoshop
how to use eps files in photoshop cs6
how to use overlays photoshop elements
how to use a shape to cut out in photoshop
how to use the pen tool in photoshop turn it into select shortcut
how to use quick selection tool to move photoshop
how to use rgb in october 2017 photoshop
how to cut out image in photoshop and use in illustrator
how to use photoshop to stack iphone photos
how to use different template with same design in photoshop
how to use a scanner on photoshop
how to use wand on photoshop cut
how to use scanner with photoshop
how to use part of a layer mask in photoshop
how to use photoshop for content management
how to use an image as an overlay in photoshop cs3
how to use line stabilization in photoshop
how to use photoshop to fill colors
i have a spot i want to smooth on photo use photoshop how
how do i use cs6 photoshop to save photos for online posting to facebook
just because you know how to use photoshop
how to use adobe photoshop to retouch photography
how to use adjustment masks in photoshop
how to use photoshop to design a web page
how to use pureref with photoshop
how to use keys to change tools in photoshop
how to use your background color photoshop
how to use photoshop in rust
how to use typography on photoshop cs5
how to use curves on photoshop
how to use text in photoshop elements 12
how to use pat file on photoshop cc for windows
how to use photoshop to enhance drawings
how to use the pen then import what you done photoshop ae
photoshop elements how to use
how to use perfect photo suite 7 within photoshop onone
how to use photoshop to sharpen to compensate for low resolution
how to use grutbrushe tecture in photoshop
how to use hair brush for photoshop
how to use stroke path in photoshop cc
how to use photoshop render drawing
how to use the mixer brush in photoshop
how to use stylus to draw on surface in photoshop
learn how to use adobe photoshop elements 9
how to use color selection photoshop
how to use the color replacement tool photoshop elements
how to use akvis with photoshop
how to use photoshop color burn
how to use fonts in photoshop cs5
how to use xmp file photoshop
how to use levels photoshop
how to use topaz clean without photoshop
photoshop lightroom 6 how to use
how to use the bucket tool in photoshop
how to use perspective crop tool in photoshop cc
how to use xmp file in photoshop
how to use photoshop brushes cc 2017
how to use vector masks in photoshop cs5
how to use vectors as brushes in photoshop
how to use feather on photoshop
how to use style and opacity in photoshop video timeline
how to use layers in photoshop elements 11
how to use freeze mask tool in photoshop
how to use an adjustment to only one layer in photoshop
how to use different fonts on the same line in photoshop
how can i use photoshop to design a website for muse
how to use anchor photoshop to crop
how to use opentype in photoshop
how to use unsharp mask filter in photoshop
how to use drag a layer from one file to another in photoshop
how to use a button template photoshop
how to use fill pattern in photoshop
how to use adobe photoshop elements 13 to set and replace photo section
how to use blend sliders in photoshop
how to use gradient editor photoshop
how to use asian type in photoshop
how to use a mask on a video in photoshop
how to use slice tool on photoshop
how to use brush tool and layer masks in photoshop
how to make photoshop use your gpu
how to use photoshop to reduce noise
how to use stylus and photoshop
how to use photoshop for
how to use dark frame subtraction in photoshop
how to use photoshop to make an image out of an eps file
how to use blur tool in photoshop elements 13
how to use cloud render photoshop
how to use sharpen tool in photoshop cc
how to use xmp files in photoshop?
how to use to change the background of a pic on adobe photoshop cc 2018
how to use quick selecion in photoshop
how to use symbol brushes in photoshop
how to use clone tool in photoshop fix
how to use burn and lighten as a separate layer photoshop
how to use photoshop elements 15 to make a flyer
how to use the pentagon lasso on more than one object at a time photoshop
how to use photoshop fix a iphone
blur tool photoshop how to use
how to use color mixer in photoshop
how to use font explorer inside of photoshop
how to use photoshop on photos
how to use pen tool on photoshop
how to use my wacom intuos pro with photoshop
how to use photoshop with obs
how to use aspect ratio in photoshop
how to use a wacom tablet photoshop
how to use fonts and shapes in photoshop cs6
how to use the organizer in photoshop
how to use the fervent effect in photoshop
how to use adobe photoshop 7 steps
how to use photoshop to make prints of drawings
how to use photoshop for fun
how to use photoshop to make a band logo
how to use an asset in photoshop cc
how to use history tool in photoshop
how to use the custom filter in photoshop elements
how to use the pen tool and paths in adobe photoshop
photoshop how to use 3d material drop
how to use add to a selection in photoshop cc
how to use canon 210 lide scanner in photoshop
how to use photoshop brushes in corel draw
how to use photoshop cc 2018 without pdapp or creative cloud
how to use a photo mask in photoshop
how to use a sky overlay in photoshop
how to use liquify of filter in photoshop
how to use white brush stroke photoshop 18
how to use adobe photoshop free trual
how to use photoshop cc to sharpen an image
how to use photoshop magic background earaser
how to use the spot healing tool in photoshop wont work
plug in photoshop how to use
how to use photoshop to make stickers for credit cards
how to use photoshop to x ray through clothing porn
how to use bucket fill tool for a shape in photoshop
how to use photoshop as a drawing progran
how to use a stylus with photoshop
how to use brush select tool in photoshop
how to use photoshop creack
how to use stroke path in photoshop
how to screen shot a pic to use as a color on photoshop
how to use pattern files in photoshop
how to use nudge in photoshop
how to use the photoshop mixer brush
photoshop how to use effects
how to use glitches in photoshop
how to use the smart remover in photoshop
how to use ms paint like photoshop
in photoshop how to use a lower opacity without it building up
how to use masking on photoshop
how to use photoshop layers without photoshop
how to use placeholder text in photoshop
how to use photoshop to make a drawing a vecor
how to use photoshop cs3 to age progression
how to use mirror mirror photoshop
how to use blending options to remove green screen in photoshop
how to make adobe photoshop use graphics card
after effects how to use layer as mask in photoshop
how to use info panel in photoshop
how to use eraser tool in photoshop cc2018
how to use spin blur photoshop
how to use text on custom path tool in photoshop elements
how to use the patch tool in photoshop cs3
how to use craft plugin photoshop cc
how to use adove photoshop cc pc
how to use create clipping mask in photoshop
how to use lasso tool in adobe photoshop
how to use brushes to remove parts of image in photoshop cs5
how to use adobe photoshop in 2048 x 1152
how to use subtle patterns in photoshop
how to use organizer in photoshop elements
how to use eraser tool on photoshop
how to use rotate tool in photoshop
how to use photoshop to change something
how to use a drop cap in photoshop elements
how to use guide preset in photoshop
how to use spot healing brush in photoshop elements 15
how to use macro keys on photoshop
how to use colors in photoshop for printing
how to use action on photoshop cs6
how to use adjustments in photoshop
how to use a mask in photoshop cs5
how to use smooth pen in photoshop
how to use justify in photoshop
how to use anchor point pen photoshop
how to use paintbrush in adobe photoshop
how to use content-aware in photoshop
how to use erase tool in photoshop
how to use adobe photoshop to edit landscape pictures
how to import photos and use multiple layers in photoshop
how to use photoshop with bamboo pen
how to use a color from the internet photoshop
how to use corner gradient in photoshop
how to use photoshop for tokens
how to use psd template in photoshop
how to use custome shape photoshop
how to use photoshop from lightroom
how to use expand in photoshop
how to use the checkered layer in photoshop
how to use the move tool in adobe photoshop
how to use kuler themes in photoshop
how to install and use actions in photoshop
how to use rainbow gradient map photoshop
how to use photoshop skins on blender
how to use photo brushes in photoshop
how to use grid on photoshop
how to use channels adobe photoshop
how do you use photoshop to even out skin tone
how do i use a vector shape to cut part of another vector shape in photoshop
adobe photoshop how to use the select and mask tool
how to use microsoft paint like photoshop
how to use photoshop in linux
how to use illustrator file in photoshop
how to use adobe photoshop patch tool
how to use photoshop tools for imvu
how to use motion blur in photoshop and leave the eyes face unblurred
how to use a clipping mask in photoshop 2018 cc?
how to use eraser photoshop
how to use the nik collection with out photoshop
how to use clipping masks in photoshop elements
how to get ready to use photoshop for a job
how to use photoshop to make avatars look more real
how to use adobe illustrator vectors in photoshop
how to use 3d tool in photoshop cc 2017
how to use the gradient tool in photoshop 2019
can't use the overlay function photoshop how to fix?
how to use everything pure photoshop actions
how to use the magnetic lasso tool in photoshop elements
step by step how to use photoshop
how to use gradient in photoshop fade one image into another
how to use unsharp mask adobe photoshop cc 2017
how to use smart objects in photoshop to add to a mock up design
how to use a clone tool in photoshop
photoshop how to use the path tool
how to use actions into photoshop cc
how to use a text box in photoshop
how to use 32bit photoshop with catalina
how to use filters in photoshop to make a coloring book
how to use adobe photoshop 7.0 step by step pdf
how to use photoshop lightbox
how to use detail smart tool brush photoshop elements 10
how to use photoshop patterns with color
how do you use high pass in photoshop to sharpen images
how to use chalkboard mock up photoshop art & illustration
how to use templates in photoshop cs6
how to use magic wand tool photoshop cc
how to use the move tool in photoshop cs6
how to use eraser tool in photoshop on a layer
how to use spray paint tool in photoshop
how to use new fonts in photoshop
how to use default actions in photoshop
how to use a photoshop mockup
how to use negative on photoshop
how to use healing brush photoshop 2018
how to use dispersion action in photoshop
photoshop how to make the clone tool use the same spot
how to use photoshop brushes in indesign
how to use spray paint in photoshop
photoshop how to use magic tool in certain area
how to use animation slide on photoshop
how to use texture on photoshop
how to use photoshop video editor
how to use photoshop files in video not pixelated
how to use adobe photoshop elements 14 to edit video
not have to know how to use photoshop to take t
how to use adobe color themes in photoshop cs6
how to use the heal tool in photoshop
how to i modify an image to use a specific color palette without photoshop
how to make use of pen tool in photoshop with pictures
how to use a font in photoshop after you downloaded it
how to use kyle's watercolor brushes photoshop
how to use gpu for photoshop
photoshop how to use contrast
how to use gaussian blur photoshop cc 2019
how to use layers in photoshop sketch
how to use vector masks in photoshop cs6
how to use a background for font background photoshop
how to use font alternates in photoshop cs5
how to use stamp tool to build up thing in photoshop
how to use surrounding color to fill in spot photoshop
how to use color correction tools in photoshop
how to use photoshop 7 to draw
photoshop how to use stoke
how to use pictures as textures in photoshop
how to save vector image in inkscape for use in photoshop
how to use font from internet in photoshop
how to use template photoshop tumblr
how to use brush tool in photoshop easier
how to use photoshop brushes in flash pro
how to use photoshop overdue
how to use photoshop to make photos awesome when lighting isn't optimal
photoshop how to use painted mask
how do i use photoshop elements 15 to make change wedding dresses
how to use background color in photoshop
how to use photoshop on cs6
how to use luminosity in photoshop elements
how to use adobe photoshop showcase
how to use outline of sports logo in photoshop
how to use dodge and burn photoshop cc
how to use a normal paint brush in photoshop cs6
how to use a pen on photoshop
how to use an image as a brush in photoshop
how to use a mask to change color of youtube logo photoshop
how to use photoshop to import pictures from camera to a specific folder
how to use guidelines in photoshop
how to use photoshop to slim face
how to use photoshop to change hair color
how to use photoshop brush in autodesk sketcbook
how to use photoshop to make you tanner
how to use reference in photoshop
how to use transparent color in photoshop
how to use display capture with photoshop obs
how to use nail template by erin in photoshop
how to use lasso tool in photoshop to paint
how to use otf in photoshop elements
how to use import bevel in photoshop text
how to use gradient in a square photoshop
photoshop cs6 how to use stroke
how to use small caps in photoshop
how to use photoshop to intimates studio shoots
how to use threshold in photoshop to make new layers
how to use the spot healing tool in photoshop cc
how to use the pattern stamp tool in photoshop
how to use photoshop creative cloud offline
photoshop how to use content aware move
how use the pen tool in photoshop to put words
how to use bokeh filter in photoshop
how to use perspective crop in photoshop
how to use photoshop motion
how to use photoshop 2k16
how to use the hue saturation in photoshop
how to use photoshop like for painting stylus
how to use abr inr in photoshop welements 12
how to use eyedropper tool in photoshop for external colors
how to use photoshop like placeit.net
how to use the magic wand eraser tool in photoshop
how to use a printer profile in photoshop
photoshop how to use channels to delete background
how to use photoshop mask to mask a video in premiere
how to use patterns photoshop cc
how to use photoshop 2003 color splash
how to use photoshop to make meme
photoshop mac how to use
how to use pattern brush in photoshop
how to use jpegs on photoshop
how to use the line tool in an inverse object photoshop
how to use pattern stamp tool in photoshop 7.0
how to use photoshop to slim down
how to make a custom photoshop elements brush that scatters on every use
how to use adobe stock templates in photoshop
photoshop slices how to use
how to successfully use the fill tool in photoshop
how to use adobe photoshop cc 2015 without serial number
how to use index pictures in photoshop
how to use the polygonal lass tool in photoshop elements to remove text
how to use icc profile without photoshop
how to use pen with points on photoshop cas6
how to use warp in photoshop timeline
how to use photoshop to make us visa picture
how to use cmyk colors in photoshop
how to use dds plugin photoshop to soften cc
how to use a picture as a font color in photoshop
how to use shape in photoshop cs5 tumblr
how to use 3rd party filters with photoshop cc
how to use dimension model in photoshop
how to use adobe photoshop to make thumbnails
how to use outline with different background, photoshop
how to use the magic wand tool on photoshop cs6
how to use photoshop 2016
how to use photoshop for instagram
how to use the 2 noise reduction options in photoshop express
how to use photoshop to put two photos side by side size of 4x6
how to use photoshop bridge
how to use a normal paintbrush in photoshop cs6
how to use the material drop tool photoshop cc
photoshop how to use brushes
how to use my monoprice drawing tablet with photoshop
how to use eraser in photoshop pro?
how to use nik in photoshop for glamour portrait
how to use craft manager with photoshop
how to use obj file in photoshop
how to use motion blur in photoshop for horror effects
how to use line crop in photoshop
how to use slices to divide in photoshop
how to use the photonegative in photoshop
how to use adobe photoshop express windows 10
how to use photoshop elements to make particle disintegration
how to use photoshop for acrylic paintings
photoshop cs6 how to use layer style
how to use photoshop cs6 with two people
how to use air brush for backround photoshop
how to use pen tool on on photoshop
how to use onion skin in adobe photoshop cs6
how to use zdepth from 3d max to photoshop
how to use pen tool in photoshop to remove background
how to use events photoshop
how to use figma in photoshop
how to use brushes in photoshop elements 14
how to use pentool photoshop
how to use text files in photoshop
how to use photoshop on a laptop
how to use the background eraser tool in photoshop cs5
photoshop cs2 how to use the pen tool creat path
how to use a point in the image for color reference for the brush in photoshop
how to use photoshop spot healing tool
how to use fonts in photoshop cs4
how to use hue saturation to change colors in photoshop
how to use the clone stamp tool in photoshop to lighten or darken
how to use an opacity brush in photoshop
how to use photoshop express iphone
how to use the path tool to create a shape photoshop
how to use photoshop past the trial
how to use the cloning tool in photoshop cs6
how to use photoshop in macbook pro
how to use finder in photoshop
how to use kpt filters in photoshop cc
how to make properly use blending options in photoshop stroke, dropshadow, etc.
how to use photoshop color range
how to use adobe photoshop cc to resize a picture
how to use polygonal lasso tool photoshop
how to use gradient background in photoshop
how to use photoshop watercolor action
how to use adobe photoshop mobile
how to use the wacom tableet pen in photoshop to draw
how to use book format in photoshop 2015
how to use after effect magic bullet looks in photoshop
how to use photoshop to piece picture together
how to use photoshop automate for facebook size
how to use curves and levels in photoshop
how to get photoshop to use the fontbook on mac
how to use a 8 bit rgb in photoshop cs6
how to use pucker tool in photoshop
how do you use photoshop to change color of skin on a photo
photoshop how to use a stencil
how to use adaptive wide-angle filter in photoshop cc
cs6 photoshop how to use history brush with contrast mask
how to save presets in light room to use in photoshop
how to use adobe photoshop to draw
how to use photoshop with powerpoint
how to use psd templates in photoshop
how to use addons in photoshop
how to use scanner in adobe photoshop 6
how to use photoshop cc 018
how to use the art templates in photoshop
how to use apply image in photoshop cs6
photoshop overlays how to use
how to use photoshop to remove fold mark
how to use content aware magic wand in photoshop
how to use photoshop plug ins
how to use the outline of a person in photoshop
how to use quick selection tool in photoshop cc2017
how to use photoshop to do ghosts of history effects
how to use the perspective grid in photoshop
photoshop how to use custom presets
how to use photoshop for web page design
how to use opacity photoshop video
how to use gradients in photoshop cs6
how to use smart removal tool photoshop
how to use vector font photoshop
how to use splatter in photoshop
how to bring a photo into photoshop and use it as refernece
how to use the histogram in photoshop
how to use pen tool and paths in photoshop
how to use photoshop for self portrait
photoshop how to use multiple masks on a layer
how to use photoshop to take hair out of your face
design how to use the pen tool and paths in adobe photoshop
how to use the expand tool on text in photoshop
how to use photoshop plugins in gimp portable
how can i use photoshop to make quotations on flat surfaces?
how to use photoshop for green screen video
how to use adobe photoshop on outside family portraits
photoshop cs 6 how to use smart objects and what are they
how to use pen tool to cut out images in photoshop
how to use the spot healing brush on photoshop
adobe photoshop cs 2 how to use the stroke option
how to use layers in adobe photoshop elements 11
how to use photoshop cs4 to edit jpeg in image
how to use text on photoshop
how to use u torrent to get photoshop
how to use adobe photoshop 7.0 to create a 9 grid page
how to use effects in photoshop
how to use specular map photoshop
how to use color balance layer in photoshop
how to use extrude filter in photoshop
how to use new photoshop 2018 tools
how to use photoshop as frisket film
this is how we use to clipping mask photoshop tutorial
how to use magical selection tool in photoshop
how to use slice tool photoshop cs5
how to use paint tool photoshop with drawing tablet
how to use a photoshop script
photoshop how to use stroke shape
how to use custom font without photoshop
how to use a shape in a photoshop action
how to use gradient layer in photoshop
how to use photoshop blur
how to accurately use the healing brush on skin photoshop
how to use photoshop on a tablet
how to use photoshop to retouch
how to use my samsung tab threee with photoshop
how to use burn tool on a separate layer photoshop
how to use photoshop brushes in gimp 2.10
how to use green screen adobe photoshop
how do i use photoshop to blur out backrounds
photoshop how to use hi pass filter
how to use take away transparent background in photoshop
photoshop how to use smart radius
how to use photoshop to make website
how to use halftone brushes in photoshop
photoshop cc how to use timeline to make gifs
how to use style presets in photoshop cs6
how to use the healing bruch in photoshop
how to use arabic numbers in photoshop and left to right
how to write scripts for use in photoshop
how to use lower case letters in photoshop
how to use a low resolution in photoshop
how to use adobe photoshop for photo editing
photoshop how to use auto align collage layers layers dont overlap enough
how to use adobe photoshop to create logo
how to use snapchat magic wand on photoshop
how to use a batch to jpeg in photoshop
how to use adobe photoshop elements 3.0
how to use font in photoshop in windows 10
how to use a setup tablet on photoshop
how to find fonts and brushes for free for photoshop for commercial use
how to use photoshop file on cad photoshop version 12
how to use a mask to crop in photoshop
how to use place text along path photoshop
how to use photoshop to content aware a pdf
how to use vector in illustrator to copy them in photoshop
how to use photoshop with gifs
how to use daz photoshop bridge
how to use the eraser tool photoshop
how to use cloud filter in photoshop cs4
how to use inches instead of pixels photoshop
how to save a photoshop file to use in powerpoint
how to use photoshop to morph photos together
how to use the peb tool photoshop
photoshop how to use stamp tool
how to use photoshop for mac
how to use a black and white image as a layer mask in photoshop
how to use mini bridge in photoshop 2017
how to use microsoft paint to photoshop
how to use a pdf template in photoshop
how to use dodge tool photoshop
photoshop how to use the spot healing brush
how to use liquify in photoshop cs2
how to use brush tool on photoshop
how to install and use camera raw on photoshop cs6
how to use action plugins for photoshop
how to use a photoshop key
how to use rendering color paths in photoshop
how to use photoshop elements editor
how to use my photoshop subscription on a different computer
how to use smart filters photoshop
how do i use d3dgear to record photoshop
how to use tweens in photoshop cc
how to use the same color from an image in photoshop
how to use engrave action photoshop
how to use a overlay mask in photoshop
in photoshop how to use pen tool
how to use photoshop combine 3 image 2016
how to use adobe cs24 photoshop
how to use artistic filters in photoshop cs6
how to use photoshop to make videos
how to use clone stamper in photoshop
how to use stamp tool to fill in gaps photoshop
photoshop how to use layer mask to combine 2 images
how to use lazy nezumi in photoshop
how to use different line thickness photoshop
photoshop how to use a calc as mask
how to email use photoshop tools
how to use fx style in photoshop
how to use pen tool adobe photoshop
adobe photoshop elements 5.0 how to use ruler
how to use a tablet in photoshop cs5
how to use texture overlays in photoshop
how to use photoshop option snapchat
how to use pop color on photoshop
how to use median in photoshop to get rid of people
how to use a photoshop doc in powerpoint
how to download and use photoshop cc 2018 without signing up
how to use old photoshop program
how to make an image use less ink photoshop
how to use selection and paint in photoshop
how to use perspective something in photoshop
how to use the shade tool on photoshop
how to use content aware in photoshop cs4 beginner
how to use camera raw in photoshop cc 2018
photoshop - how to use the patch and healing tool
how to use paint 3d to photoshop
how to use psd brushes photoshop
how do you sync typekit fonts to use in photoshop
how to tell photoshop not to use so much ram
how to use healing brush tool in photoshop 2015
how to use bucket in photoshop
how to use filter photoshop
how to use the bucket tool in photoshop cs6
how to use color correction in photoshop cs5
how to use tree filter in photoshop
how to use illustrator with photoshop
how to use photoshop to make imgmaps in gaia
layer groups photoshop elements 10, how to use
how to use photoshop to remove a person
how to use photoshop tools for drawing
how to use an ssd for photoshop
photoshop how to use background clone
how to use adobe photoshop video
how to use photoshop to put two photos side by side using preview
how to use photoshop elements to reduce the size of a photo
how to use fingertip to paint on photoshop
how to use photoshop to transform photos
how to use funny edits in photoshop
how to use photoshop tell if a photo is edited photoshop
how to use a grid in photoshop for website design
how to use masks in photoshop cc to create circlular photo
how to use define pattern in photoshop
how to use magnetic selection in photoshop
how to use different camera lenses in photoshop
how to use the library in photoshop cc
how to use color threshold image in photoshop
how to use icc profiles when editing in photoshop
how to use a pattern in photoshop cc
how to use photoshop for free students
photoshop replace color how to use steps
how to use custom fonts in photoshop cs5
how to use brushes in photoshop to look realistic
how to use adobe photoshop cc 2015 layers
how to use photoshop in iphone 6
how to use photoshop pen tool with wacom tablet
how to use a custom font on photoshop
how to use unsharp mask in photoshop cc
how to use the bloat tool in photoshop
how to use dafont fonts in photoshop
how to use histograms in photoshop
how to use photomerge in photoshop cc
how to use the history brush in photoshop
how to use your touchpad with photoshop no mouse
how to use the photoshop version of adobe camera raw in photoshop elements
how to use perspective warp smart object photoshop
photoshop how to use spacing lketters
how to use the size tool in photoshop
how to use clone stamp tool in photoshop cs6 is not working
how to use picture tubes in adobe photoshop cs6
how to use fontbase in photoshop
how to use .aco file in photoshop
how to use groups in photoshop elements
how to use photoshop atn file cs6
how to use the clone tool in photoshop elements on a mac
how to use quick whiten teeth tool in photoshop elements
how to use mixer brush photoshop cs6
how to use davis one-click wow photoshop
how to use paragraph styles in photoshop
how to use photoshop fnaf resources
how to use old shortcut on photoshop cc
how to use magic wand tool in photoshop youtube
how to use photoshop cs6 mac
how to use icon fonts in photoshop
how to use third party photoshop brushes
how to use photoshop icons
how to use the paint brush in photoshop
how to use a lens flare in adobe photoshop
photoshop cs2 plugins how to use
how to use polaroid photoshop action
how to use stroke path in photoshop cs6
how to use magic want tool in photoshop and keep color
how to use gem brushes in photoshop
how to use the darken blend mode photoshop
how to use a pencil in photoshop
how to use photoshop plugins cs6
how to use perfect resize in photoshop version 8
how to use photoshop slice tool and elementor
how to use 15 bit color in photoshop
how to use text effects photoshop
how to use photoshop sequences
how to use burn and lighten as a sepreate layer photoshop
how to use photoshop file on cad pjotoshop version 12
i have a color palette i need to use to change colors in photoshop how
video on how to use adobe photoshop
photoshop how to use an image as a stamp like a brush?
how to use blur on a selection in photoshop
how to use pen tool in photoshop cs5
how to use rulers photoshop
how to use the magnetic lasso in photoshop
how to use the clone tool in photoshop cc 2018
how to use scanner in photoshop cs5
how to use the patch tool to remove images from photoshop
how to use fonts in photoshop 2018
how to use photoshop cs6 tools
how to use photoshop cs5 to improve color
how to use asset brush photoshop cc
how to use adobe photoshop cc 2014
how to use your second photoshop download
how to use laso photoshop
how to use pexels in photoshop
how to still use photoshop cc trial expired
how to use wacom intuos art in photoshop
how to use eyedropper between photoshop files
how to use os x automator with photoshop
how to use utorrent on mac to download photoshop
how to use spot heal tool in photoshop keyboard shortcut
how to use photoshop field blur
how to use actions in photoshop windows
how to use clipping masks in photoshop ps3
how to use cracked dll for photoshop cs6
how to use brush as eraser photoshop
photoshop how to use flow
how to use paintbrush on a picture in photoshop
how to use magic wand in photoshop elements
how to use photoshop for drawing and tools
photoshop how to use color of background
how to use clouds from another photo in photoshop
how to use special characters in photoshop file name
how to use text perspective in photoshop
how to use a pen tablet in photoshop
how to use exact measurements when resizing in photoshop cc
how to use adobe photoshop cs6 for stop motion with lego
how can you use the color picker to restrict your color choices to only web-safe colors? photoshop
how to use photoshop effects in premiere
how to use text on photoshop cc 2018
how to use smart layers in photoshop to replace an image
how to use content aware extend in photoshop
how to use photoshop to make rankings
how to use photoshop brushes add ons
how to use adobe photoshop 7.0 for cut out image
how to set photoshop to use graphics card
how to use levels on one image to give it a cppr negitive lok pon photoshop
photoshop how to use green screen in photo
how to use word font template in photoshop
how to use photoshop beginner tutorial
how to design shapes to use in a cricut design space photoshop
how to use 3d tool in photoshop cs6
how to use a downloaded font photoshop
how to use adobe photoshop free
how to use photoshop sharpen tool
how to use photoshop cc free permanantly
how to use colors in my library in photoshop
how to use a photoshop image to key out video in premiere
how to use the blending tool in photoshop
how to use free actions in photoshop elements 10
how to use actions in photoshop cs5 gifs
how to use mirror painting in photoshop
how to use golden ratio crop tool adobe photoshop cs6
how to use online photoshop free advanced
how to use photoshop refine edge tool
how to use inner shadow in photoshop
how to use photoshop blend tool
how to use installed brushes in photoshop
how to use hud picker adobe photoshop cc
how to use vanishing point in photoshop cs3
how to use auto image adjustments in adobe photoshop
how to use pen tool to crop image in photoshop
how to use perspective in letters photoshop
how to use photoshop project in premiere for animation
how to setup your photoshop for easy use
how to use photoshop to take out blue tint
how to use magic wand on whole image photoshop
how to use photoshop 2019
how to use any pen on bamboo fun tablet in photoshop
adobe photoshop cc 2017 how to use plugins
how to use quick selection tool to make a border in photoshop
how to use obama filkter photoshop
how to use lightroom preset on photoshop
how to use brush in photoshop to reveal what is underneath
how to save a layer for future use in photoshop
how to use photomerge in photoshop elements 14
how to use pen toll in photoshop cs 7.0 to edit picture
are you limited to how many trees you can use on photoshop
how to use stylus touchscreen photoshop
how to use styles in photoshop cs8
photoshop ocr how to use
how to use simple line icons in photoshop
how to use outline on photoshop
how to use the stamp tool photoshop
how to use 1000 photoshop preset actions in corel photoshop pro 8x
how to reduce a jpeg photo down to a size to use on facebook in photoshop cs6
how to use quick mask mode in photoshop cs6
how to use gaussian blur in photoshop cc
how to use hdr on photoshop
how to use perspeive tool in photoshop
how to use the grid system to create a mockup website in photoshop
how to use a hex color in photoshop
photoshop how to use hand tool canvas
how to use marquee square tool in photoshop
how to use photoshop cc history brush
how to use alternate fonts in photoshop elements
how to use avery stickers in photoshop
how to use sharp lense fisheye lens photoshop app
how to use transform tool in photoshop to downsize an image without losing resolution
how to use halloween digital stamps using photoshop cc
how to use eye candy in photoshop
photoshop how to use the patch tool
how to use levels in photoshop to get red hues out of an image
how to use adobe photoshop episode 1
uf learn how to use photoshop, how to code, etc
how to use premiere in photoshop
how to use photoshop realistically
how to use photoshop for amazon merch
how to use photoshop cs5 on mojave
how to use adobe photoshop video youtube
how to use photo edges in photoshop
how to use a brush as an eraser in photoshop
how to use simple filters in photoshop
how to use a screenshot in photoshop
how to use marquee tool in photoshop cc
how to use magic bullet looks in photoshop gif
how to use transform rotate in photoshop
how to use the circle cutting tool in photoshop
how to use an image as a text style in photoshop
how to use photomerge to merge star trail photos by photoshop elements
how to use graphics processor in photoshop
photoshop how to use eyedropper ring
how to use drawing tablet on photoshop wacom
how to use photoshop to create a video from still frames
how to use a matte action photoshop
how to use shift tool in photoshop
how to use photoshop to make picture clearer
how to use the grow tool in photoshop
how to use straighten tool adobe photoshop
how to use the healing brush in photoshop elelments
how to use brush action in photoshop elements 15
how to use grow in photoshop
how to use png luts in photoshop
photoshop how to use multiple images
how to use "apply image" in photoshop
how to use fonts you downloaded in photoshop
how to use photoshop for 2d game dev
how to use installed photoshop actions\ site:youtube.com
how to use film storyboard templates in photoshop
how to use photoshop cc after trial period
photoshop how to use slices
how to use a psd in photoshop on gif
photoshop cs6 how to use gradient fill on object
how to use photoshop in android
how to use photoshop elements 13 for facebook
how to use color picker in hue and saturation in photoshop
how to search for an image to use in photoshop
photoshop how to use shake reduction
how to use healing brush on photoshop elements
how to use a line to mask in photoshop
how to use my installed plugins in photoshop cc 2017
how to use adobe photoshop elements 8.0
how to use a image to cut a image in photoshop
how to use shape mask in photoshop
how to use texture brushes in photoshop
how to use photoshop path in indesign
how to change color to use history panel to make one thing colored in photoshop
how to use clone stamp tool photoshop with pen on microsoft
how to use photoshop motion workspace
how to use a slice tool in photoshop
how to use photoshop cc 2018 without a key
how to use magic wand tool in photoshop cs6 to delete background
photoshop 2017 how to use clone stamp
how to use photoshop 2015 to alter trademark logo
how to use the lighting effects in photoshop 2019
photoshop how to use the pen tool efectively
how to use masking layers in photoshop
how to use svg files in photoshop
how to use a pattern in photoshop cs6
how do use the path selection tool in photoshop to move a path
how to use photoshop color born
how to use photoshop files on an iphone
how to use seamless patterns in photoshop
how to use smart objects in photoshop batching
how to use gradiant editor in photoshop
how to use an action on photoshop
photoshop how to create use image map on website
how to use the pen tool in photoshop cs2
how to use oil paint photoshop
how to use the colored pencil tool in photoshop
how to use the mask tool on many layer in photoshop
how to use smart objects for badges photoshop
how to use calculations in photoshop cc 2018
photoshop how to use the healer tool
step by step tell me how to use the smudge bar in photoshop
how to use a pen device tool in photoshop
how to use conde digital downloads in photoshop
adobe photoshop how to use shapes
how to use the eraser tool in photoshop cc
photoshop how to use a pattern
how to use photoshop express for raw android
how to use curves to edit photo in photoshop 2018
how to use treshold in photoshop
how to use adobe photoshop memes
how to use photoshop elements video editor 2019
how to use photoshop to compress images
how to use gimp brushes in photoshop
how to use photoshop curves adjustment
how to use photoshop to design clothes
how to use a photoshop image in illustrator
how to use photoshop cs6 2019
how to use a seamless tile in photoshop cs5
how to use pexels in photoshop 2019
how to use pen tool in photoshop cs5 extended
how to make photoshop text not use hyphens
how to use a mask shift filter in photoshop
how to use photoshop cs6 to round corners
how to use slideshow in photoshop
how to use cool fonts on photoshop
how to use photoshop cc and lightroom for free on mac russian fashion photographer
how to use font that is outlined in photoshop elements 11
how to use color on paint tool in photoshop
how to use plugin in photoshop
how to use the photoshop elemenets
breezy photoshop plugin how to use
how to use photoshop premiere elements
how to use a work path in 2 files in photoshop
how to use perspective warp in photoshop cc 2018
how to use a plug in in photoshop
basic how to use photoshop elements paint
how to use splashtop photoshop
how to use overlays in "photoshop elements 15"
how to use action scripts in adobe photoshop for ebook covers
how to use a drop shadow in photoshop
how to use refine selection tool photoshop cc
how to use digital templates in photoshop elements
photoshop cs3 how to use a stroke effect without blending options
how to use photoshop brush with touch screen
how to use the eyedropper tool in photoshop cc
invision craft photoshop plugin how to use
how to use polygon tool photoshop
how do i use guides to create solids photoshop
how to use the dodge tool photoshop
how to use the mirror effect in photoshop
how to use layers with adobe photoshop mix
how to use overlays in photoshop "elements 15"
how to use teh pin tool in photoshop
what are photoshop brushes and how to use them
how to use photoshop magic eraser tool
how to use actions in photoshop cs6 tumblr
how to use color overlay in photoshop cc
how to use flame render in photoshop
how to use truetype fonts in photoshop
how to use the masking tool in photoshop
how to use swirl brushes in photoshop
how to use the pen tool in photoshop ps
how to use pen tool curve in photoshop
how to use mouse to expand canvas photoshop cc
how to use fonts in photoshop after dowloading them
how to use magic wand to remove background photoshop
how to use photoshop backgrounds
how to use a fonts you downloaded in photoshop
how to use brush to draw in photoshop
how to use intuos with photoshop
how to use curves in photoshop elements
how to use weird characters in photoshop upside down e
photoshop how to use text to create a star
how to use lense flare in photoshop
how to use paper as a layer mask in photoshop
how to use selective tool in photoshop
how to use photoshop elements 8 for windows
how to use photoshop for layout
how to use photoshop for spoonflower
how to use onone plugin to photoshop
photoshop cc how to use puppet warp
how to use the patch tool in photoshop cc phlearn
how to use the sponge brush in photoshop elements
how to use photoshop 7 pen tool
how to use defringe in photoshop
how to use tpl file in photoshop cc
how to use spacing in photoshop
how to use effects in photoshop elements
how to use photoshop cs5 to still a photo from a video
how to use vector lines in photoshop
how to use photoshop to make a photo look black and white
how to use opacity in photoshop timeline
how to use halftones in photoshop
how to use photoshop file as smart object
how to use photoshop stamp tool without leaving circles
how to use stylus with photoshop cc
how to use topaz denoise in photoshop
how to use photoshop in portreait on a surface
how to use photoshop cc for drawing
how to use luminosity to remove noise in photoshop
how to use images in photoshop template
how to use quick mask layer in photoshop cc
how to use the blank brush to erase things in photoshop
how to use photoshop to change appearence
how to use background eraser in photoshop cc
how to use urdu font in photoshop
how to use black background photoshop overlays
how to modify brush tool in photoshop to use background image
how to use photoshop cs2 to edit photos
how to use luminosity masks in photoshop elements 14
photoshop how to use image as layer mask
how to use swatches photoshop
how to use powerpoint like photoshop
how to use the healing brush tool in photoshop cs5
how to use adobe photoshop cs6 to edit pictures pdf
how to use scanner in photoshop cc
how to use a paint brush in photoshop
how to use puppet tool in photoshop cc
how to use gradient tool photoshop grade layers
how to use decorative font features in photoshop
how to use the color replace tool in photoshop
how to use effect style sin photoshop
how to use cs2 photoshop with mac el capitain
how to use typography photoshop
how to use the brush in in photoshop
how to use crop and straighten in photoshop cc
how to use photoshop 101 youtube
how to use polygon tool in photoshop
how to use lasso tool photoshop cc
how to use photoshop to see yourself older
how to use smart select in photoshop
how to use fill on photoshop
how to use photoshop styles in affinity photo
how to use freeform pen tool photoshop cc
how to use photoshop from a computer that is not yours
how to use photoshop to make a drawing a vector
how to use touch screen in photoshop cc 2015
how to use smudge tool in photoshop cs5
how to use live trace in photoshop
how to use 3d in photoshop cs6 in youtube
how to use photoshop gradients in illustrator
how to use adobe photoshop pdf free download
how to use eraser tool in photoshop cc 2015
how to use boris red 5 in photoshop?
how to use style on fonts in photoshop
how to use photoshop to insert a photo
how to use the crystallize tool in photoshop
how to use png image luts in photoshop
how to photoshop a picture for use in forced perspective
photoshop cc how to use channel mixer
how to select part of an image to use in photoshop
how to use texture as paint photoshop
how to use photoshop to edit text and remove rough edges
how to use the topaz lab plug in photoshop
how to use the sponge tool in photoshop cs6
how to use layres in photoshop
how to use actions in photoshop cs3
how to use the bounding box feature on adobe photoshop
how to use magic eraser tool in photoshop cs5 and make it opaque
how to use photoshop to draw if i do not have illustrator
how to use photoshop touch on ios 11
how to use a gif overlay in photoshop
how to use copyright symbol on photoshop
how to use perspective option for font in photoshop
how to use eye unreddener in photoshop
how to use texture image for text photoshop
how to use content aware tool in photoshop
how to use animation timeline in photoshop cs3
how to use channels photoshop
how to use vectors in photoshop cs6
how to use photoshop libraries offline
how to use ilin photoshop
how to use alignment in photoshop cs5
how to use healing brush on top of layers in photoshop
how to use 3d extrusion in photoshop cs5 for logo
how to use adobe photoshop crop certain dimensions
how to use perspective warp in photoshop cs6
how to use photoshop to get a crisp color
how to use photoshop 2015 for beginners
how to use the cloning tool in photoshop
how to use the slice tool photoshop
how to use a background image for adobe photoshop
how to use green screen in adobe photoshop
photoshop how to use to edit port
photoshop how to use nearest neighbor
how to use color on black and white image in photoshop
how to use photoshop to prepare jpeg for high resolution printing
how to use a adobe capture pattern in photoshop cs6
how to use exact decimals in photoshop
how to use the eraser tool in photoshop without color appearing
how to use dotted line in photoshop cc
how to use photoshop on cloud
how to use photoshop to make a flyer for a club
how to use csh file in photoshop
how to use custom warp in photoshop
how to use a fog brush in photoshop
how to use nef in photoshop
how to use photoshop to change all orange to black
how to make photoshop use backround color
how to make photoshop use only 8 shades
how to use pantone ase file in photoshop
how to use roblox models in photoshop
how to use the path selection tool in photoshop
how to use curved lines in photoshop
how to use brushes i downloaded in photoshop
how to use fill in photoshop cs6
how to use pixelify in photoshop
how to use every tool in photoshop master collection phlearn
how to use quick selection tool in photoshop elements 2019
how to use image as texture in photoshop
how to load and use photoshop asl file
how to use black photoshop overlays
how to use plugin photoshop
how to use photoshop to create a baked texture
how to use photoshop to read faded words in document
how to use swatch photoshop
how to use photoshop minecraft
how to use adobe photoshop to make a poster
how to use adobe photoshop elements 8.0 mac
photoshop how to use magic lasso
how to use photoshop to add abs
photoshop how to use healing brush with content aware
how to use print studio pro ver.2.2.3 (mac) with photoshop
how to use ruler fraction of picture photoshop
how to use graphics in photoshop elelnts 15
how to use the adobe mobile apps for photoshop for android
this is how we use to clipping mask photoshop
photoshop how to use another image as background
photoshop cs6 how to use the 3d
how to use magnetic lasso in photoshop
how to use a dollar in photoshop
how to set photoshop to use 12gb of ram
how to use lasso in photoshop mix
how to use photoshop for an overlay for league ofelgends
how to use photoshop to sketch
how to use backpack template in photoshop
how to use color sampler tool in photoshop cs5
how to use a layered template in photoshop cs6
how to use .eps vectors in photoshop
how to use lasso on photoshop cs
how to use paint brush effect in photoshop
photoshop how to use textures
how to use pattern maker photoshop cs5
how to use shutterstock fonts in photoshop
how to use scanner in adobe photoshop elements 6
how to use a change the size of a pattern in photoshop
photoshop cs5 how to use smudge tool
how to use photoshop well tricks and tips
photoshop how to use lasso on mac
how to use photoshop sketch filter
how to use smart objects in photoshop cc
how to use hud color picker photoshop cc
how to use photoshop to enhance photo quality
how to use photoshop to eliminate shadows
how to use jpegs in photoshop
how to use photoshop horizontal and vertical guides
step by step illustration on how to use the gradient tool in photoshop
how to use a photo as a background in photoshop
how to use ultra key photoshop
how to use photoshop noise reduction
how to use content aware and proximety match photoshop
how to use a background from one image in a different image in photoshop elements
how to use bright brush in photoshop
how to use actions gif photoshop
youtube how to use adobe portfolio website with photoshop cc
how to use color control patches photoshop
how to make masks in photoshop for continued use
how to use stylus photoshop
how to use photoshop cc preset manager
how to use transparency in photoshop
how to use clone stamp on adobe photoshop
adobe photoshop cs5 how to use
how to use skyfonts in photoshop
how to use restraint with photoshop
how to fix a flat photograph in photoshop command do you use
how to use glithces in photoshop
how to use red brush preview photoshop
how to use styles in photoshop elements
how to use magic want in photoshop
how to use lens flare filter in photoshop
how to use drop shadow tool photoshop elements
how to use cc libraries in photoshop cs5
how to use text as a layer mask in photoshop
how to use the whiten teeth tool in photoshop elements 10
how to use quick selection in photoshop
how to use photoshop for rendering
how to use blur in photoshop to help watercolor painting
how to use clone stamp tool in photoshop for beginners
how to use psd vectors in photoshop
how to use chroma key photoshop
how to use 3d option in photoshop cs5
how to use photoshop for roblox
channels photoshop how to use them
how to use color in photoshop 6.0
how to use the character tool in photoshop cs6
how to use radial filter in photoshop
how to use photoshop file in animate
how to use photoshop portable
how to use an image to cut another image photoshop
how to use a pattern to put a stroke around a picture in photoshop 7
how to use photoshop frame
how to use cintent removal tool photoshop cc
how to use grid in particular rectangular box in photoshop cs6
how to use frame brushes in photoshop
how to use the magic wand tool inn photoshop
how to use photoshop youtube channel art
how to use photoshop to clean up scanned photos
how to use an image as a texture in photoshop
how to use photoshop brush shape tool
how to use lightroom presets in photoshop cc
how to use a 8bit photo in photoshop
how to use different losses at the same time photoshop
how to use digital items in photoshop elements 9
photoshop how to delete background and use brush to reveal
how to use a svg file in photoshop
how to use masks to beautify photoshop
how to use adobe photoshop to make a large image smaller
how to use detail smart brush photoshop elements
how to cut part of the photo to use in photoshop
how to use smudge tool to create border in photoshop
how to use different brushes in photoshop
how to use photoshop to batch alter photos
how to use different fonts on photoshop
how to use wood texture in photoshop
how to use photoshop to make visa picture
how to use difference clouds in photoshop
how to use keyboard macro keys in photoshop
how to use photoshop alpha channel
how to use a picture as a style in photoshop
how do you use a curvature map to paint scratches in photoshop
how to use adobe color in photoshop
photoshop how to use gradients tutorial
how to use kyle brushes photoshop cc
how to use dxo photolab in photoshop
how to use photoshop cc to convert film color negatives
how to use the cookie cutter in photoshop cs3
how to use photoshop cs4 to edit jpeg image
how to use photoshop eraser cc
how to use a png file to layer in photoshop
how to save photoshop edits to use again
how to use every button in photoshop
how to use ipad as a drawing tablet photoshop
how to use photoshop to make a templates
how to use photoshop to create a timelapse
how to use distort in photoshop timeline
how to use photoshop to make and print my own greeting cards
how to use asl styles in photoshop
how to use gradient tool in photoshop cs5
how to use a png as a shape cutter in photoshop
learn how to use not photoshop
photoshop filters how to use
how to use photoshop for beginner
how to use one color in photoshop
how to use photoshop elements to turn the sky blue
how to use pen tool in photoshop to make selection
photoshop how to use a image as mask
how to use the ambient occlusion layer photoshop
how to use the gradient tool photoshop cc
how to use the line tool in photoshop cs6
photoshop how to use brush tool
how to use photomerg in photoshop
how to use google nik collection in photoshop
how to use auto red eye fix in photoshop elements
how to use photoshop to create dynamic eyes
how to use photoshop cs6 to edit photos
virtual photoshop plugin + how to use
how to use a pattern as stroke in photoshop
how to use the pen tool in photoshop cs5 to draw line
how to use the filter offset tile in photoshop
how to use lip brush in photoshop
how to use adobe photoshop cs6 in windows 7
how to use brushes on photoshop cs6
how to use actions in photoshop 7.0
how to use photoshop adjustment layers
how to use photoshop cc 15
how to use adobe photoshop cs5 beginners
how to use the new select and mask in photoshop
how to use 3d layers in photoshop cs3
how to use quick selection tool in photoshop cs3
how to use snow overlays in photoshop
how to use 3d effect in photoshop cs6
how to use photoshop macbook
how to use the rule of thirds in photoshop
how to use magic wand in adobe photoshop
how to use photoshop like a professional
photoshop plugin how to use
photoshop how to use spot healing tool
how do i learn to use photoshop
how to use photoshop in ipad pro
how to use photoshop to design a banner
how to use the clone stamp tool in photoshop elements 15
how to use photoshop in jio phone
how to use photoshop cc on ipad pro
how to use 3d in photoshop cc 2015
how to use adobe photoshop 9
clone stamp tool photoshop how to use
how to use dodge and burn in photoshop cc
how to use a bamboo tablet in photoshop
how to use field blur in photoshop cs6
how to use photoshop cc tools pdf
how to use the quick selection tool in photoshop cc 2017
how to use refine edge tool photoshop
how to use adobe photoshop cs6 online
how to use transform tool in photoshop cs5
how to use liquify tool in photoshop cs5
how to use tilt shift in photoshop cc
how to use layer styles in photoshop cs5
how to use the color wheel in photoshop
how to use photoshop cs3 on mac
how to use tamil fonts in photoshop
how to use photoshop watermark in lightroom
how to use photoshop cs6 to make a logo
how to use adobe photoshop for android
how to use photoshop selection tools
how to use quick selection tool photoshop cs6
how to use in photoshop cs6
how to use adobe photoshop in iphone
how to use water brush in photoshop
how to use a magic wand tool in photoshop
learn how to use pen tool in photoshop
how to use magic wand tool in photoshop hindi
how to use airbrush adobe photoshop
how to use adobe photoshop layers
how to use adobe photoshop 8.0 cs
pdf on how to use adobe photoshop cs6
how to use the clone stamp tool in photoshop on mac
how to use ruler photoshop cc
how to use hdr in photoshop elements
how to use photoshop cs4 on mac
how to use quick selection tools in photoshop
how to use adobe photoshop 5.0
how to use tools for photoshop
how to use photoshop to turn a photo into a cartoon
how to use magic wand tool in photoshop tutorial
how to use gaussian blur in photoshop elements
how to use arabic font in photoshop
how to use adobe photoshop 10
how to use photoshop cs6 brushes
how to use crop tool in photoshop cs6
photoshop actions how to use cs6
how to use the clone stamp tool in photoshop elements 11
how to use photoshop actions downloaded
how to use frequency separation on photoshop
how to use adobe photoshop cc for beginners
how to use character map in photoshop
how to use quick selection in photoshop cs6
instructions on how to use adobe photoshop elements 9
how to use gaussian blur photoshop cs6
how to use photoshop good
how to use the clone stamp tool on photoshop cc
how to use adobe photoshop 7.0 step by step pdf in tamil
how to use photoshop spot healing brush
how to use photoshop free trial forever
how to use obs to stream photoshop
how to use font ligatures in photoshop
how to use 8bf file in photoshop cs6
how to use frame in photoshop 7
how to use blur tool in photoshop elements 8
how to use blur in photoshop cc
photoshop psd how to use
how to use photoshop cs6 video download
how to use in adobe photoshop
how to use notes in photoshop cc
in photoshop how to use patch tool
how to use svg fonts in photoshop
how to use the magic wand tool in photoshop elements 7
how to use adobe photoshop on iphone
how to use photoshop cc without paying
how to use clone stamp tool in adobe photoshop cs3
how to use photoshop cc 2014 mac
how to use photoshop manipulation
how to use photoshop to remove watermark
how to use photoshop to make an animated gif
how to use 3d material eyedropper tool in photoshop cc
how to use photoshop cc patch tool
how to use photoshop to create mood board
how to use photoshop tools tutorials
how to use the magic wand tool in photoshop elements 12
photoshop how to use picture as background
how to use wingdings in photoshop
how to use photoshop to edit photos in hindi
how to use high pass photoshop
how to photoshop use 7.0
how to use smart brush in photoshop elements 11
photoshop cc 2018 how to use
how to use the art history brush in photoshop cs5
adobe photoshop cc 2018 how to use
how to use a glitter overlay in photoshop
how to use 960 grid action in photoshop
how to use downloaded fonts in photoshop on mac
how to use use adobe photoshop
how to use selection tools in photoshop cs6
how to use dodge burn and sponge tool in photoshop
how to use photoshop ui in android
how to use 2 images in photoshop
how to use photoshop quick selection tool to change a background
how to use 3d mode in photoshop cc
how to use adobe photoshop without downloading
how to use the clone stamp tool on photoshop elements
how to use clipping mask in photoshop 7
how to use adobe photoshop wikihow
how to use photoshop fix on iphone
how to use adobe photoshop 7.0 change background
how to use gimp in photoshop
how to use pixlr to photoshop
how to use adobe photoshop in urdu
how to use adobe photoshop cc 2015 pdf
how to use photoshop software in hindi
how to use photoshop cc videos download
how to use 3d feature in photoshop cc
how to use layers in photoshop elements 9
how to use ruler photoshop cs6
how to use warp tool in photoshop 7
how to use 960 grid plugin in photoshop
how to use adobe photoshop cs5 youtube
how to use photoshop fix app
how to use clipping path in photoshop cs6
how to use gif animation in photoshop
how to use the photoshop pen tool � photoshop beginner tutorial
how to use adobe camera raw as a filter in photoshop cs6
how to use adobe photoshop on ipad pro
how to use double exposure action in photoshop
how to use adobe photoshop to make a collage
how to use content aware scale in photoshop cs4
how to use roboto font in photoshop
how to use photoshop warp
how to use photoshop vietnamese
how to learn how to use photoshop
how to use grid system in photoshop
how to use textured backgrounds in photoshop
how to use color splash on photoshop
how to use blender photoshop
how to use frequency separation action in photoshop
how to use noise reduction in photoshop cs5
how to use .ai photoshop
how to use dust and scratches in photoshop
how to use ambient occlusion in photoshop
how to use clipping mask in photoshop cs4
how to use shapes in photoshop cc 2017
how to use arabic fonts in photoshop
how to use select and mask in photoshop 2017
how to use levels photoshop cs6
how to use audio annotation tool in photoshop
how to photoshop use in hindi
how to use photoshop for artists
how to use guides in photoshop cc
how to use photoshop cs4 for mac
how to use photoshop cc tutorial
how to use magic wand tool in photoshop cc 2018
how to use double light photoshop action
learn how to use the background eraser tool in adobe photoshop
how to use magic wand in photoshop elements 10
how to use external fonts in photoshop
how to use akvis in photoshop
how to use quick select in photoshop cs4
how to use photoshop cc tools
photoshop file (psd) extract/recover tool how to use
how to use 3d materials in photoshop
how to do use photoshop
how to use photoshop speak khmer
how to use photoshop 18
how to use 3d effect in photoshop cc
how to use photoshop in interior design
how to use adobe photoshop pdf download
how to use the magic wand tool in photoshop cs2
how to use blur in photoshop elements
how to use blur filters in photoshop
how to use tpl brushes in photoshop
how to use quick mask in photoshop cs4
how to use dodge and burn tool in photoshop
how to use photoshop trial again mac
how to use font icons in photoshop
how to use default shapes in photoshop
how to use clone stamp tool in photoshop cs6 extended
how to use refine edges in photoshop cc
how to use split toning in photoshop
how to use adobe photoshop in android
how to use pen tool in photoshop hindi
how to use a photoshop cc
how to use photoshop on iphone 7 plus
how to use the clone stamp tool in photoshop elements 18
how to use photoshop batch processing
how to use gaussian blur filter in photoshop
how to use adobe photoshop for editing photos
how to use splatter brushes in photoshop cs5
how to use masking in photoshop cs4
how to use photoshop cs6 online
how to use blur tool photoshop cs6
how to use 3d on photoshop cs6
how to use adobe photoshop to remove background
how to use 3d in photoshop cs6 pdf
how to use pixel fonts in photoshop
how to use bootstrap grid system in photoshop
how to use clipping mask in photoshop elements 10
how to use the clone stamp tool in photoshop elements 6
Basics Of Photoshop : 5 Steps - Instructables
When you open Adobe Photoshop for the very first time, it's easy to click around in confusion for a minute and after that reach for your freelancer's phone number instead. Trust us, you're not alone in this. It's an incredibly effective style software application with a lot going on, consisting of a wealth of tools that can appear frustrating at times.
With a little help, you can quickly teach yourself how to use it to produce lovely, engaging graphics. All it takes is an introduction to core elements-- in plain English. Pro Tip: You can do all sorts of cool things with layers-- and believe it or not, making animated GIFs is among them.
To find out more about including, deleting, and duplicating layers in Photoshop, take a look at this video tutorial - how to use the blur tool in photoshop. What It Does: The Color and Swatches tool lets you utilize, modify, copy, and conserve customized colors for your material. While this may appear like a pretty self-explanatory element, it really has powerful functions that will keep your visual content vibrant and merge your color design.
Another place to discover the Color tool is at the bottom of the toolbar on the left, suggested by 2 overlapping boxes: Open the Color Picker by double-clicking on the top box either in the Color module, or in that menu on the left. From there, you'll see a vertical spectrum of color with a slider on it, which you can get used to develop your own custom color.
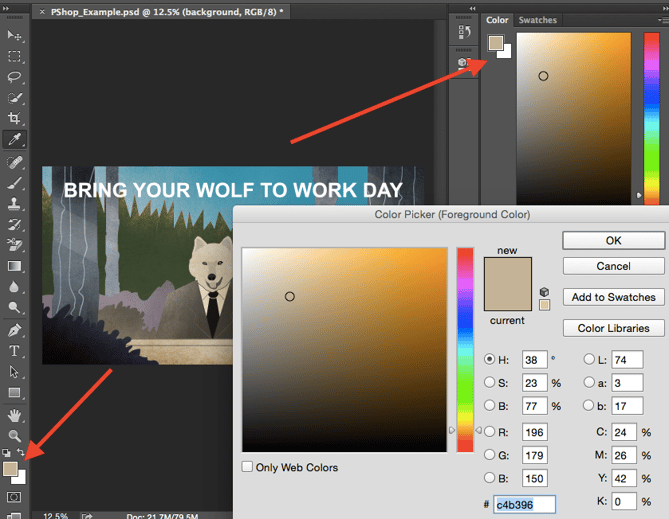
# 1fb 1ee), then enter it in the appropriate box to find that color automatically. You can likewise choose your color example based upon RGB or CMYK worths. Any colors you create can be included to your "Examples" if you click "Contribute to Examples." Pro Pointer: Take your company colors and save them as "Examples" so that you can reference and recycle them whenever you're developing your visual content.
Where It's Located: The toolbar on your left, near the bottom. When you click the Text tool icon, all of the settings and font style alternatives will turn up at the top of your screen. These settings let you alter the font, font style size, and spacing in between characters, height, width, color, and design.
The text tool works like any other text tool you have actually used. Click the "T" icon on the left side bar, drag the text box over any specific location you want text to appear, and you're set to go (how to use gradient tool in photoshop cc). Whenever you produce a text box, Photoshop will produce a layer for it.
Pro Suggestion: While Photoshop offers a wide range of typefaces, you can also install your own font styles. To discover more about typefaces and the Text tool, have a look at this video tutorial . What It Does: Just as with typefaces, you can include your own, royalty-free, customized brush pointers. With the brush settings, you can change the size, shape, and openness of your brush strokes to accomplish a variety of various visual results.
12 Beginner Tutorials For Getting Started With Photoshop
Photoshop starts you off with a nice selection of brush pointers that you can use to tidy up your graphics and create some fundamental visual impacts. Where It's Found: The toolbar left wing. As soon as you click the Brush tool icon, all of the settings and brush alternatives will turn up at the top of your screen.
You'll discover a variety of pre-installed brush ideas, in addition to any custom brush ideas you set up to Photoshop. (You can find royalty-free brushes at www.brusheezy.com if you wish to get actually imaginative.) The brush tool is best for adding style accents to your content material. When using the brush tool, I constantly recommend including a new layer to deal with so you do not paint over any of your other elements.
Altering the brush settings can provide your brush a dramatically various appearance and design. Don't be afraid to play around a bit with all of your custom brushes. What It Is: When utilized properly, this tool will let you select specific aspects, whole graphics, and identifies what is copied, cut, and pasted into your graphics.
The Select tool is known as among one of the most standard, yet frustrating tools to utilize in Photoshop. The very first thing you should understand is that it'll just work if a layer is highlighted. So, if I want to cut or copy a piece of Layer 4, Layer 4 must be highlighted in my Layer's tool bar.
When you remember to pay attention to which layer you are working with, the Select tool ends up being a lot easier to use. First, highlight your location of option. Then, simply right-click and choose what you 'd like to do from the pull-out menu. For example, you can cut out objects from an existing layer and develop a layer of your own.
Once you have actually chosen the area of the image, simply copy the location. Next, open the tab for your present task and paste it in as a new layer. Highlight the layer of the things( s) you 'd like to select. You can move several things simultaneously by highlighting several layers. Then, right-click your choice, and after that you have a few choices, consisting of: A) Picking "Layer by means of Copy" to copy the things( s) from this layer and develop a layer of its own.
When you've determined the area to copy, utilize the menu bar at the top and click "Edit" > "Copy Merged." This will copy the entire graphic so you can paste it as its own layer. B) Picking "Free Transform" to scale, rotate, move, and flip your choices. (Refer to the Move tool in the next area of this post if you require more aid on this.) Pro Pointer: One actually cool technique you can do with "Free Transform" is to overlay screenshots of a PDF to make a 3D-looking image, like the one below for our read this article for the detailed guide .
What It Does: This is a relatively standard tool that enables you to move individual components of your graphic. The Move tool works on specific layers, and on the graphic as a whole-- if (remember how to do this?) you highlight all of your layers - how to use eyedropper tool in photoshop. It can be found in handy when you're trying to rearrange images, text, and other style elements.
35 Basic Tutorials To Get You Started With Photoshop - Webfx
Click the Move Icon from the left hand menu bar and just drag the things( s) you would like to move - how to use slice tool in photoshop. To move all items in one layer, simply highlight the layer and utilize the Move tool. You can likewise right click the item for extra options. The Free Transform tool lets you scale, turn, move, and flip any aspect in your choose layer or layers.
Hold the SHIFT key while changing to keep the percentages of your elements. What It Does: The Zoom tool lets you zoom in near to specific areas of an image, and zoom out to get more of a bird's eye view of what's happening. Where It's Found: In the leading menu bar, select View > Zoom In or View > Zoom Out.
To use the keyboard shortcut, hold ALT (PC) or Command (Mac) and press + to focus, and ALT (PC) or Command (Mac) and press - to zoom out. What It Does: The Basic Eraser works a lot like the brush tool. You can alter the size and solidity of the eraser tip to achieve a range of effects, like mixing and fades.
The eraser is one of the most beneficial tools in Photoshop. Yes, I understand it's technically just an eraser, but you have actually never used an eraser like this (how to use paint bucket in photoshop). Where It's Located: The toolbar left wing. As soon as you click the Eraser icon, all of the settings will pop up at the top of your screen.
Like most tools in Photoshop, the eraser works just on a specifically chosen layer. how to use photoshop for free. Make certain you've got the layer you want chosen prior to you start eliminating. This tool is a time-saving marvel. You can see how easily it gets rid of background colors from images. This is especially handy if you require an item with a transparent background.
Choose "Background Eraser." Now you're prepared to do some serious erasing. Adjust the size of the Background Eraser, and simply click the color you would like deleted from the selected layer. Remember to pick the layer you wish to eliminate on. Pro Idea: Do not hesitate to utilize an oversized eraser idea for the Background Eraser.
To find out more about how to eliminate the background of a photo in Photoshop or Power Point, take a look at this step-by-step guide . What It Does: The Crop tool lets you crop an image. It works like any crop tool you've ever encountered: Simply choose your location and crop it out.
Where It's Found: The toolbar left wing. Select the icon showed in the screenshot from the side menu bar, and drag package over the location you wish to crop. how to use 3d in photoshop. To change the crop box, simply click and drag the little anchor boxes on the sides and corners of the crop box.
40 Best Photoshop Tutorials That Will Make You A Photoshop ...
have a look at this short article from Digital Photography School . What It Does: The Fill tool, formerly the Paint Bucket tool, fills any strong location with the color of your option - how to use an action in photoshop. It's terrific for solid backgrounds or coloring large areas. It can likewise be utilized to use patterns to your images. The Gradient tool within the Fill tool lets you create a nice, faded background effect of the color of your option.
From there, you have the choice to select "Strong Color," "Gradient," or "Pattern." Initially, select the layer you wish to fill with a strong color. Then, from the leading menu bar, select Layer > New Fill Layer > Solid Color ... From there, a "New Layer" window will pop up and prompt you to name the new color fill layer.
Here, you can choose which strong color you wish to fill. Since I 'd picked my background layer to fill in (i.e. the color of the sky in my graphic), the color I select in the Color Picker determines the color of the sky: These patterns can be manually produced if you have the time and patience, or you can discover a variety of royalty-free patterns offered for download through a fundamental Google search.
Then, from the leading menu bar, pick Layer > New Fill Layer > Pattern ... From there, a "New Layer" window will appear and prompt you to name the new color fill layer (photoshop how to use clone stamp). Don't worry about choosing the color you want right then and there-- simply name the layer and press "OK." Next, you'll see the "Pattern Fill" window appear.
Given that I 'd selected my background layer to complete (i.e. the color of the sky in my graphic), the pattern I choose in the Pattern Fill changes the sky: To use a gradient, very first select the layer you 'd like to fill with a pattern. Then, from the top menu bar, choose Layer > New Fill Layer > Gradient ...
Don't stress over picking the color you desire best then and there-- simply name the layer and press "OK (how to use photoshop brushes)." Next, a "Gradient Fill" window will turn up. Play around with these alternatives, including the style, angle, and scale. To pick a different gradient than the one provided by default, click the arrow on the right-hand side of the default gradient to open the Gradient Editor, revealed below: What It Does: This handy little tool lets you extract and utilize any color from any image in Photoshop.
Select the icon from the sidebar. Next, find that color you wish to extract, and merely click that location to clone the color. When you've drawn out the color, you'll see it indicated both in the Color module on top right of your screen, in addition to the bottom of the left sidebar.
***
Categories
Copyright© How To Use Photoshop All Rights Reserved Worldwide