how to use photoshop
how to use pen tool in photoshop
how to use photoshop actions
how to use masks in photoshop
how to use layers in photoshop
how to use actions in photoshop
how to use the patch tool in photoshop
how to use luts in photoshop
how to use the clone tool in photoshop
photoshop how to use pen tool
how to use magic wand in photoshop
how to use clone stamp photoshop
photoshop actions how to use
how to use smart objects in photoshop
how to use gradient tool in photoshop cc
how to use textures in photoshop
how to use content aware in photoshop
how to use quick selection tool in photoshop
how to use photoshop elements
how to use photoshop youtube
how to use font awesome in photoshop
how to use selection tool in photoshop
adobe photoshop how to use
how to use gimp like photoshop
how to use styles in photoshop
how to use the liquify tool in photoshop
how to use the burn tool in photoshop
how to use downloaded brushes in photoshop
how to use lighting effects in photoshop
how to use curves to edit photos in photoshop 2016
how to use pen tool in photoshop cc
how to use the ruler tool in photoshop
how to use paint brush in photoshop
how to use photoshop patch tool
how to use fill in photoshop
photoshop how to use the pen tool
how to use dodge tool in photoshop
how to use touch screen in photoshop
how to use blending modes in photoshop
how to use pattern in photoshop
how to use slice tool photoshop
how to use masking in photoshop
how to use puppet warp in photoshop
how to use custom shapes in photoshop
photoshop how to use patch tool
how to use the liquify tool in photoshop cs6
how to use the quick selection tool in photoshop cc
how to use the warp tool in photoshop
how to use background eraser tool in photoshop
how to use chroma key in photoshop
how to use pressure sensitivity in photoshop
photoshop how to use layer mask
how to use tilt shift blur in photoshop
how to use stamp in photoshop
how to use .pat files in photoshop
how to use smart filters in photoshop
how to use the healing tool in photoshop
how to use custom brushes in photoshop
how to use an image as a mask in photoshop
how to use adobe photoshop elements 14
how to use color sampler tool in photoshop
how to use an eps file in photoshop
how to use vignette in photoshop
how to use photoshop elements 2018
how to use clone stamp on photoshop
how to use adobe photoshop cs2
how to use downloaded font in photoshop
how to use smart object in photoshop
how to use actions in photoshop cs5
how to use downloaded photoshop brushes
how to use photoshop 3d tool
how to use stylus with photoshop
how to use photoshop cc 2019
how to use photoshop brushes tutorial
how easy is photoshop to use
how to use color in photoshop
how to use lasso tool in photoshop to remove background
how to use photoshop cs3 for beginners
how to use gradient map in photoshop
learn how to use photoshop cs6
adobe photoshop how to use layers
how to use drawing tablet in photoshop
how to use content aware in photoshop cc 2018
how to use photoshop without paying
how to use the polygonal lasso tool in photoshop cs6
how to use adobe photoshop app
how to use photoshop tools with example
how to use filter gallery in photoshop
how to use clipping masks in photoshop cs5
how to use photoshop actions cs6
how to use photoshop after trial ends
how to use stylus on photoshop
how to use selection in photoshop
how to use adobe photoshop cs4
how to use a pen tool in photoshop
how to use clipping mask in photoshop cs5
how to use pin tool in photoshop
how to use the pen tool in photoshop cc
how to use quick selection tool in photoshop cc 2017
photoshop how to use the clone stamp tool
youtube how to use photoshop
how to use color halftone in photoshop
how to use layer mask in photoshop cs6
how to use the photoshop app
how to use photoshop to animate
how to use magnetic lasso photoshop
how to use color dodge in photoshop
how to use gif in photoshop
photoshop cs2 how to use
photoshop cc how to use
how to use the dodge tool in photoshop cs6
how to use onion skin in photoshop
how to use the magic eraser tool in photoshop
how to use photoshop free trial
how to use animation in photoshop cs5
how to use perspective tool photoshop
how to use lens correction in photoshop
how to use photoshop crack
how to use slices in photoshop
how to use watercolor brush in photoshop
how to use adobe photoshop cs6 for beginners
how to use ai files in photoshop
how to use wacom intuos with photoshop
how to use photoshop scripts
how to use blend if in photoshop
how to use adobe photoshop cs5 for beginners
adobe photoshop how to use pdf
how to use smart sharpen in photoshop
how to use bullet points in photoshop
how to use photoshop for pixel art
how to use an image as a fill in photoshop
how to use polygonal lasso tool in photoshop
how to use photoshop software
how to use eraser in photoshop
how to use adobe photoshop elements 10
how to use pen pressure in photoshop
how to use quick selection tool in photoshop cs5
how to use the content aware tool in photoshop
how to use photoshop to make logos
how to use history brush tool in photoshop
how to use a plugin in photoshop
how to use the pen tool in photoshop to cut out an image
how to use blending brush in photoshop
how to use transform in photoshop
how to use the smudge tool in photoshop cs5
how to use installed fonts on photoshop
how to use the healing brush in photoshop cc
how to use the gradient tool in photoshop cc
how to use gradient tool in photoshop cc 2019
photoshop how to use lasso tool
how to use feather tool in photoshop
how to use bullets in photoshop
how to use photoshop for interior design
how to use photoshop clone stamp
how to use adobe photoshop elements 15
how to use your selection as a image photoshop
how to use layers for effects in photoshop
how to use photoshop to test wall colors
how to use perspective in photoshop 2016
photoshop cs6 how to use lasso
how to use border graphics on photoshop
how to use stylus photoshop cc asus laptop
how to use paint brush in photoshop cs5
photoshop how to use the ruler tool
photoshop how to use solidify
how to use control t in photoshop manually
how to use content aware fill photoshop 2017
photoshop how to use rule of thirds overlay
photoshop 12 how to use fill
how to use shape in photoshop to design a invitation
how to use photoshop for ux design
hungryjpeg how to use stylistic alternates in photoshop
how to use layers in photoshop for coloring
how to get color from image to use for text in photoshop
how to use web based online photoshop free
photoshop how to use magic wand tool
how to use photoshop slices you tuve
how to use photoshop pictures on twitch
how to use content aware in photoshop cc 2017
how to use styles in photoshop text
how to use photoshop to create a pattern
how to use eyedropper tool on photoshop
how to use the stitch tool in photoshop
how to use photoshop 2019 book
how to use preset photoshop
how to use textures stock on photoshop
photoshop use brightness and contrast a lot how to keep it close at hand or open till you close it
how to use vray gi channel photoshop
how to use photoshop presets in brodge
how to use brush along path photoshop
how to use photoshop with uf apps
how to use paint brush in photoshop for fonts
how to use jpeg image as style photoshop
how to use slice tool photoshop cc 2019
how to use photoshop all tools
how to use selection tool photoshop cc
photoshop cs6 how to use replace color
photoshop cs5 how to use topaz
how to use i shorctut photoshop in windows
how to use pixelsquid photoshop
how to use photoshop express to make your eyes pop
how to use sharpen tool adobe photoshop cs5.1
how do i update my computer to use photoshop
how to use a vector mask in photoshop
how to use cut mask photoshop
how to use photoshop animations in unity
how to use graphics in photoshop tumblr
how to use a polygonal lasso twice photoshop
how to use bucket in photoshop using 32 bit
how to use image as 3d texture in photoshop
how to use smart lasso photoshop
how to use javascript in photoshop
how to use timeline in photoshop to make seemless gif
how to transfre photoshop to illustrator still able to use paths
photoshop how to use kuler
how to use extract filter in photoshop
how to use keys to move around in photoshop
photoshop how to use index picture
how to use photoshop elemtns on a different macbook account
how to use an at&t tablet with photoshop
how to use transparent text in photoshop
how to use content aware fill photoshop cc 2018
how to use magic wand tool in photoshop to change colour
how to use cutom textures in photoshop
how to use feather in photoshop cs4
how to use the ellipse tool in photoshop
how to save logo in photoshop for use in illustrator
how to use photoshop to get scratchs out of a photo
how to use the magic wand photoshop
how to use adobe photoshop elements 14 special edition
how to make and use overlays in photoshop
photoshop how to use my 3d text layer styles
how to use the pen tool on photoshop
how to use color card for color correction photoshop
how to use photoshop draw business products
google how to use photoshop
how to use clone tool on photoshop
how to use content aware fill to remove clothes in photoshop cc
how to use colour replacement brush in photoshop
how to use add grass to a large area in photoshop
how to use topaz photoshop plugins
how to use lines to create shapes in photoshop
how to use inverse to fade edges in photoshop elements 14
photoshop how to use histogram
how to use content aware scale in photoshop 2016
photoshop how to use color replace
how to use scroll wheel to zoom in photoshop cc2015.5
how to use plays photoshop
how to use photoshop with a trackpad
how to use healing photoshop express
how to use the move tool in photoshop cc
how to use photoshop element organizer beginners
how to use eyedropper tool for brush tool photoshop
how to use artboards in photoshop 2018
how to use the photoshop to print on the fabric
how to use the app photoshop
how to install and use photoshop addons
how to use 30 degrees photoshop
how to use suitcase fusion in photoshop cc
how to use clone stamp tool in photoshop elements 11
how to use adobe photoshop express on windows 10
how to use stylus photoshop cc
how to use photoshop to create black and white photos of patients applying mask
how to use liquify in photoshop with timeline
how to use tf2 font on photoshop
how to use raw images on cs6 photoshop
how to use liquify in photoshop cc 2018
how to use select and mask in photoshop cc 2019
how to use frame tool in photoshop
how to use adobe photoshop to steal roblox maps
how to use donjon dungeons in photoshop
how to use photoshop for swimsuit
how do you use photoshop to make a photo look like a line drawing
how to use photoshop to make greeting card preview
how to use the pen tool to select in photoshop
how to use xmp files in photoshop
how to use vector backgrounds in photoshop
how to use replace color in photoshop elements
how to use the brush in photoshop cs6
how to use sky overlay in photoshop
how to use a straight edge on photoshop
how to use third party tools in photoshop
how to use old photoshop without a licensec
how to use brushes in photoshop elements
how to use a png image in photoshop
how to use photoshop brushes in cs6
how to use plugins in photoshop elements
how to use photoshop for a logo
how to use actions in photoshop 5.5
how to use bubble overlay in photoshop
how to use photoshop product key
how to use adobe photoshop fix for android
how to use cloning stamp in photoshop
how to use greenscreen effect in photoshop cc 2017
how do you add a photo into photoshop in order to use it as a filler
how to use matte in photoshop
how to use photoshop actions easy
how to use wind effect in photoshop
how to use layers in photoshop 2017
how to use photoshop to convert files to cricut
how to use action scripts in photoshop for magazine cover
photoshop how to use card template
how to use adobe photoshop paint brushes
how to use custom photoshop brushes
how to use load channel as selection in photoshop elements
how to use alpha channels photoshop
photoshop how to use layer mask to control edits
how to use the mixer brush tool in photoshop cc2014
how to use bandaid feature in photoshop express
how to use magic wand photoshop cc
how to use photoshop to change a doctors note
how to use atn files in photoshop cc
how to use adobe photoshop in order to change a twith overlauy
how to use a brush to edit exposure in photoshop
how to use photoshop to add graytones to manga
how to use adobe photoshop to make transparent layers
how to make use magic wand on shape photoshop
how to use the color replacement tool in photoshop cs5
how to use photoshop to add a shine like apples logos
how to use select similar in photoshop
how to use curves in photoshop rgb
how to explain in resume that you can use photoshop
how to use pattern rubber stamp photoshop cs5
how to use 3d in photoshop cc 2018
how to use background eraser in photoshop elements
how to use paint to create photos in photoshop
patterns photoshop how to create and use
how to use old paper texture filter photoshop
how to use an otf photoshop
how to use photoshop for digital painting
how to use measuring ruler in photoshop cc
how to use nvidia shadowplay to record photoshop
how to use pro touch in photoshop
how to use color replacement on photoshop elements
how to use the pen tool for curves in photoshop
how to use wave tool in photoshop
how to use photoshop filters in premiere
how to use photoshop change light
how to use photoshop cc 2015 trial over and over
adobe cs6 photoshop tools how to use
how to use images as small references in photoshop for painting
how to use photo pockets in photoshop
how to use extend in photoshop
how to use photoshop when working with hair
how to use inches in photoshop
how to use photoshop without serial number
how to use my photoshop brushes
how to use photoshop to design a menu
how to use illustrating temaplate in photoshop
adobe photoshop portable cs6 how to use
how to use a color picker in photoshop
how to use combine shapes on photoshop
how to use the elliptical marque tool on photoshop
photoshop cs2 how to use layers
how to use clone source in photoshop
how to use laer mask photoshop
how to use overlay photoshop
how to use pen tool in photoshop to curve
how to use mixer brush tool in photoshop for skin color
how to use magic wand in adobe photoshop cs2
how to use the flame filter in photoshop
how to use photoshop cc with serial number
how to use bmp files in photoshop
how to use puppet manipulation photoshop
how to use retouch in photoshop cs5
how to use other fonts in photoshop
how to use new brush in photoshop
how to use photoshop to make a background out of a photo
how to use photoshop to create a collage
how to use dng file to color in photoshop
how to use the cloan stamp tool in photoshop
how to use the lasso tool in photoshop to cut and erase background
how to use add anchor point tool in photoshop
photoshop how to use a sketch mlp
how to use median filter in photoshop cs6
how to use photoshop zip file mac
how to use photoshop new tool
how to use photoshop pen tool cs6 to make an icon
how to use watermark in photoshop cc
how to use spot color in photoshop 6.0
photoshop how to use words to create an image
how to use ugee tablet photoshop cs6
how to use gimp to photoshop faces onto other images
how to use touch up on photoshop
how to use composition tools in photoshop
how to use photoshop without downloading
how to use photoshop to make a picture into a cartoon
photoshop how to use flood plugin
how to use color picker out of photoshop
how to use color code on photoshop
how to use photoshop to make a comic
how to use photoshop to make silk screen
how to use brightness and contrast in photoshop
how to use 3d typing on photoshop
how to use darken blend layers in photoshop
how to use photoshop templates elements
how to use paint brush photoshop
how to make photoshop use 3d even if you dont meet the requirementd
photoessential how to use background eraser in photoshop cs5
timeline photoshop cs6 how to use for sketch
how to use pen tool to cut image in photoshop
how to use lens blur filter in photoshop
how to use liquify in photoshop portrait
how to use extract vectors in photoshop
how to use contact aware in photoshop
how to use photoshop to put your character in video
how to use brush liquify tool in photoshop
how to use magic wand photoshop cs6
how to use same font in photoshop
how to use adobe photoshop cs6 for stop motion
how to use a pattern photoshop cs6
how to use expired photoshop
how to use photoshop puppet warp
how to use photoshop cc in not 4k mode
how to use brush tool in photoshop cc 2017
how to use gradient tool in photoshop 2018
how to use photoshop filters to turn a photo into a painting
how to use photoshop cs5 3d tools
how to use overlays into photoshop
photoshop how to use the close stamp tool
how to use adobe photoshop elements 5.0
how to use photoshop site:youtube.com
how to use a msk in photoshop
how to use photoshop cs6 for graphic design
how to use skew tool in photoshop
how to use custom brushes in photoshop elements
how to use photoshop to improve photo quality
how do you use adobe photoshop to get rid of red eye
how to use checker background in photoshop
how t use photomerge to merg start trail photos by photoshop elements
how to use lightroom cc and photoshop
how to use portable photoshop
how to use layer as mask in photoshop
how to use spothealing in photoshop
how to use save for web in photoshop cc
how to use brush dodge in photoshop cc 2017
how to use the gradient tool in photoshop 2018
how to use the pen tool in photoshop like illustrator.
how to use photoshop text
how to use brown paper layer photoshop
how to use clone stamp tool in photoshop cs6 \
photoshop cs6 how to use text
photoshop how to use ajustments on multiple layers
how to use the paint bucket tool in photoshop on vendor masks
how to use quick selection tool photoshop elements
how to use selection tool in photoshop pdf
how to use lighting wffects in photoshop for kitchwn
how to use student account for photoshop
photoshop how to use stroke
how to use photoshop minecraft packs
how to use plugins with cracked photoshop
how to use chroma key in photoshop cs6
how to use photoshop design space
how to use gbr brushes in photoshop
how to use photoshop pattern in illustrator
how to use adobe photoshop cs6 tools
how to zoom in photoshop and use only that part of the photo
how to use actions on photoshop cc 2017
how to use photoshop to remove blur
how to use photoshop on samsung tablet
photoshop how to make use of channels
how to use pen tool to make selection in photoshop
how to use swashes in photoshop
how to use photoshop with a touch screen and stylus
how to use psdt files in photoshop
how to use fisheye lens photoshop
how to use adjustment tool in photoshop
how to use stack blended images photoshop
how to use stamp tool on photoshop
how to use fill tool with photoshop
how to use vectors from bigstock in photoshop
how to use a previous color in photoshop
how to use photoshop text tool
how to use photoshop archiving
how to use eraser tool in photoshop cc 2018
how to use photoshop blur remove pimples
how to load a brush in photoshop cc and use it on layer
how to use ipad pro with photoshop
how to use photoshop cs6 to make pixel art
how to use gradient in a square photoshop image
how to use a pen tool in photoshop cs6
how to photoshop use commands
how to use an image as a background in photoshop
how to use different fonts on photoshop cs6
how to use topaz simplify in photoshop
how to use a usb drive for a scratch disk on photoshop cc 2017
photoshop how to use greenscreen
how to use grunge brushes in photoshop on tshirt design
how to use photoshop to remove text captions from snapchat pictures
how to use rule photoshop
how to use photoshop files on gimp
photoshop 3d text how to use
how to use layers mask in photoshop
how to use colors photoshop
how to use lasso tool to cut out in photoshop
photoshop cs5 how to use the line tool and remove the arrow setting
photoshop how to use pencil tool
how to use lens correction for multiple pictures in photoshop cs5
how to use ionic font in photoshop
how to use color replacement tool in photoshop cc 2017
photoshop how to use pathing to crop
how to use eraser tool photoshop elements
photoshop how to use pattern brush
how to use photoshop to edit a photo
how to use photoshop cs6 with minecraft
how to use a png photoshop
videos how to use layer masks in photoshop
how to use blending mode in photoshop cs5
how to use a new fill layer in photoshop without erasing a photo
how to use photoshop cc how to bring a photo in and add a person from another photo
how to use adobe photoshop quick selection tool
how to use photoshop brushes in creative ads
how to use graphics processor in photoshop cc
adobe photoshop how to use bucket
photoshop how to use burn tool
how to use a turcom tablet with photoshop
how to use group with photoshop cc
how to use ai vector in photoshop
how to use scripts in photoshop
how to use people groups in photoshop elements
how to use a pdf in photoshop
how to use a vanishing point in photoshop 2018
how to use photoshop cs6 to create a background for website
how to use the pen in photoshop
how to use photoshop healing brush tool
photoshop 2015 how to use onion skin
how to use grany patterns in photoshop
how to cut out piece of image in photoshop to use as layer
how to use photoshop to crop image to just content
how to use puzzle plugin in photoshop
how to use multiple pictues photoshop
how to use the hdr presets in photoshop
how to use actions photoshop cc
how to use the blur tool in photoshop cc
how to use the pattern tool in photoshop
photoshop how to use modifier keys keyboard shortcuts
how to use a gif as a layer om photoshop
how to use your wacom tablet with photoshop
how to use photoshop texture brushes
how to use sharpen brush in photoshop
in photoshop how to use magnetic lasso and smooth
photoshop how to use marquee tool
how to use oil paint in photoshop cc 2015
how to use paragraphs in photoshop
how to use shear tool in photoshop
how to use adobe photoshop cs6 on android
how to use pen tool photoshop illustrator
how to use logo from photoshop in video
how to use texture files in photoshop
photoshop how to use mixer brush
how to use dodge and burn in photoshop
photoshop how to use pen pressure
free photobacks and how to use in photoshop
how to use photoshop to outline art
how to use magnetic lasso tool photoshop
how to use photoshop to make a smart phone mockup
how to use photoshop perspetctive tool
how to use the grain finder on photoshop
photoshop elements clone tool how to use
how to use templates in photoshop elements
how to use the vanishing point in photoshop cc 2019
how to download new fonts and use on photoshop
how to use goz with photoshop
how to use photoshop cs 101 youtube
how to use levels in photoshop across multiple photos
how to use photoshop combine three image 2016
photoshop how to use refine edge
how to use photoshop to make animations
how to use the grid crop in photoshop
how to use photoshop marquee tool
how to use magazine cover in photoshop
how to use the threshold feature in photoshop
how to use smart select in photoshop cc
how to use swash fonts in photoshop
how to use the wond photoshop
tutorial video on how to use merch amazon photoshop template
how to use color drop tool outside of photoshop
how to use photoshop cc for free
how to use the pen tool to outline in photoshop
how to use gradient tool adobe photoshop cc 2015
how to use photoshop to make a picture black and white
how to develop an image in photoshop to use in design space
how do you use the elliptical to free transform in photoshop
how to use middle guides photoshop
how to use photoshop watercolor brushes
how to use pictures in photoshop
how to use photoshop indesign
how to use slice for photoshop
how to use duotone icons in photoshop
how to use photoshop to change to print dimensions
how to use photoshop to create mosaic picture
how to use adobe photoshop 7 step by step
how to use a background on photoshop
how to use text in adope photoshop elements 12
photoshop how to use pencil only single pixels
how to use channels in photoshop cs6
how to use layer mask in photoshop to copy effects onto another
how to use pat file on photoshop change size
how to use actions and overlays in photoshop
how to use redeye tool in photoshop
how to use offset in photoshop
how to use the marquee tool in photoshop to cut in half
how to use photoshop psds in affinity
how to use layers on adobe photoshop
how to use a photos gradient as a paintbrush photoshop
how to use pixelmustache in photoshop
how to use cool fonts with photoshop
how to use photoshop to expend back ground
how to use pens on photoshop
how to use nvidia dds plugin for photoshop
english how to use photoshop 7
photoshop cs6 extended how to use
how to use motion interface in photoshop cs6
how to use photoshop elements 15 from within lightroom 5
how to use filmconvert photoshop
how to use history eraser tool in photoshop
how to use grain in photoshop
how to use the eraser tool photoshop cc 2017
how to use cinema 4d in photoshop
how to use whiten teeth tool in photoshop elements 11
how to use photoshop like instagram
how do i set up photoshop elements 10 to use with canon pro 100 printer
how to use the tools in photoshop cs6
how to use the photoshop tool lasso
photoshop how to use line weight
how to use translucent in photoshop
how to use mouse scroll wheel to enlarge brush size in photoshop
how to use photoshop to change the perspective of an object
how to use photoshop to make mixtape cover
how to use color replacement tool at photoshop
how to use grid in photoshop
how to use refine image in photoshop cc
how to use action in photoshop cs2
how to use background eraser tool in photoshop cs5
how to use image trace photoshop
how to use the pen tool in photoshop to make smooth lines
how to use photoshop to edit photo
how to use eyedropper tool in photoshop cc
how to use photoshop elements 14to change a background
how much does it cost to use photoshop for 1 person
how to use the rectangle marquee tool in photoshop
how to use hue in photoshop
how to use photoshop cc 2018 without a license
how to use the refine edge tool in photoshop cc 2017
how to use 3d photoshop action
photoshop how to use curves with pen toolo
how to use red eye tool in photoshop 2019
how to use adobe color themes in photoshop
how to use paint can in photoshop
how to use pen tool for selection in photoshop
how to use ruler what button on photoshop
photoshop flames filter how to use
how to use photoshop cc pasteing image on to a image
how to use wacom pen with photoshop
how to use camera raw plug in photoshop cs6
how to use photoshop to make scrapbooking
how to use a pic of internet for photoshop
how to use the pen tool to make a selection in photoshop
how to use photoshop to make something brighter
how to use downloaded fonts in photoshop cs6 mac
how to use adobe photoshop for drawing
how to use your ipad with photoshop
how to use a new picture on new layer in photoshop
how to use a green screen with photoshop
how to use clarity in photoshop
how to use stabilizer in photoshop cs6
how to use photoshop elements clone stamp tool
how to use photoshop crop tool
how to use photoshop 3d mode
how to use gradient map photoshop
how to use brushes in photoshop elements 2019
how to use text edit face photoshop
how to use xray in photoshop
how to use to change the background of a pic on adoble photoshop
how to use an alternate glyph in photoshop
how to use a path as a selection photoshop
how to use quick selection tool in photoshop cc 2017 on macbook
how to use touchscreen laptop in photoshop
how to use photoshop for app design
how to use photoshop 3d files in after effects
how to use maguv wand in photoshop
how can you use photoshop to layout graphic novel?
how do i use photoshop elements to make teeshirts
how to use a color wheel in photoshop
how to use dvd clips in photoshop cc
photoshop how to use blue tool
how to use a photoshop gif
how to use a cd template in photoshop video
how to use photoshop for overlapping picture on a picture
how to use close stamp tool photoshop cc 2018
how to use photoshop csinterface
how to use the clone tool in photoshop on a photo
photoshop how to use the clone stamp
how to use gradient tool in photoshop to blue two images together
how to use depth in photoshop
how to use preset actions in photoshop
how to use presets in photoshop you just downloaded
how to use photoshop cc 2015 tablet
how to photoshop maps for architectural use
how to use vectors in photoshop eliments editor
how to use photoshop league overlays
how to use the photoshop red eye tool
how to use adobe photoshop cc to make an add
how to use justify all in photoshop
adobe photoshop how to use second color
this is how we use to clipping mask photoshop illustration tree
how to use a blender photoshop
how to use an adjustment brush in photoshop
how to use photoshop text in illustrator
how to use light tool effectively in photoshop
photoshop how to use a mask to delete
how to use crack adobe photoshop cs6
how to use background in photoshop
how to use position in photoshop
how to use color library in photoshop
how to use color gradients in photoshop
how to use mockup tee template in photoshop
how to use bootstrap grid in photoshop
how to use the gradient tool to fade to transparent in photoshop
how to use freckle pen photoshop
how to use shape tools in photoshop
how to use color range tool in photoshop
how to use photoshop purchased overlays fonts
how to use photoshop to make clothes see through
how to use clone stamp in photoshop elements 7
adobe photoshop cc how to use paint bucket tool
photoshop how to use new refine edge tool
how to use the refine edge tool in photoshop cc
how to use asian fonts in photoshop
how to use a vector mask in photoshop cs6
how to use line stabalization in photoshop
how do i use the image processor in photoshop to compress photos for the web
how to use lasso tool to crop in photoshop
how to use divide photoshop
photoshop how to use multiply
how to use pen tool select photoshop
how to use uv in photoshop secondlife
how to use concept mix action in photoshop
photoshop cc 2018 how to use clone tool
how do i use photoshop to make a picture all black
how to use creative market templates photoshop
how to use the magic wand in photoshop on floor plan
how to use keygen on mac photoshop
how to use the sharpen tool in photoshop elements 2019
how to use photoshop to morph pictures
how to use adjustment center in photoshop
how to use the pen tool in photoshop to cut out things inside images
how to use japanese keyboard in photoshop youtube
how to use clone stamp tool in photoshop cs
how to use the plastic filter photoshop
how to use pen sketch tool in photoshop cs5
photoshop how to use a font pack
how to use adobe photoshop to enhance a picture
photoshop elements how to use stroke
how to use the paint bucket tool in photoshop cc
how to use the ruler in photoshop cs6
how to use gradient tool photoshop cc
how to use photoshop windows 10
how to use the done command photoshop
how to use glyphs in photoshop elements
how to use a brush in photoshop cs2
how to make canvas size use transparent background photoshop
how to use photoshop to create a clothing line logo
how to use downloaded fonts in photoshop mac
how to use psd album templates in photoshop
how to use the eyedropper tool in adobe photoshop
how to use warp on photoshop
how to use smart aware in photoshop
how to use adobe photoshop automate web gallery in windows 10
how to use a path for alpha in photoshop
how to use photoshop template mask
how to use the [entool in photoshop ps
how to use the pen tool in photoshop to create a vector imagfe
how to use brush tool in photoshop straight line
how to use fdr free photoshop double exposure action
how to use photoshop for etsy
photoshop how to use bump map
typekit how to download fonts for use in photoshop
how to use the cutout filter in photoshop
how to use migrate preset in photoshop cc
how to use wacom intuos pro with photoshop
how to use color replacement tool photoshop c6
how to use smooth skin in photoshop
how to use perspective photoshop
how to use image size in photoshop
use photoshop to see how cosmetic look
"how to fix photoshop \"could not use stamp clone\""
how to use acr in cc with photoshop cs5
how to use ink files in photoshop elements editor
how to use student photoshop account
how to save a file in photoshop to use in illustrator
how to use chinese characters in photoshop
how to use references with photoshop
how to use 3d image in photoshop
how to use format painter in photoshop
how to use a stylus on photoshop
how to use fill tool on a svg in photoshop
how to use a downloaded font on photoshop
photoshop background eraser tool how to use
how to use gradient on the sky photoshop
how to use gradient tool in photoshop text
how to use photoshop cc on a tablet
how to use ambient occlusion layer in photoshop
how to use vector in photoshop cc 2014
how to use photoshop to add text to photos
how to use abr files in photoshop
how to use sample eyedropper in photoshop
how to use the magic wand tool in photoshop elements 6
photoshop how to use type
how to use layer outter glow in photoshop
how to use inner glow style in photoshop elements 13
how to use paintbrush on photoshop cs4
how to use photoshop to crop an image the way you want it
how to use clone stamp photoshop cs
filetype:pdf how to use adobe photoshop camera raw 9.7
how to use photoshop brush rar
how to use adobe color theme in photoshop cc
how to use two brushes in photoshop
how to use font awesome icons in photoshop hindi tutorials
how to use outer glow and remove the inner image photoshop
how to use photoshop cs6 to create a background
understanding how to use photoshop
how to use the add back an image photoshop
how to use photoshop after trial period
how to use the clone stamp tool in photoshop 2017
photoshop how to use the gradient tool
how to use adobe photoshop student for two different computers
how to use photoshop to make a animated person
how to use the paint bucket tool in photoshop elements
how to use color guide in photoshop
how to use atn file with photoshop
how to use fonts on photoshop cs5
how to use stylistic fonts in photoshop
how to use the brush tool photoshop
how to use adobe tool to patch photoshop 6.0
how to use adjustment layers for photoshop
how to use photoshop on chromebok
how to use photoshop on a phone
how to use tool in photoshop cs5
how to use polygonal lasso tool in photoshop cs6
photoshop how to use guide file to add photos
how to use delete as photoshop shortcut
how to use photoshop comps to build a webpage
how to use the pencil tool in photoshop for mac
how to use magic wand on photoshop
how to use gradient tool on photoshop on two sides
how to use photoshop to fix a frozen beverage
how to use the quick selection tool in photoshop cs2
how to use photoshop brushes cs6
how to use photoshop for templates
how to use photoshop to make a beautiful headline
how to use psds in photoshop
how to use the various templates that come with adobe photoshop cc
how to use photoshop for clothes
how to use measuring tape in photoshop
how to use adobe photoshop seasonal templates
how to use a custom shape in photoshop
how to use free photoshop shirt template
how to use content aware fill command in photoshop
how to use prespective in photoshop
how to use blend tool in photoshop elements 10
how to use photoshop for t-shirt design
how to use photoshop video editing software 2019
how to use a brush to add blur photoshop
macbook how to use "context aware scale" photoshop
how to use tool presets in photoshop
photoshop how to use color to transparent gradient
how to use color mixer brush in photoshop
how to use video in photoshop
how to use the recompose tool in photoshop
how to use adobe configurator photoshop cc 2014
how to use the horzontal type tool in photoshop
how to use a tablet pen in photoshop
how to use the mixer brush tool in photoshop cc 2014
how to use chromakey in photoshop cs6
how to use adonit jot on photoshop
how to use ao with photoshop sfm
how to use actions on photoshop cs6
how to use a photo as background in photoshop elements
how to use the magnetic lasso tool in photoshop video
how to use particleshop photoshop cs5
how to use text margins in photoshop
how to use filter blur in photoshop 7
how to use a brush to selectively lighten photo photoshop
how to use brushes in photoshop elements 11
how to use square brush in photoshop
how to use a selection in multiple layers in photoshop
how to use artboard in photoshop to design websites
how to use online photoshop to remove
how to use photoshop to paste a face into another picture
how to use a downloaded photoshop mask
how to use the clone tool in photoshop elements 11
how to use file and new in photoshop
photoshop how to use japanese font
how to use photoshop to keep face only
how to use your touchscreen in photoshop
how to use drop shadow photoshop
how to use hsb sliders photoshop
how to use raw photoshop cs5
how to use clone stamp tool in photoshop elements 9
how to use the fill bucket tool in photoshop
how to use a pattern as brush photoshop cs6
photoshop elements how to use spot healing brush
how to use perspective warp on shapes adobe photoshop
photoshop how to use background eraser straight edge
how to use square crop tool in photoshop
photoshop how to use pencil eraser
how to use the clone brush on photoshop
how to use adobe cs6 photoshop
how to use dropper to change color of text in photoshop elements 14
how to use photoshop clone tool on mac
how to use a photoshop ]shape to cut in illustrator
how to use eyeropper outside of photoshop
how to use a template in photoshop elements 14
how to use path to reveal an image in photoshop
how to use photoshop tools from computer on ipad
brush how to use multiple colors in photoshop
how to use alt codes in photoshop
how to use photoshop for sublimation
how to use adobe photoshop to make photo into a caricature
how to use fill bucket in photoshop
how to use blender as photoshop
how to use photoshop elements 18
how to use photoshop to morph photos togethr
how to use gifs in photoshop cs6
how to use transparent background images in photoshop
how to use photoshop cc tumblr
how to use eyedrop tool in photoshop
super png photoshop how to use
how to use a style shet in photoshop
how to use gif image in photoshop
how to use photoshop with zbrush
how to use star tool in photoshop perspective grid
how to tell photoshop not to use si much ram
how to use downloaded filters in photoshop
how to use topaz denoise ai as plugin in photoshop
how to use grow command in photoshop
how to use the animation time line in photoshop
how to use 3d text photoshop cs6
how to use photoshop for drawings
how to use the crop tool in photoshop free
how to use smart pen on photoshop
how to use adobe photoshop elements 13
how to use frame animation in photoshop
how to use brushes in photoshop with photos
how to use the layer mask in photoshop to combine picture
how to use photoshop after trial
how to use bootstrap with photoshop cc
how to use downloaded photoshop actions site:youtube.com
how to use brushes in photoshop cs5
how to use the bruch tool in photoshop
how to use 3d in photoshop cs4
how to use a touch tablet with photoshop
how to use brush tool photoshop elements 13
how to use anchor points in photoshop to create a bezel
how to use a download font photoshop
how to use xp pen with photoshop
how to use displacement map in photoshop elements
how to use a template photoshop
how to use photoshop to fix body curve
photoshop how to use rulers
how difficult is it to use photoshop
how to use content aware to remove object on photo in photoshop
how to use brush if it doesn't work on photoshop
how to use distort on photoshop cc
how to use photoshop plugins in psp 7
how to use gradient map in photoshop cs5
photoshop how to use an abr file
how to use cdr file in photoshop
how to use a mask template in photoshop
how to use photoshop heal cs4 to edit photos
how to use tilt shift blur photoshop cs6
how to use the mixer brush tool in photoshop
how to use gaussian blur in photoshop cc color
can knowing how to use photoshop hel with jobs
how to use replacement color photoshop
how to use photoshop files in animoto
how to use photoshop to edit portraits like professionals
how to use transparent in photoshop cc
how to use downloaded fonts on photoshop mac
how to use font in adobe photoshop
how to use the color picker tool in photoshop elements 15
how to use photoshop perspective warp
books on how to use photoshop
how to use the background remove tool in photoshop
how to use 3d menu in photoshop cs5
how to use adobe photoshop to edit out somthing in a picture
how to use the ruler and pencil tool in photoshop
how to use light flare in eps format for photoshop
how to save photoshop setting and use on different computer
how to use shadow in photoshop without effecting other files
how to use photoshop to get a license plate number
how to use color efex pro 4 in photoshop
how to use photoshop to restore detaill to faded photographs
how to use straighten tool in photoshop elements
how to use content aware scale in photoshop 2019
how to use printer profiles in photoshop cs6
how to use downlaoded brush photoshop
photoshop how to use a font as a brush
how to use hue t get rid of green in photoshop
how to use brushes into photoshop
how to use photoshop with no background
how to use gradient on text in photoshop
how to use square tool photoshop
how to use adobe photoshop cs5 premiere
how to use duotone in photoshop cc
how to use vanishing point in photoshop cc 2018
how to use photo as background in photoshop
how to use psd filters in photoshop for gifs
how to use photoshop for retards
how to use the camera rotate tool in photoshop
how to concept art use photoshop
how to use window fonts in photoshop elements
how to use photoshop 7.0 for beginners
how to use the professional brochure template in photoshop
how to use photoshop to measure
how to use ruler in photoshop cs6
how to use invision craft with photoshop
how to use greenscreen in photoshop cs2
how to use a point to lock and transform from photoshop
how to use crosshatch in photoshop
how to use photoshop bridge in cc
how to use the swashes on photoshop with text
photoshop cs3 how to use channels
how to use firewall to block internet connection of photoshop
how to use touch rotate in wacom tablet in photoshop
how to use rule on photoshop
how to use photoshop something out
how to use photoshop elements 13 to the fullest
how to use hue in photoshop cs6
youtube and how to use photoshop
how to use pictures as textures for text in photoshop
how to use cloud with photoshop
how to use brush tilt surface book photoshop
how to use a custom pattern in photoshop
how to use photoshop to make negatives bigger
how to use photoshop to convert photo to blueprint
how to use avery cd template in photoshop
photoshop how to use blur tool
how to use flares in photoshop
how to use actions on gifs in photoshop cs5
how to use a wacom bamboo tablet with photoshop
how to use fonts on adobe photoshop
how to use grapgic packs photoshop
how to use envato watercolor action in photoshop cs5
how to save just a msp character to use in photoshop
how to use the ipad pro as a wacom tablet for photoshop and illustator
how to use a digital pad with photoshop
how to use conceptum in photoshop
how to use photoshop to turn images into drawings
how to use content aware move tool in photoshop cc
how to use photoshop cs5 for beginners
how to use photoshop patterr=b
how to use magic eraser tool photoshop
how to use a picture as a draw tool photoshop
how to use an alternate glyph in photoshop cs6
how to use dgk color tooks with photoshop
photoshop cs6 how to use slice tool
how to use the dripper on photoshop to cover up something
how to use curves to edit osphot in photoshop
how to use airbrush tool in photoshop 17
how to use adobe photoshop for iracing paint schemes
how to use vector patterns in photoshop
how to use lrtemplate in photoshop
how to use black and white point in photoshop 2019 to adjust color cast with black and white points
how to use a mirror in photoshop draw
how to use fonts from dafont in photoshop
how to use costco printer profiles in photoshop
how to use the line tool in photoshop cs5
how to use adobe bridge between photoshop and illustraitor
how to use the scale crop tool photoshop
how to use a monoprice tablet photoshop
how to use solid color in photoshop
how to use guide lines in photoshop cs6
how to use color range to change all of one color to another in photoshop
how to use flames from picture in photoshop
how to use the pen with my huion tablet in photoshop
how to use photoshop on your phone
how to use replace color in photoshop cs5
how to use photoshop for giving my pictures a look
how to use halloween digital stamps using photoshop cc on youtube
how to use lasso photoshop
how to use photoshop spone tool
how to use wacom tablet with photoshop make lines less jagged
how to use elliptical marquee tool in photoshop
how to use photoshop to make npc in skyrim
how to use photoshop to edit a scanned document
how to use photoshop hdr merge
how to use levels in photoshop elements
how to use a screen overlay photoshop
how to use the fill method in photoshop
how to use pen tool in photoshop youtube
how to use pain bucket tool in photoshop youtube.com
how to use snap in photoshop
how to use photoshop com classes
how to use photoshop with two monitors
photoshop how to use healing bruch
photoshop how to use layer elements 14
how do i use the selection tool to cut an image out, then feather it in photoshop cc?
how to use photoshop to edit hair
photoshop how to use channels to mask
how to use photoshop for drawing and tools and shading
how to use liquify in photoshop 2019 to straighten clothes
how to use photoshop as a rip software for screen printing
how to use photoshop to make passport size photo
how use and image to make a pattern in photoshop
how to use the brush tool in photoshop to remove spots
how to use photoshop to merge two images
photoshop how to use flame
how to use adobe photoshop cc 2017 for iracing paint schemes
how to use photoshop to crop out background and just leave product
photoshop cs6 how to use clipping masks
how to use photoshop on another hard drive
how to use the airbrush tool in photoshop
how to use symbols photoshop elements
how to use smart sharpen filter in photoshop
how to use fire overlay in photoshop elements
photoshop how to use inks to erase
how to use photoshop to remove a watermark
how to use oil paint filter in photoshop cs6 grayed out
how to use silky shark for photoshop
how to use the pen tool in photoshop to make a line for a pencil
how to use custom brushes in photoshop touch
how to use vanishith point in photoshop
how to use photoshop camera raw
how to use load photoshop actions
how to use the blending tools in photoshop
how to get lightroom to use an older version of photoshop
how to use photoshop creative cloud
how to use your tablet with photoshop
how to use curve presets in photoshop elements 6
how to use photoshop lessons
how to use fill colour in photoshop
how to use sunburst on photoshop
how to use a ttf file in photoshop
how to use refine edge on hair in photoshop
how to use hair brush photoshop
how to use photoshop to make images clearer
how to use a grid in photoshop
how to use photoshop to change background
how to save part of a picture to use later in photoshop
photoshop how to use out of gamut view for printing
how to use the align tool in photoshop
how do you use photoshop to blend two pictures together
how to use blender to color objects like you would in photoshop
how to use spot remover in photoshop
wikihow how to use the type ttol on photoshop
tumblr photoshop how to use free tansform
how do i use adobe photoshop 2.0 serial number to upgrade
how to use hsb mode photoshop
how to use a masking tool to select photoshop
how to use lightroom in photoshop
how to use alien skin in photoshop cc
how to use photoshop cs7 pdf free download
photoshop how to use polygonal lasso tool to clean
how to use photoshop fill tool
photoshop how to use line tool
how to create a logo and send it to mobile phone to use in photoshop
how to use transform warp in photoshop
photoshop cc how to use paths
how to use the color swap tool in photoshop
how to use paint to photoshop documents
how to use adobe photoshop magic wand tool
how to use photoshop actions in paint shop pro
how to use photoshop to capture image without the background
how to use cc packs in photoshop
how to install use photoshop layer styles
how to use gifs in photoshop?
how to use perspective tools extention photoshop
how to use soft brush in adobe photoshop
how to use photoshop to make a fall look
how to just use mouse in photoshop to move pictures
how to make a photoshop image use black only to make grey color
how to use tabs photoshop cc
how to use green screen with photoshop
how to use magic lasso in photoshop
how to use photoshop to make a picture into a drawing
how to use current picture as pattern photoshop
how to use paper sketch in photoshop
how to use the lasso tool in photoshop to crop
how to use photoshop for a thumbnail youtube
how to use scanner in photoshop cc 2015.5
how to use the dodge tool in photoshop elements 13
how to use photoshop to adjust color
dispersion photoshop how to use
how to use photoshop to morph pictures together
how to use gradient presets in photoshop
how to use pixel sorting photoshop action
how to use photoshop to make comics
how to use 3d painting in photoshop
how to use an imovie video in photoshop
photoshop how to use image as mask
photoshop how to use eraser gradient
how to use the shake reduction in photoshop cc
how to use photoshop to kins on second fe
how to use photoshop with imac and pencil
bootstrap photoshop responsive how to use
how to use photoshop to create cartoon
adobe photoshop cs6 how to use
how to use the clone tool in photoshop cc
how much ram is recommended to use photoshop
how to use fire brush photoshop
photoshop how to use a layer as a layer mask
how to use oen and vecture on photoshop
how to use action tools photoshop the command select is currently unavaliable
how to use the brush in photoshop cx5
how to use style on th photoshop timeline
how to use adobe photoshop quizlet
how to use gradient in photoshop on text
how to use obj with mtl photoshop
how to use a clipping mask in photoshop cs3
photoshop how to use image as brush
how to use colored pencil brush set photoshop
actions photoshop how to use
how to use adobe photoshop c55
how to use magic wand tool in photoshop background
how to use imagenomic portraiture in photoshop
how to use bridge in photoshop
how to use purchased brushes in photoshop cc
how to use free transform photoshop
how to use photoshop element 2018
how to use an image as text fill in photoshop
how to use lasso in photoshop to cut background
how to use brushes on photoshop 2018
how to use vignette in photoshop cs6
how to use lasso tool in photoshop to cut out images
how to use clone stamp in photoshop 7
lifehacker how to use photoshop
how to use adobe media encoder to import movie and audio into photoshop
how to use photoshop for twitch
how to use photoshop to make pillows
how to use brushes to photoshop
how to use a file with multiple editable patterns in photoshop
how to use photologo in photoshop
how to use adobe photoshop elements 8.0 mac text
how to use whiten teeth tool in photoshop elements
wacom drawing tablet how to use wight in photoshop
how to use brushes downloaded for photoshop
learn how to use photoshop cs5
how to use color map photoshop
how to use photoshop cc 2017 for circle inside of a circle
photoshop how to use gifs
how to use the same color as the image on photoshop
how to use skew photoshop
how to use iphone photo in photoshop
how to use clone stamp photoshop fix
how to use the clipping mask in photoshop
how to use the pen in photoshop cc
how to use photoshop to draw person in pool
how to use photoshop to scale down an image on a new layer
how to use watercolor filter in photoshop
how to use photoshop premere elements
how to use photoshop with a touch screen laptop
how to use pen with photoshop
how do i use photoshop to make a picture all balck
how to use photoshop the ultimate guidebook pdf
how to use a custom pattern overlay in photoshop
how to use photoshop cs5 3d letters tools
how to use photoshop animation timeline
how to use illustrator text in photoshop
how to use similar colors using photoshop
how to use saved selections in photoshop cs6
how to use ipad as a drawing tablet photoshop imac
how to use filter tree tree in photoshop
how to use light streaks in photoshop
how to use clone stamp photoshop elements on mac laptop
how to use touch on photoshop
how to use lasso tool in photoshop to edit
how to use a smart object photoshop
how to use photoshop to edit animations
how to use photoshop as a photo editor in coreldraw
how to use paint brush in photoshop elements 11
how to use photoshop adobe stock templates
photoshop how to use unsharp mask
how to upload a font to use in photoshop
how to quickly use photoshop to take better portraits
how to use photoshop save png 300 dpi
how to use distort sphere in photoshop
how to use an outline of a person in photoshop
how to use photoshop psd files
how to use pen tool in photoshop elements 8
photoshop how to use a gradient map
how to use perspective warp in photoshop to make it wrap around
how to use photoshop cc on surface pro 6
photoshop how to use tiny fonts
how to use photo filter layers in photoshop
photoshop 5.5 how to use pantone colors
how to use select and masks in photoshop cc
how to use a fill layer in photoshop cc
how to use adobe photoshop cc 2015 for beginners
how to use the modify in photoshop
how to use winzip on asus for adobe photoshop elements
how to have photoshop use pressure sensitive
how to use photoshop to draw a druid
how to use custom ui in photoshop
how do i use the spot healing brush in photoshop to remove phonelines
how to use the perfect eyes action in photoshop
how to use grid photoshop cs6
how to use photoshop cc 2016
how to use a masking layer in photoshop
how to use the lasso tool in photoshop cc 2017
how to use text overlays in photoshop
how to use wacopm tablet with photoshop
how to use gradient tool in photoshop to blur two images together
photoshop color mode settings how many bits to use
how much ram to use photoshop elements
how to use a blur brush in photoshop elements
how to use the lightening brush on products in photoshop
photoshop how to use quick selection tool
how to use photoshop to change dimensions of entire folder of pictures
how to use stock images in photoshop
how to use photoshop premiere elements to make audio cd
how to use the clone stamp too photoshop
how to use multiple brush pack in photoshop
showed my uncle how to use photoshop
how to use red eye removal in photoshop
how to pick up color from an image to use in photoshop
how to use .sketch as smart object in photoshop
how to use cutting tool in photoshop
how to use photoshop templates cc 2017
how to use corel photoshop x2
how to use photoshop to fix a blurry picture
how to use photoshop for photo editing
how to use trackpad to zoom photoshop
how to use photoshop adjust transparency
how to use opensansemoji photoshop
how to get photoshop to use hardware acceleration
how to use isolate an image in photoshop cs5
how to use pen tool in photoshop 2016
how to use bucket on photoshop to fill in without jagged edge
how to use photoshop to make a image resize to 4:5
how to use normal maps in photoshop post production
photoshop how to use brush strokes
how to use high pass filter gaussian blur photoshop
how to use keyframes in photoshop
how to use special glyphs in photoshop cs3
how to use the magic wand in photoshop on a laptop
video on how to use photoshop
how to use paint bucket on photoshop
how to use oil paint in photoshop cs6
how to use alpha channel to create a shadow in photoshop
how do i use photoshop to enhance pictures?
how to use a kindle tablet for photoshop
how to use photoshop cs5 3d tools step by step
do developers need to know how to use photoshop
photoshop how to use action
perfectly clear v3 how to let photoshop and paint shop use it
how to use shift to go through tools on photoshop
how to use photoshop with touch screen laptop
how to use place embedded in photoshop
how to use the vector mask in photoshop
how to use old photoshop on mojave mac
how to use photoshop cs6 to make a website
how to use photo online in photoshop
how to use photomerge in photoshop elements 15
photoshop how to use brussh
how to use another picture as a screen on another picture in photoshop
how to use the rectangle tool in photoshop cc
how to use perfect photo suite within photoshop onone
how to use adobe photoshop with merch amazon
how to use the step backward tool on a mac in photoshop online hotkeys
how to use photoshop patch tool cs6
how to use older plugins on photoshop
how to use quick selection tool on photoshop 2017
adobe photoshop 8 how to use
how to use scissors in photoshop
photoshop elements how to use clone stamp
how to use an illustrator seamless pattern in a photoshop file
how to use free photoshop contents in photoshop elements 10
how to use actions in photoshop site:youtube.com
how to use photoshop to design planner stickers
how to use layer mask to control transparency photoshop
how to use smart guides in photoshop
how to use fuzzy tool in photoshop
hue saturattion photoshop how to use
how to use photoshop cc 2014
how to use photoshop to shade with color on a floor plan
how to use rulers in photoshop
how to use liquid layout in photoshop
how to use photoshop for pictures
how to use blur tool in adobe photoshop
how to use cricut with adobe photoshop
how to use photoshop to look though clothes
how to use free photoshop tool
how to use grunge brushes in photoshop
how to use pantone colors photoshop
how to use photoshop on macbook pro
how to use the smoothing tool photoshop
how to use photoshop advanced
how to use curves adjustment in photoshop
photoshop how to use ruler tool
how to use photoshop cc to make a logo
photoshop brush designs how to use
how to use photoshop to make embosed words on snake skin
how to use adobe photoshop premiere pro free
how to use healing patch tool in photoshop
how to use tools in photoshop cs6
how to use craft with photoshop
how to use silver color in photoshop
how to use photoshop for architecture
how to use lens flare on photoshop
how to use actions in photoshop lite portable
how to use bucket fill tool in photoshop
how to use photoshop ae
how to use content aware photoshop cc 2018
how to more efficiently use the pen tool photoshop
how to swithc photoshop to use pixels instead of inches
how to use lightroom and photoshop together
how to use actions on photoshop 7.0
how to use images as patterns in photoshop
how to use move fonts from downloads to photoshop
photoshop paper texture how to use
how to use gradient tool in photoshop to fade layers
how to use skin brush photoshop
how to use content aware tool to remove smudges photoshop cc
how to remove background to use digital background photoshop cc
how to use genuine fractals 6 in photoshop
photoshop how to use fold brushes
how to use lock transparent pixels in photoshop
how to use photoshop to remove dot patterns
how to use sss pass in photoshop
how to use patch for adobe photoshop cs6
how to use photoshop cc 2019 slice
how to use photoshop pen tool cs6
how to use the patch tool in photoshop cc 2018
how to use a custom brush in photoshop
how to use charicture photoshop action
how to use photoshop express to add a person to photos
how to use a bullet point in photoshop
how to use the main features of the photoshop interface
how to use your photoshop actions
how to use adobe photoshop elements 13 to cut and replace photo section
how to use a 8 bit rgb in photoshop
how to make crop use pixels not inches photoshop
how to use photoshop to add nd filter look
photoshop how to use plugins
how to use a photoshop action on a photo
how to use amt emulator photoshop cc 2017
how to use gimp 2 to photoshop
how to use strokes in photoshop
how to use photoshop smart guides ps cs5
how to use spot healing brush in photoshop 2017
how to use photoshop lightroom 5
how to use process control patches in photoshop
how to use dehaze in photoshop
how to use content aware planter in photoshop
how to use curves photoshop
how to use a vector image in photoshop
booklet layout for photoshop how to use
how to set photoshop to use less ram
how to use photoshop to put someone else in your licture
how to use content aware filter photoshop
how to use photoshop lr for editing pictures
how to use dxo photolab3 in photoshop
how to use manipulation in photoshop
how to use frequency separation photoshop
how do i switch photoshop to use pen workspace
how to use force touch macbook pro photoshop
how to use artboard in photoshop
how to make use of pen tool in photoshop with pictures wikihow
how to use stylus pen tablet photoshop
how to use photoshop free course
how to use magnetic lasso tool photoshop elements
how to use the photoshop express app
how to use glow brushes in photoshop
how to re use your layer styles in photoshop
how to use color replace photoshop
how to use a texture photoshop
how to use glow in photoshop
how to use photoshop to eliminate
how to use the line shape tool in photoshop
how to use type font ornaments fonts "photoshop"
how to use photoshop dds plugin for fs9 paints
how to learn to use photoshop for free
how to use photoshop to make things look glitchy
how to use mask layers in photoshop
how to use photoshop without artboards
how to use gradient tool on an image in photoshop
how to install and use older versions of photoshop
how to get color from picture to use photoshop
how to use the pencil tool in photoshop cs3
how to use an action photoshop tumblr
how to use lock transparency in photoshop
how to use topaz clean in photoshop cs6
how to use photoshop and craft manager
photoshop how to use color sampler tool
how to use the dropper to get a color in photoshop
how to use external tools in photoshop
how to use soft eraser in photoshop
how to optimize a photoshop image for use in indesign?
in photoshop 7 how to use the clone tool
how to use insert photo into photoshop
how to use photoshop in tablet mode
how to use transform tool to change height and width in photoshop
how to use the patch tool to remove glare in photoshop cs5
how to use flame filter in photoshop cc
how to use photoshop bubble overlays
how to use typography on photoshop cc 2017
how to use adobe photoshop to create thumbnail
how to create a watermark in photoshop and use it in lightroom
how to use paint to photoshop heads windows 10
photoshop tutorials on how to use the various tools pdf
how to use the pen tool in photoshop to draw
how to use photoshop cs3 to edit photos
how to use rgb colors in photoshop elements
how to use pen tool to cut out image in photoshop
how to use a pattern fill in photoshop without lines
photoshop how to use guides
how to use slice tool in photoshop elements 14
how to use magic wand tool in photoshop to add
how to use a stencil in photoshop
how to use a quick mask in photoshop
how to make a brush on photoshop use pen pressre for tablet
how to use anti aliasing in adobe photoshop
how to use the slice took in photoshop
how to use adobe photoshop 14
how to use layers shapes in photoshop elements 15
how to use extract in photoshop
how to use multiply in photoshop with clip art
how to use render flame in photoshop
how to use photoshop focus
how to use masks with camera raw photoshop
how to use vistaprint templates in photoshop
how to use pen tool in photoshop 2019
how to use the mirror effect while drawing in photoshop
how to use lasso took photoshop
how to use timeline in photoshop cs5
how to use the clone clamp photoshop
how to use the photoshop background eraser tool
how to use photoshop to overlay images
how do i use photoshop to convert a film negative to positive?
photoshop cs6 how to use patterns
how to sample color and use it in photoshop
how to use ctrl +u in photoshop
how to use your own fonts in photoshop
best nyc class to learn how to use photoshop
how to use pen tool to isolate layer photoshop
how to use the magnetic lasso tool in photoshop to change color
how to use photoshop patterns in gimp
how to use burn toolin photoshop
how to use craft sync with photoshop
how do i use photoshop elements to reduce a photo for emailing
how to select use white photoshop
how to use clipboard on photoshop mix iphone
how to use photoshop to remove watermarks from photos
how to use the bandaid tool in photoshop elements 12
how to use photoshop to make text look old like it came from an old typewriter
how to use content aware move tool in photoshop cc 2018
how to use a texture as a layer mask in photoshop
how to use photoshop bridge cs4
how to use an image as a parttern fill in photoshop
how to use warm and cool tones in photoshop
how to use pen tool in photoshop to make a clipping mas
how to use pixlr levels in photoshop
how to use mask to change the picture photoshop
how to use repousee in photoshop
photoshop cc how to use 3d camera
how to use photoshop cs5 without adobe id
how to use photoshop in tablet
how to use image of glass for windows in photoshop
how to use color replacement on photoshop
how to use photoshop to edit images tumblr icons
how to use photoshop for pretty instagram pictures
how to use photoshop with the entreprise id
how to use photoshop artboards
how to use control to select multiple layers in photoshop
how to use photoshop cs6 to make a book cover
how do you use photoshop elements 13 to put someone into another picture?
photoshop how to use curves with pen tool
how to use notes in photoshop
how to use control t in photoshop
how to use adjustable lasso in photoshop
how to use a font you downloaded in photoshop
how to use multiple paths photoshop
how to use half ruler on photoshop
how to use clipart in photoshop
how to use 3d extrusion in photoshop cc
how to use spot healing brush tool photoshop cc
how to make photoshop use less ram
how to use filter in photoshop cs5
how to use a pattern photoshop cc
how to use photoshop to make the half face illuson
how to use puppet warp in photoshop to change the flow of water by greg benz
how to use lightroom adobe photoshop
how to use texture packs in photoshop
how to use files meant for adobe photoshop
how to use paintbrush tool photoshop
how to use photoshop cs5 after trial period
how are you supposed to use both hands when working in photoshop
how to use the marker in photoshop cc
how to take a pattern in photoshop and use it with the paint brush
how to use the lens blur filter in photoshop
how to use photoshop without adobe creative cloud
how to use image as background in photoshop
how to use layers and filters in photoshop
how to use spot restore photoshop
how to effectively use photoshop on green screen
how to use the strobe in photoshop elements
how to use the color tool in photoshop
how to use different fonts in photoshop
how to use adobe photoshop code
how to use photoshop for squarespace
photoshop how to use clone stamp tool
how to use clipping mask in photoshop elements 14
how to use photoshop masks for anime
how to use the detail brush photoshop elements 15
how to use one tool with 2 cursors photoshop
how to use a picture as a layer in photoshop
how to use outline of the shapes only photoshop
how to use downloaded photoshop brushes in elements 14
how to use fill tool with photoshop no fringe
how to use hp selection pen with photoshop
how to use the subtractive selection in quick selection tool in photoshop
how to use the shape tools in photoshop by good creative academy
how to use border templates in photoshop
how to use deco 01 tablet in photoshop
how to use photoshop to create uv maps
how to use pen tool in photoshop hair
how to use photoshop sketch action tutorial
photoshop how to use vector inside selection
how to use haze filter photoshop
how to use animation photoshop cs5
how to use stack in photoshop
how to use drop shadow tool photoshop
how to use lut in photoshop cs3
how to use photoshop for sprite animation
how to use adobe color palette with photoshop?
how to use surface pen with photoshop
how to use warp text in photoshop
how to toggle the use of escape in photoshop
how to use photoshop to make template for website
how to use photoshop plugins for to make scrapbooking embellishments
how to use sky overlays in photoshop cc
how to use actions photoshop elements 10
how to use clone stamp mac photoshop
how to use a photoshop action cc
how to use camera raw functions from inside photoshop
how to use freepik vectors in photoshop
how to use copy in photoshop
how to use photoshop batch
how to use rar file in photoshop
how to use photoshop express on iphone
how to use pngs from internet on photoshop
how to use high pass filter in photoshop
how to use spot removal in photoshop
how to use alpha in photoshop
how to use photoshop automator batch edit
how to use timeline photoshop cs5
how to use lasso tool photoshop cs6
how to use gimp to make logo without photoshop
how to photoshop use
how to use the lasso tool in photoshop elements
how to use the polygonal lasso tool to cut an image in photoshop
how to use styles file in photoshop cc
photoshop cs2 how to use color replacement
how to use free wand in photoshop
how to use luminance in photoshop
how to use smooth tool in photoshop
how to use new textures photoshop cs6
how to use symbols in photoshop on mac
how do you get photoshop to use morecou cores
how to use brushes photoshop cc 2017
how to use photoshop cs6 to draw
photoshop how to use brush storkes
how to use adobe bridge in photoshop
how to use photoshop for forensic enhancement
how to use emoji in photoshop
how to use photoshop clone tool when you can't right click
photoshop cs6 how to use plugins
how to use the text tool in photoshop
how to use portrait professional in photoshop cc
how to use photoshop to make a picture look 3d
photoshop how to use quick mask
how to use enchanted watercolor kit template in photoshop cs6
how to use expand tool photoshop
how to use layers to paint in photoshop cs2
how to use photo references in photoshop
how to use the sharpening brush in photoshop
how to use free transform in photoshop cs5
photoshop how to use paths
how to use the photoshop
how to allow photoshop to use more ram
how to use clone tool mac photoshop
how to download and use a photoshop action
how to use color sampler photoshop
how to use psd files in photoshop cc
youtube how to use quick mask in photoshop
how to use photoshop cc 2017 noise reduction
how to use table in photoshop
how to use the dropper tool from photoshop
how to use vanishing point tool photoshop
how to use photo po kets in photoshop
how to use one imagie to punch out another image in photoshop
how to use gradient tool photoshop cs6
how to use actions to photoshop cs6
how to use a opacity brush in photoshop
how to use drawings in illustrator in photoshop
how to use paint bucket in photoshop on different layer
how to use photoshop element 12 smart brush
how to use photoshop 7 for art
how to use the airbrush tool in photoshop cs6
how to use the clone tool in photoshop on a photo on a mac
how to use a photoshop file with afet effects
how to use photoshop to make a label
how to use pen tool in photoshop elements 14
how to use color picker in photoshop cs5
how to use custom brushes photoshop
how to use presets in photoshop elements
how to use photoshop to enhance photos
how to use layers in photoshop cc 2017
how to use brusheezy pattern packs in photoshop cc
how to use photoshop to save pdf to specific file size
how to use photoshop windows 2010
how to use fractal effect photoshop
how to use the fade tool in abode photoshop cc
how to use font flourishes in photoshop
how to use print studio pro with photoshop
how to use paint as photoshop
how to use license key photoshop
photoshop layers how to use
how to use symbols character in photoshop cs6
how to use polygon background photoshop
how to use drawing references while in photoshop
how to use adobe photoshop to edit an already existing id
photoshop how to use camera blur
how to use the magic wand in photoshop on a macbook
i taught my dad how to use photoshop
how to use healing bruch in photoshop 2018
how do i isolate an object in photoshop to use in illustrator
how to use peltmade photoshop
how to use brush tool in photoshop on layers
how to use png images in photoshop
how to use the color dropper with text in photoshop
tumblr how to use psds without photoshop
how to use an svg files photoshop or illustrator
photoshop cc how to use the eyedropper tool and select a color from another image
how to use refine edge in photoshop elements
how to use layer blending modes in photoshop
how to use photoshop on a generic tablet
how to use photoshop to create website
quick how to use adobe photoshop on a picture
how to use the healing brush in photoshop cs5
how to use smart objects in photoshop elements
how to use .eps photoshop
how to save an illustrator pattern to use in photoshop
how to use background eraser tool in photoshop?
how to use the history brush in photoshop cc
how to use photoshop to scale an image
how to use photoshop on a pc
how to use photoshop to make animation
how to use photoshop to subtitle video
how to use select tool in photoshop cc
how to use my vinyl cutter on photoshop
how to use tilt photoshop
how to use wrinkle brush photoshop
how to use photoshop to resize an compress image
adobe photoshop how to use pen tool to cut out an image
how to use photoshop guidelines
how to use an adjustment layer in photoshop
how to use masking to remove object in photoshop
photoshop how to use hisogram
how to use photoshop to make your avatar talk
how to use photoshop to make bookcovers
how to use transparent background images on photoshop 2019
how to use motion blur photoshop
how to use photoshop sharpening actions
how to use healing tool to remove the acne at photoshop
how to use select and mask in photoshop cc 2015.5
how to use find and replace text in photoshop
photoshop cs6 how to use pen tool
how to use color palette in photoshop
how to use topaz remask in photoshop
photoshop how to use shape
how to use photoshop to make png file
how to use templates in photoshop 2015 cc
how to use a cracked photoshop
how to use the cloning tool in photoshop elemenrs 15
how to use the blur filter in photoshop
how to use the blend in adobe photoshop
how to use a photoshop sketchpad to trace
how to use vignette in photoshop elements expert
how to use eraser tool in photoshop on photos
how to use texture tool photoshop
photoshop how to use level
how to use the space around the canvas in photoshop
how to use photoshop to create five pencil light and dark image
how to use saved actions in photoshop cs6
how to use auto blend in photoshop
how to use new photoshop brushes
how to use the pen tool in photoshop to select stuff
how to use brush tool in illustrator when opening a pdf from photoshop
how to do i use the clone stamp photoshop cs5
if you dont know how to use photoshop
how to use stamp clone tool in photoshop
how to use onone free plugin to photoshop
how to use adobe photoshop express app
photoshop how to use atn file
how to use pen tool photoshop cc
how do i get obs to use photoshop
how to get around product key in use photoshop cs6
how to use channels in photoshop to change the color of a shirt
how to use the same style of text as barbara krueger in photoshop
how to make a photoshop image use black only to make grey
how to use the pillow emboss fx in photoshop
how to use a square paint tool in photoshop
how to use the mirror tool in photoshop
training on how to use adobe photoshop
how to use photoshop cs5 anchor point line segment shortcut
how to use photoshop elements clone tool
how to use the rectabgular merquee in photoshop
how to use text path in adobe photoshop elements 18
how to use sosa font in photoshop
how to use tpl brushes photoshop
how to use dingbats in photoshop elements
how to use photoshop to restore images
how to use a photoshop plugin
how to use eyedropper tool outside of photoshop
how to use photoshop path tool
how to use gradient tool in photoshop for vinyett
how to use adobe illustrator and photoshop for free
how to use the color replacement tool in photoshop elements 10
how to use presets photoshop
how to use tablet pen in photoshop
how to use patterns files in photoshop cc
how to use photoshop cs4 to edit jpeg
how to use pattern in photoshop as background layer
how to use photoshop sharpening actions gif
how to use photoshop in edu sketchup
how to use simple line icons websfont in photoshop
how to use spot healing in photoshop
photoshop how to use pen too
how to use the select and mask tool in photoshop cc
how to use the laissez effect on photoshop
how to let photoshop use harddrive for ram
how to use the eraser tool on photoshop
how to use amt emulator on photoshop
how to watch tv and use photoshop
how to use signature in photoshop
how to use photoshop to erase background hair
how to use photoshop rotate tool
how to use a writing tablet in photoshop
how to use typography in workspace photoshop 2017
how to use a photoshop token template
how to use adjustment layer in photoshop on only one layer
how to use photoshop grunge brushes
how to use measurement scale photoshop
how to use huion tablet with photoshop
how to use healing tool in photoshop
how to use healing brush photoshop cc
how to use the lasso tool on adobe photoshop
photoshop how to use marquee tool to cut objects
how to use adobe patch photoshop
how to use brush to make patterns in photoshop elements
how to use the pen tool to draw curves in photoshop
how to use clone stamp photoshop ps elements 13
how to use a certain peice of a photo in photoshop
how to use clone stamp in photoshop cc 2017
how to use average filter in photoshop
how to use fake bakes in photoshop
how to use photoshop without signing into adobe?
how to use the clone stamp in photoshop cc
lightroom classic photoshop cc how to use 3d
how to use new paintbrushes in photoshop
how to use surface pen with photoshop cs6
photoshop elements how to use magnet lasso
how to take a photo from the library on mac and use it in photoshop
how to use adobe photoshop well
how to use .tpl in photoshop
how to use codes to get adobe photoshop
how to use a saved gradient map in photoshop?
how to use a photo of yourself and turn it into anime in photoshop
how to use blending options on multiple layers in photoshop
how to make use of graphics card photoshop
how to use lightroom and photoshop
how to optimize photoshop for tablet use
how to use photoshop with page cloud
how to use photoshop to edit jpeg file
how to use photoshop to see through redaction
how to use a photoshop action in cs5
how to use photoshop templates free
how to use photoshop actions with layers
how to use a reference image in photoshop
utube photoshop how to use transform tool
how to use greenscreen images in photoshop
how to use photoshop elements organizer 2019
how to use the color picker overlay in photoshop cs4
tumblr tutorial on how to use brushes in photoshop
how to use the eyedropper in photoshop
how not to use a color in the mixer brush in photoshop
how to use backward slash key in photoshop
how do i use photoshop to turn color images black and white
how to use dispersion brush in photoshop
how to transparent photoshop file for use in illustrator
how to use a pen tool on photoshop
imagenomic portraiture how to use photoshop
how to use photoshop to soften skin
how to use photoshop to remove part of a picture
how to use the blend option with a photoshop brush
how to use scanner in photoshop
how to use content aware to fill an empty space in photoshop
photoshop how to use color and tone on old photos
how to use a phone for photoshop
how to use the refine edge tool in photoshop 2017
how to use do invision kit on photoshop
how to use place command in photoshop
how to use photoshop to make hdr photos
how to use soft light in photoshop deviantart
how to use pen text in photoshop
how to use the clone stamp tool cc photoshop
how to use aco file in photoshop
how to use tone curve in photoshop
how to use photoshop to set a picture to 169
how to use greenscreen in photoshop
how to use pen tool in photoshop dashed line
how to use photoshop to make contact sheet
photoshop cs5 how to use patch tool
how to use ctrl f5 on photoshop
photoshop how to use a pattern brush
photoshop how to use smart filters
how to use glitter brushes photoshop
how to use photoshop action set
how to use adobe photoshop from external hard drive
how to use diffuse glow in photoshop
how to use art history brush tool in photoshop
photoshop how to use artboards
how to use the persepctive crop tool in photoshop
how to use auto tone photoshop
how to use photoshop button templates
timeline photoshop cs6 how to use for drawing
how to use filter render light effects in photoshop
how to use tabs photoshop cc 2017
how to use photoshop to simulate long exposure
how to use photoshop for minecraft
how to use history brush tool in photoshop 7
how to use the exact same text from a picture in photoshop
how to use photoshop to make labels
how to use the slice tool in photoshop to erase a portion of an image
how to use photoshop well
book on how to use photoshop
how to save a picture from photoshop to use for instagram
how to use quick mask photoshop
how to use adobe photoshop elements blur tool
how to use slice tool in photoshop cc
how to use photoshop to make a cs go skin
how to use layers in photoshop elements 2.0
how to use clone mask in photoshop cs5
how to convert photos edited in photoshop for use with cnc plasma cutter
how to use photoshop for drawing with a tablet
how to use photoshop to correct under eye lines?
how to use two photos in photoshop
how to use middle gray in photoshop
how to use perspective warp in photoshop cs2015
how to use actions in photoshop elements 10
how to use perspective transform in photoshop
learn how to use photoshop for beginners on phone
photoshop how to use make pressurized lines
how to use use color lab photoshop
photoshop cs6 how to use patch tool
photoshop how to use mask
how to use swell in photoshop fix
how to use text in photoshop video
how to use photoshop with 2 monitors
how do you use the frame tool to place photos in photoshop cs6
how to use my adobe photoshop without subscription
how to use photoshop effect in corel
how to use ruler tool in photoshop to align
photoshop how to use one image to cut another
how to use crop tool in adobe photoshop elements 6
how to use more than one color in your painbruh photoshop cc
how to use uv from maya in photoshop
how to use extract filter in photoshop cs6
how to use a psd file in photoshop
how to use height maps in photoshop
how to use photoshop cs6 to create t shirt designs and mockup
photoshop cc how to use smart sharpen
how to use photoshop with photos mac
how to use adobe photoshop see through clothes
how to use pinch tool in photoshop
how to use blending modes with textures in photoshop cc
how to use black and white adjustment layer photoshop
how to edit use printer profiles in photoshop
how to use photoshop star stable
how to use normal maps in photoshop
how to use photoshop combine 2016
how to use a abr file in photoshop
windows 10 photoshop how to use
how to use eraser in photoshop pro x7?
how to use the anti eraser photoshop
how to use action scripts in photoshop
how to use downloaded brushes on photoshop
how to download and use a brush on photoshop
how to use photoshop shape tools
how to use mosaic censor in photoshop
how to make photoshop actions highlighed for use
how to use background on photoshop
how to use a crack for photoshop cc 2015
how to use the blemish tool in photoshop cc 2018
how to use photoshop tablet
how to use clone stamp tool in photoshop 6c6
how to use photoshop when making pixel art
how to use the quick selection tool on a headshot in photoshop
how to use eps overlay photoshop
how to use 3d function in photoshop with a picture
how to use text layer style in photoshop
how to use a white balance card in photoshop
how to use justification in photoshop
how to use the replace color tool in photoshop
how to use pdf in photoshop
how to select use alpha channel in photoshop
search.myq how to use mask in photoshop
how to use grd file in photoshop
how to use photoshop to enhance handwriting pages
how to use the brush as a selection in photoshop
how to use defringe in photoshop camera raw
how to use photoshop boulder girls instagram
how to use a pantone color in photoshop
how to use contour shuttlexpress with photoshop
how to use sw colors in photoshop
how to use nik hdr in photoshop
photoshop how to use black to show underlying image
if you don't know how to use photoshop
how to use splatter brush in photoshop
how to use photoshop to reloop a sound of a word
how to use brush tool in photoshop for color
how to use align tools in photoshop for text
how to use a touchscreen in photoshop
how to find a map to use with photoshop cs3
tutorial how to use photoshop cs6
how best to photoshop landscape image to use for portrait book cover
how to use lens correction in photoshop cs3
how to use pen selection tool in photoshop
how to use move tool in photoshop cs6
how to use stretch on photoshop
how to use text mask photoshop
how to use ionicons in photoshop
how to use obs to livestream photoshop twitch youtube facebook 2019
how to use a waterbush in photoshop
how to use auto align in photoshop
how to use the puppet tool in photoshop
adobe pse photoshop how to use
how to use aurora plugin photoshop
how to use microsoft photoshop
how to use a cells photoshop
how to use the lasso tool in photoshop to remove blemish
how to use reduce noise in photoshop
how to use the pen tool to cut out in photoshop
how to use the magic wand tool in photoshop cc
how to use photoshop to do avengers dissolve
how to use a photo as an overlay in photoshop
how to use path selection tool in photoshop
how to use timeline photoshop gif
how to use transparent ai files in photoshop with laters
how to use brushes actions in photoshop
how to use adobe photoshop elements for drawing
how to use cintiq express keysfor photoshop
how to use the refine edge tool photoshop cs6
how to use the pen tool in photoshop phlearn
how to use the gradient tool for drop shadow in photoshop cc
how to create a rollover button for use in paypal in photoshop cc 2015
how to use two colors on the stroke of an ellipse in photoshop
how to use vectors photoshop elements
how to use layer masks in photoshop to help with lighting
how to use puppet warp in photoshop cs5
how to use photoshop live 3d in after effects cc
how to use photoshop student edition without a student id
i have a png file for logo how to use it in photoshop as a watermark
how to use adobe photoshop on mac
how to stop use airbrush photoshop cs6
photoshop how to use symbols
how to use adjustment layer on one layer in photoshop
how to use photoshop to change text
how to use animation photoshop cs4
how to use branding kits in photoshop?
how to use selective color in photoshop cc
adobe photoshop how to use rectangular marquee tool
how to use the color picker tool in photoshop elements
how to use xml in photoshop
how to use awesome font in photoshop
how to install and use photoshop brushes
how to use adobe photoshop elements 14 without the cloud
photoshop subscription ended how to use for free
how to use photoshop beginners guide
how to use photomerge in photoshop
how to use quick selection tool photoshop cc
how to use mask tool in current photoshop
photoshop express how to use
how to use photoshop to convincingly troll
how to use the pen tool to mask in photoshop
how to use pick up attributes in photoshop
how to use photoshop pattern brushes
how to use photoshop elements 13
how to use cs5 photoshop background eraser
how to use punin photoshop
how to use brush window in photoshop
how to use the pen tool to draw things photoshop cs6
how to use photoshop for lifetime
how ot use photoshop to draw
how to use tpl files in photoshop cs2
how to use the feather command in photoshop
how to use image in background in photoshop cs3
how to use scanner in photoshop cs6
how to use 3d and 2d together on photoshop
how to use slice tool in save for web in photoshop
how to use photography v9 in photoshop
how to enable use graphics processor in photoshop
how to use photoshop to make vector illustaro
how to use adobe photoshop fix to remove something from picture
how to use shaders with photoshop
how to use median in photoshop
how to use photoshop to remove objects
how to use conde digtal downloads in photoshop
how to use liquify on photoshop
how to cut something out in photoshop to use on label
how to use scroll button for zoom in photoshop
how to use dodge and burn in photoshop elements
how to use color replacement in photoshop
how to use a generator in photoshop
photoshop how to use alpha channel to remove background
how to use custom state brushes photoshop
photoshop how to use wind style
how to use pantone color manager in photoshop
how to use cmky colors in photoshop 2015
how to use artbrush in photoshop
how to use photoshop to remove dots
how to use kyle brushes in photoshop
how to use green screen effect in photoshop cc 2017
how to use colorize in photoshop
sims 4 how to use photoshop filters that downloaded
how to use nvidia texture tools for adobe photoshop
how to use photoshop to refine an image down to 250x250
how to use select photoshop cs6
how to install fonts to use in photoshop
how to use photoshop to make pdf
how to use numbers adobe photoshop
rectangle select marquee tool photoshop how to use mac
aurora hdr how to use photoshop plug in
how to use photoshop for fonts
photoshop cc how to use pen tool to cut
how to use liquify to get rid of belly fat in photoshop
how to take the color of something and use it in photoshop+
how to use font awesome in photoshop cs6
how to use a layer effect text in photoshop
how to use border brushes in photoshop
how to use text on a curve photoshop
how to use font explorer with photoshop
how to use a library item to photoshop
how to use selection tools in photoshop youtube
photoshop cc how to use gradients
how to use preset styles in photoshop
how to use color balance photoshop
how to use textures in photoshop cc
how to use saturation in photoshop
how to use charcoal in photoshop
architecture how to use photoshop to place a rendering onto a street
how to use the firefly brush in photoshop elements
how to use adobe illustrations and vectors in photoshop
how use the direct selection tool to modify the type and make it into a logoin photoshop cc 2017
how to use paint tool on different layers in photoshop
how to use the red eye tool in photoshop
how to use clone stamp in photoshop elements 10
how to use sketchup to render on photoshop
how to use pattern tool in photoshop cs3
how to use patterns in photoshop 2017
how to use adobe photoshop cs6 plugins
how to use a file with multiple patterns in photoshop
how to use symbol photoshop greek
how to use photoshop to clean up a picture
photoshop how to use graduated density tool
how to use the healing brush on photoshop
how to use lens correction in photoshop cc
photoshop how to use new brushes
how to use clipping masks in photoshop cc
how to use multiple filters in a custom saved filter photoshop
how to use adobe photoshop ps
how to use the latest version of photoshop
how to use photoshop to clear up a picture
how to use a jpeg as an overlay photoshop
photoshop cc how to use refine edge
how to use photoshop for stacked focus
how do you get to select the use dither option when converting color spaces in photoshop
how to use pen photoshop
how to use android tablet in photoshop
how to use layer shapes in photoshop
how to use photoshop with surface dial
how to use tools in photoshop
how to use styles files in photoshop for text
photoshop how to use google fonts
how do i use photoshop to make me into a pumpkin?
how to use matting in photoshop
how to use extrude in photoshop
how to use hsl panel in photoshop
how to use photoshop patch tool to remove glare from eyegleass
how to use deborah extras/ornanments fonts photoshop
how to use psds files in photoshop tumblr
photoshop elements how to use reverse black and white
how to use photoshop save gif image
how to use the magic eraser tool in photoshop cc
how to use photoshop to create website and show on mockup
how to use the curvature pen tool photoshop
how to use photoshop cc 2015 to make flyer
how to use a photoshop file on gimp mask
how to use a pattern photoshop
how to use createspace cover templates in photoshop elements
how to use ttf in photoshop
how to use photoshop to remove stray hair
how to use artboards in photoshop cc2017'
how to use the 3d in photoshop cs5 words
how to use sai on photoshop
how to use photo to phill letters in photoshop
how to install and use photoshop cc actions
how to save a logo in photoshop for use in lightroom
how to use a picture mask in photoshop elements
how to use the magic lasso tool in photoshop
how to use pen styles in photoshop cs6
how to use photoshop elements 10 for hdr photography
how to use iskn with photoshop
photoshop how to use clolor as green screen
how to use channels to select hair in photoshop
how to use style brushes in photoshop cs6
how to use a picture to make a pattern in photoshop
how to use wireframes in photoshop
how to use photoshop to photoshop in a picture
how to use photoshop for a pdf
how to use basic photo editing in photoshop
how to use photoshop with transparent background for obs
how can i use adobe photoshop elements 2018 to get rid of face wrinkles
how to use photoshop corporation seal
how to use photoshop elements organizer lessons
how to use photoshop mobile app to draw a line ?
how to save a text box layer in photoshop for future use
how to use visibility variables in photoshop
how to use photoshop to create a flow chart
how to use horizontal type mask tool in photoshop
how to get photoshop to use jpeg
how to use diffrenet painbrush in photoshop
how to use magic selection tool in photoshop 5
how to use vanishing point in photoshop cs4
how to use photoshop on rpw minecraft
how to use photoshop cc to restore old photos
how to use the pattern stamp tool in photoshop cs6
how do i use photoshop to duplicate an object from picture
how to use mockups photoshop
how to use ynsharp mask in photoshop
photoshop cc how to use clone stamp
how to use ipad photoshop mix to cut a circle out of a photo
adobe photoshop elements 2019 how to use mouse for zooming
how to use ligatures in photoshop elements
how to use linear gradient in photoshop
how to use downloaded fonts in photoshop cc
how to use the sample brush in photoshop
how do you use magic wand to copy and paste text in photoshop
how to use photoshop to make invitations
how to use add mask to selection in photoshop
how to use a book template in photoshop elements 13
how to use custom fonts photoshop
how to use photoshop addons
how to use photoshop self portrait
how to use a specific fonts in photoshop
how to use eyelash brush in photoshop
how to use brush tool in photoshop without color overlap
how to use mixer brush tool in photoshop cc
youtube how to use the pen tool in photoshop
how to use paint bucket tool photoshop cs6
how to use photoshop cc lasso
how to use the adobe photoshop app
how to use photoshop elements to make a person dissolve
how to use the lasso tool to paint photoshop
how to use use photoshop
how to use the eraser tool in photoshop elements 10
how to use photoshop to blur a background image
how to use context aware tool of photoshop
how to use the rotate tool in photoshop
how to use photoshop curves without making a new layer
how to use vsco presets in photoshop
photoshop how to use custom path tool -text
how to use warp tool in photoshop for 4 point perspective
how to use patch command photoshop
how to use photoshop to whiten teeth
how to use kerning in photoshop
how to use note in photoshop
how to use liquefy tool in photoshop
how to change the units rulers use photoshop
how to use 3d postcard in photoshop
how to use acr radial filter in photoshop cc 2017
how to use radial blur in photoshop tumblr
how to use the align command in photoshop
lesson on photoshop how do i use pictures i have to make 1 image
how to use the replacement color tool in photoshop
how to use transparent photo in photoshop
photoshop how to use the mask to get ride of part of a picture
how to use corel photoshop to edit look and face of a person
how to add use icons in photoshop
how to use heal in photoshop cs4 for beginners pdf
how to use adobe illustrator and photoshop together
how to use multiple images as background in photoshop
how to use ipad as a drawing tablet for photoshop
photoshop cs6 patterns how to use
how to use paint bucket in photoshop express
how to use photoshop 2015 to alter logo
how to use photoshop mobile
how to use glitch in photoshop
how to use the healing brush tool in photoshop[
how to use photoshop to make grids for art
how to use knockout in photoshop
how to use photoshop to turn a pencil drawing into a digital drawing
how to use spot heaing in photoshop
how to use the photoshop healing brush tool
photography 101: how to use your digital camera and edit photos in photoshop
photoshop elements how to use gradient tool on text
how to use align in photoshop cs6
how to use gradient tool on a shape in photoshop
how to use hue and saturation in photoshop
how to use live trace cs6 photoshop
how to use photoshop refine edge tool for perfect selection
how to use fonts on photoshop windows 10
how to use stamp plant image photoshop
how to use content aware in photoshop elements 9
how to use old photoshop tumblr
how to get use to photoshop
how to use multiple layers in photoshop how to decide layer order
how to use a fuse character in photoshop
how to use the quck select tool photoshop cs6
how to use character styles in photoshop
how to use bloat tool photoshop
how to use text in photoshop cs2
how to use the rounded rectangle tool in photoshop
photoshop cc how to use 3d tutorial 101
how to use japanese font on photoshop elements
how to use actions in photoshop cs4
how to use photoshop brushes with other programs
how to use sims 4 workshop without photoshop
how to i stop use lasso tool in photoshop
how to use green screen photoshop cs6
how to use align tool in photoshop
how to use color saturation in photoshop
how to use dp crackle in photoshop cs6
how to use eye dropper tool to choose foreground color photoshop
how to use shaprness in photoshop
how can you use lightroom cc to photomerg a panorama in photoshop
how to enable photoshop use more ram
how to use a path in photoshop
how to get photoshop to use a wacom tablet
how to use the mask tool photoshop
how to do use brush and cyan in photoshop
photoshop how to use wacom tablet tutorial
how to use vector on photoshop cc 2017.
how to use eraser tool in photoshop youtube
how to use the masking tool in photoshop cs6
how to use photoshop brushes to create pattern paper
how to save in photoshop cc for use with previous version
photoshop how to use different colors for font
how to use the color picker tool in photoshop cs2
how to use masking in photoshop cs3
how to use cs5 plugins in photoshop 2019
how to use photoshop slices
how to use the darken overlay photoshop
how to use color wheel in photoshop
how to use inverse in photoshop cs4
how to use the surface blur tool in photoshop elemetns
how to use photoshop with merch amazon
how to use color picker in photoshop elements
how to use gradient tool in photoshop cc 2017
how to use photoshop to create a paint by numbers
how to use custom photoshop brushes cc
how to use photoshop to save higest quality image
how to use lightroom bridge photoshop together
how to use photoshop to diesgn pictures from scratch
how to use illustrator from photoshop
how to use photoshop 12
how to use rounded rectangle as a mask in photoshop
how to use threshold in photoshop
how to use surface pro 3 pen in photoshop cs6
how to use photoshop touch
how to use watercolor brush photoshop
how to use adobe photoshop elements 2.0
how to use a tint brush in photoshop
action photoshop how to use
how to use smooth steady in photoshop
photoshop how to use face transform
how to use the high pass filter in photoshop
how to use the photoshop clone source panel
how to use the healing brush in photoshop cs4
how to use the quick selection tool in photoshop cs6
how to use fuzy tool in photoshop
how to use the pen tool and fill it photoshop
how to use the pen tool for illutrating in photoshop
how to use photoshop to put measurement on the photo
how to use gimp as photoshop
how to use refine edge in photoshop elements 11
how to use an image as a texture in photoshop cs3
magic wand tool photoshop how to use
how to use pattern swatches photoshop
how to use photoshop with wacom tablet
how to use smart object in photoshop cs6
how to use layer mask in photoshop for coloring
how to use content aware to fill in photoshop
how to use measurement tool in photoshop
how to use transparent illustrator images in photoshop
how to use sure cuts a lot 3 photoshop
how is mini bridge more convenient to use in photoshop?
how to use flamingo bussiness card on photoshop
how to use brush tool in photoshop elements 8
how to use downloaded watercolor photoshop
how to use vanishing point photoshop
how to use a save flyer png from publisher into photoshop
zoivo how to use photoshop
how to use an image as a swatch in photoshop cc
how to use healing brush in photoshop 2017
how to use photoshop to fix a drawing
how to use a btach option in photoshop if the layers are locked
how to use photoshop to measure area covered by a color
how to use extract vectors from eps in photoshop
how to use the art history tool in photoshop cs5
how to use photoshop with microsoft surface
how to use layers in photoshop elements 8
how to use polar coordinates in photoshop
how to use gradient in photoshop cc
how to use photoshop on hp
how to use the color replacement tool in photoshop elements 2.0
how to use xmp in photoshop
how to use actions in adobe photoshop cs6
how to use edit perspective warp in photoshop
how to use brush settings in photoshop cc
how to use a custom shape photoshop cs6
how to use the blow up tool in photoshop
how to use refine edge tool in photoshop cc
how to effectively use layers in photoshop
how to use text tool in photoshop cc
how to use photoshop gif on instagram
how to use sublimation templates in adobe photoshop
how to use adobe photoshop sktch app
how to use icon code on photoshop
classes on how to use photoshop
how to use look up tables in photoshop
photoshop how to use color channels in hue/saturation layer
how to use the 3d in photoshop cs5
how to use photo templates in photoshop
how to use obs 17 adobe photoshop cs6
how to use select subject in photoshop
how to use photoshop smart scale
photoshop how to use it to draw
how to use mini-bridge in photoshop
how to use the pen in adobe photoshop cc2015
how to use photoshop to depixelate an image
how to use pencil to delete photoshop
how to use colors for tracing photoshop
how to use load selection in photoshop
how to use smart object in photoshop?
how to use belarc to find photoshop product key
how to use camera raw on photoshop
how to use photoshop elements to manage photos
how to use a ruler with the brush in photoshop
how to use 1000 photoshop actions in corel photoshop pro 8x
how to use elliptical tool with photoshop cs6
how to use photoshop for creating planners
how to use photoshop for a sign night
how to use font glyphs in photoshop elements
how to use bullet points in photoshop?
how to use photoshop to reduce shine on object
how to use patch within selection photoshop
photoshop minecraft how to use cc packs
how to use photoshop transparency
how to use firework overlays in photoshop cc
photoshop how to use 3d tools
photoshop how to use magic wand to change color
i can use anything in photoshop how to return to workspace
how to use add and outline to text in photoshop elements 15
how to use color schemes for photo in photoshop
how to put picture inside an opening use photoshop
how to use photoshop for anime drawings
learn how to use vectors photoshop
photoshop how do i use content aware tool to remove part of a picture
how to use vector path photoshop
how to use bmps as brushes in photoshop
how to use curved text in photoshop
how to use round rectangle tool to copy and paste in photoshop
how to use photoshop transforms
how to use font in photoshop cs5 in windows 10
how to use a pattern as text in photoshop
how to use artistic filters in photoshop
how to use adobe photoshop express on android
how to use green screen on photoshop
how to use blend if sliders in photoshop
how to install and use photoshop brush file
how to use topaz labs in photoshop cc
how to use photoshop to convert negatives
how to use scanlines in photoshop
how to use eraser in photoshop cs4
second life how to use targas for alphas with photoshop
how to use the adjustment brush in camera raw filter in photoshop
how to use photoshop to take off clothes
how to save a picture in photoshop to use in lightroom without loosing quality
how to use puppet warp in photoshop to move a leg
how to use layers in photoshop elements 2018
how to use styles to photoshop
how to use atn file in photoshop cs2
how to print from photoshop that use ruler tool
how to use screen blend mode in photoshop
how to use adjustment layer in photoshop
how to use line tool in photoshop cs
how to use levels in photoshop clean up sketch
photoshop how to use colorblind
how to use spot healing brush in photoshop cc
how to use compound path in photoshop
how to use photoshop cs5 extended youtube
how to use photoshop cc 2017 for art
how to use photoshop controls in illistrator
how to use arabic text in photoshop
how to use pen tool in photoshop and fill the color
how to use paint like photoshop
how to use the bucket tool in photoshop cc
how to use images for references in photoshop
photoshop how to use 3d youtube
how to use photoshop for ux
how to use a cintix with photoshop
how to use auto erase in photoshop
how to use daz in photoshop
how to use photoshop with hawku g640
how to use photoshop to express emotion
how to use grid lines in photoshop
how to use 3d models in photoshop
how to let guest account use photoshop
photoshop elements 15 how to use
how to use quick selection tool photoshop to fill in
how to use photoshop and make picture see through
how to use color wheel photoshop
photoshop how to use brush in certain area
how to use smart object mockup photoshop
how to use adobe photoshop to design a tool
how to use photoshop files in after effects
how to use photoshop to create a 5x7 print
how do i use photoshop to remove an object from picture
how to use a whibal card in photoshop
how to use the quick mask tool in photoshop
how to use eyedropper in photoshop?
how to use match fonts in photoshop cc
how to use gradient tool in photoshop 2019
how to use content aware tool in photoshop cc
how to use photoshop zip file
how to use brush templates in photoshop
how to use content aware fill photoshop
how to use contour shuttle with photoshop
how to use the paint bucket tool in photoshop on a separate layer
photoshop how to use to edit portraits
how to use offset in photoshop for seamless design
how to use shading in photoshop
how to use vincentia font in photoshop
how to use brighten photos in photoshop
how to use pdf vectors in photoshop
how to use dng converter photoshop cs6
how to use brush dp crackle in photoshop cs6
how to use photoshop for windows 7
how to use cartoon from photoshop in anime studio pro
how to use photoshop for a snapchat filter
how to use history brush photoshop
how to use quick masks in photoshop
how to use packs in photoshop cs6
how to use custom photoshop brushes 2015
how to use shape maker in photoshop
how to use magnet tool in photoshop
how to use reference photos in photoshop
how to use suitcase fusion in photoshop cc video
how to use red in levels in photoshop elements 4
how to use cartography brush photoshop
how to use dashes in photoshop cc
how to use adobe photoshop 3d
how to use adobe photoshop for graphic design
how to use photoshop actions in photoshop elements
how to use photoshop to make pictures smaller
how to use focal points in photoshop
how to use photoshop cc to crop a photo into a circle
how to use downloaded text in photoshop
how to use photoshop for organize
how to use photoshop on chromebook
how to use the blur tool in photoshop elements
how to use photoshop to highlight images
how to use adobe photoshop for nudes
how to use purchased fornts on photoshop
how to use photoshop cs5 to make a 3d photo
how to use photoshop packs
how to use sprite sheet exporter in photoshop
how to use chinese for photoshop
use guide on how to save on photoshop
how to use photoshop element actions
how to select a color to use with brush in photoshop
photoshop how to use a gradient in a specific area
photoshop how to canvas size use swatch
how to use 3d mockup in photoshop
how to use text masks photoshop
how to use photoshop to make a photo look like a drawing
photoshop how to make the brush use color swatch instead of pattern
how to use eye dropper tool in photoshop to use another color
how to use photoshop to convert pdf to pes
illustrator how to use photoshop to
how to use photoshop tools to create basic web graphics
how much processing power to use photoshop
how to use the brush to blend something in and out of your photograph in photoshop
how to use the eraser tool in photoshop elements 11?
photoshop text effects psd how to use
how to use paintbrush in photoshop elements
how to use new cc feature in photoshop tutorial
how to use the oil paint filter in photoshop
how to use print screen with photoshop
how to use photoshop 2017 to add layers to photos
how to use the text tool in photoshop elements
how to use camera raw for photoshop
how to use a photoshop layer mask in after effects
photoshop 2017 cc how to use clone stamp
how to use camera raw filter for photoshop cs5
how to use basic photoshop
how to use photoshop with tsr workshop
how to use spot healing brush tool in photoshop cs5
step by step instructions on how to use smudge brush in photoshop
how to use large files in adobe cc photoshop
how to use adobe photoshop 2015 to make or alter logos
how to use lighting effects photoshop
how to use the clone stamp tool in photoshop video
how to use toon it in photoshop
how to use the photoshop slice tool
how to use photoshop with graphic tablet
how to use dingbat fonts in photoshop
how to use photoshop cc 2017 for free
how to use the 3d function in photoshop cc
how to use photoshop for astrophotography
how to use magic wand in adobe photoshop 7
photoshop mockup how to use
how to use mask in photoshop 7
how to use adobe photoshop 7.0 in urdu lesson 2
how to use slice tool in photoshop cs3
https://creativemarket.com/blog/how-to-install-use-photoshop-brushes
how to use photoshop easy steps
how to use the magic wand tool in photoshop elements
how to use selective color adjustment in photoshop
how to use adobe photoshop for web designing
how to use quick selection tool in adobe photoshop cs5
how to use adobe photoshop download
how to use actions in photoshop elements 2018
how to use layer styles in photoshop cs3
how to use grunge brush in photoshop
how to use content aware scale in photoshop cs5
how to use photoshop to make photos look vintage
how to use the clone stamp tool in adobe photoshop
how to use the photoshop cc
how to use photoshop with keyboard
how to use a layer style in photoshop
what is the best way to learn how to use photoshop
how to use vsco in photoshop
how to use photoshop quora
in photoshop how to use clone stamp tool
how easy to use photoshop
how to use photoshop pictures as background
how to photoshop 7 use
how to use adobe photoshop 2015
how to use clipping mask in photoshop cs2
photoshop file (psd) extract/recovery tool how to use
how to use photoshop on another computer
how to use adobe photoshop to change the background of a picture
how to use action photoshop cc
photoshop cs6 how to use crack
how to use photoshop on iphone 7
how to use rain brush in photoshop
how to use ico plugin for photoshop
how to use adobe photoshop hindi
brush tool photoshop how to use
how to use spot healing brush tool in photoshop cs3
how to use eyedropper tool in photoshop cc 2015
how to use photoshop cs5 on mac
how to use photoshop cc 18
how to use adobe photoshop after trial
how to photoshop use pdf
how to use oil paint filter in photoshop cc 2017
how to use photoshop keyframes
how to use photoshop cs6 step by step
how to use photoshop on linux
how to use photoshop cs6 2017
how to use magic wand on photoshop cs6
how to use magic wand tool in adobe photoshop cs4
how to use splatter brushes photoshop
how to use adobe photoshop in hindi
how to use photoshop cc on mac
how to use photoshop adobe cc
brush photoshop how to use
how to use color wheel in photoshop cc
how to use photoshop ps6
how to use photoshop editing youtube
how to use magic wand tool in adobe photoshop 7
how to use photoshop liquify tool
adobe photoshop 7.0 how to use in hindi
photoshop action how to use
how much ram do i need to use photoshop
how to use pen tool using photoshop
how to use the eyedropper tool in photoshop elements
how to use the clone stamp tool in photoshop elements 8
photoshop how to use color range
how to use photoshop brushes in coreldraw
how to use photoshop cs6 in mac
how to use photoshop assets
how to use vanishing point in photoshop cc
how to use adobe photoshop in mobile
how to use hdr toning in photoshop cc
how to use photoshop cs5 without serial number
how to use fonts from typekit in photoshop
how to use photoshop to increase resolution
how to use the spot healing tool in photoshop cs6
how to use photoshop in marathi
how to use adobe photoshop 7.0 in tamil
how to use adobe photoshop 18
how to use the clone stamp tool in photoshop cc mac
how to use clipping masks in photoshop cs6
how to use adobe photoshop to design a logo
how to use elliptical marquee tool in photoshop cs3
how to use all tools in photoshop cc
is it hard to learn how to use photoshop
how to use liquify tool in photoshop cc 2017
how to use pen tool in photoshop to cut out images in hindi
how to use photoshop on a mac computer
photoshop cc how to use gradient tool
how to use photoshop cs6 for beginners mac
how to use gradients photoshop
texture photoshop how to use
how to use 3d font in photoshop
how to use photoshop layout in dreamweaver
how to use photoshop a picture
how to use hdr effect in photoshop
how to use adobe photoshop cc youtube
how to use filters in adobe photoshop
how to use adobe photoshop cs4 for beginners
how to use feather option in photoshop cs6
how to use the clone stamp tool in photoshop elements 2018
how to use smart brush in photoshop elements 10
how to use photoshop express on pc
how to use adobe photoshop cc mac
how to use video timeline in photoshop cc
how to use adobe photoshop cs6 youtube
how to use photoshop paint brush
how to use animation frames in photoshop
how to use watercolor paint brushes in photoshop
how to use photoshop cc 2018 pdf
how to use pen tool adobe photoshop cs6
how to use photoshop cs6 pen tool
how to use photoshop levels and curves
how to use brush for photoshop
how to use adobe photoshop passport size photo
how to use magic wand tool in photoshop cc 2015
how to install and use shutter pulse actions photoshop
how to use photoshop in iphone
how to use the clone stamp tool in photoshop elements 13
how to use clone stamp tool in photoshop 7.0 in hindi
how to use grid layout in photoshop
how to use a cloud overlay in photoshop
how to use photoshop cc for animation
how to use adobe photoshop trial forever
how to use watercolor brush on photoshop
where can i learn how to use photoshop
photoshop cs5 how to use
how to use magic wand in adobe photoshop cs6
how to use adobe photoshop 7.0 video download
how to use photoshop to draw shapes
how to use the clone stamp tool on photoshop cs5
how to use magic wand tool in photoshop cs3
how to use photoshop sinhala
how to use imagenomic portraiture in photoshop cs6
how to use photoshop landscape photos
how to use photoshop shortcuts
how to use photo overlays in photoshop
how to use photoshop on multiple computers
how to use photoshop 2015 cc
how to use obs for photoshop
how to use quick selection tool in photoshop elements 9
how to use the magic wand tool photoshop cs6
how to use photoshop clone
how to to use photoshop
how to use photoshop letterhead in word
how to use adobe photoshop 7.0 pdf in hindi
how to use quick selection tool in photoshop 2018
how to use quick selection tool in adobe photoshop cs3
how to use photoshop cc 2018 after trial expired mac
how to use photoshop cc for mac
photoshop how to use knockout
how to use photoshop pictures
how to use photoshop design logo
how to use the quick selection tool photoshop cc
how to use adobe photoshop cc crack
how to use mac photoshop
how to use digital paper in photoshop
how to use adobe photoshop pen tool
how to use photo filter in photoshop cs6
how to use clipping mask in photoshop elements 11
how to use feather option photoshop
how to use photoshop toolbar
how to use photoshop cc wikihow
how to use photoshop gif
how to use adobe photoshop 2014
how to use photoshop on surface pro
how to use the clone tool in photoshop cs6 on a mac
how to use the clone stamp tool in photoshop cs3
how to use adobe photoshop filters
how to use layers in photoshop 7
how to install and use brushes in photoshop
how to use photoshop to create logos
how to use clone stamp tool in photoshop 6.0
how to use photoshop to blend pictures
how to use photoshop basics video
how to use quick selection tool in photoshop 7.0
how to use knife in photoshop
how to use photoshop 2003
how to use hdr in photoshop cs6
how to use font awesome 5 in photoshop
how to use photoshop for web design youtube
how to use of adobe photoshop 7.0
how to use the quick selection tool in photoshop cs3
how to use watercolor action in photoshop
how to use photoshop editing photos
how to use vsco with photoshop
how to use oil paint effect in photoshop cs6
how to use spot healing brush tool in photoshop cs2
how to use fonts in photoshop mac
how to use adobe photoshop 7.0 in pdf
how to use magic wand tool in adobe photoshop 7.0
how to use a graduated filter in photoshop
how to use eyedropper tool in photoshop cc 2018
photoshop how to use patch
how to use photoshop 7.0.1
how to use adobe photoshop in pdf
how to use the clone stamp tool in photoshop 7.0
how to use magic wand tool adobe photoshop
how to use adobe photoshop cc 14.2
how to use watercolor photoshop action
adobe photoshop elements 8 how to use
how to use cloud effect in photoshop
how to use photoshop add new layer
how to use photoshop cs6 in tamil
how to use lens flare in photoshop cs3
how to use photoshop to create t shirt designs
how to use the magic wand in adobe photoshop
how to use digital scrapbooking templates in photoshop elements
how to use clone stamp tool in photoshop cc 2015
how to use sky overlay photoshop
how to use paths and shapes in photoshop
how to use a photoshop pdf
how to use font awesome photoshop
how to use adobe photoshop in telugu
how to use adobe photoshop elements 7
video how to use photoshop actions
how to use 3d tools in photoshop cc
how to use quick mask in adobe photoshop
how to use urdu fonts in photoshop
how to use photoshop on tablet
how to use of photoshop cs6
how to use photoshop for iphone
how to use the magic wand in photoshop cc
how to use adobe photoshop 7.0 youtube
how to use photoshop actions cc 2015
how to use adobe photoshop elements editor
how to use adobe photoshop in youtube
how to use elliptical marquee tool in photoshop cc
how to use photoshop cs6 hindi
adobe photoshop actions how to use
Photoshop Tutorial: Photoshop Basics In Photoshop Cs6
When you open Adobe Photoshop for the very first time, it's simple to click around in confusion for a minute and after that reach for your freelancer's contact number rather. Trust us, you're not alone in this. It's an incredibly effective style software application with a lot going on, consisting of a wealth of tools that can appear frustrating at times.
With a little help, you can easily teach yourself how to use it to produce beautiful, engaging graphics. All it takes is an intro to core elements-- in plain English. Pro Tip: You can do all sorts of cool things with layers-- and believe it or not, making animated GIFs is among them.
For more information about adding, deleting, and replicating layers in Photoshop, examine out this video tutorial - how to use a photoshop action. What It Does: The Color and Examples tool lets you use, customize, copy, and conserve customized colors for your material. While this might appear like a pretty obvious component, it in fact has powerful functions that will keep your visual content vibrant and combine your color plans.
Another location to find the Color tool is at the bottom of the toolbar on the left, suggested by 2 overlapping boxes: Open the Color Picker by double-clicking on the top box either in the Color module, or because menu on the left. From there, you'll see a vertical spectrum of color with a slider on it, which you can adjust to produce your own customized color.
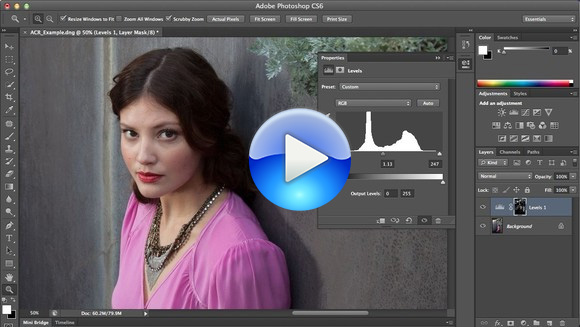
# 1fb 1ee), then enter it in the appropriate box to discover that color instantly. You can also select your color example based on RGB or CMYK worths. Any colors you produce can be added to your "Examples" if you click "Contribute to Swatches." Pro Pointer: Take your company colors and conserve them as "Examples" so that you can reference and reuse them whenever you're designing your visual material.
Where It's Found: The toolbar on your left, near the bottom. When you click the Text tool icon, all of the settings and typeface options will turn up at the top of your screen. These settings let you alter the font style, font size, and spacing in between characters, height, width, color, and style.
The text tool works like any other text tool you have actually used. Click the "T" icon on the left side bar, drag the text box over any specific location you desire text to appear, and you're set to go (how to use marquee tool in photoshop). Whenever you develop a text box, Photoshop will create a layer for it.
Pro Pointer: While Photoshop provides a wide range of fonts, you can also install your own typefaces. To get more information about fonts and the Text tool, have a look at this video tutorial . What It Does: Simply as with typefaces, you can include your own, royalty-free, custom brush suggestions. With the brush settings, you can change the size, shape, and transparency of your brush strokes to achieve a variety of various visual impacts.
Photoshop Basics Tutorials For Beginners - Learn Adobe ...
Photoshop begins you off with a great selection of brush tips that you can utilize to tidy up your graphics and develop some fundamental visual effects. Where It's Located: The toolbar on the left. When you click the Brush tool icon, all of the settings and brush options will appear at the top of your screen.
You'll find a variety of pre-installed brush suggestions, in addition to any custom brush ideas you set up to Photoshop. (You can find royalty-free brushes at www.brusheezy.com if you want to get really creative.) The brush tool is ideal for including design accents to your material material. When utilizing the brush tool, I always recommend adding a brand-new layer to deal with so you do not paint over any of your other components.
Changing the brush settings can give your brush a significantly various appearance and style. Don't hesitate to play around a bit with all of your custom brushes. What It Is: When utilized properly, this tool will let you select specific elements, entire graphics, and determines what is copied, cut, and pasted into your graphics.
The Select tool is called one of the many basic, yet aggravating tools to utilize in Photoshop. The first thing you should know is that it'll only work if a layer is highlighted. So, if I wish to cut or copy a piece of Layer 4, Layer 4 must be highlighted in my Layer's tool bar.
Once you keep in mind to take notice of which layer you are working with, the Select tool ends up being a lot easier to use. First, highlight your location of choice. Then, merely right-click and decide what you 'd like to do from the pull-out menu. For example, you can cut out things from an existing layer and develop a layer of your own.
When you have actually picked the area of the image, merely copy the area. Next, open the tab for your current job and paste it in as a brand-new layer. Highlight the layer of the things( s) you want to choose. You can move multiple objects at the same time by highlighting several layers. Then, right-click your choice, and then you have a couple of options, including: A) Selecting "Layer through Copy" to copy the things( s) from this layer and develop a layer of its own.
As soon as you've figured out the area to copy, utilize the menu bar at the leading and click "Edit" > "Copy Merged." This will copy the entire graphic so you can paste it as its own layer. B) Picking "Free Transform" to scale, rotate, move, and flip your choices. (Refer to the Move tool in the next section of this post if you require more help on this.) Pro Idea: One truly cool technique you can do with "Free Transform" is to overlay screenshots of a PDF to make a 3D-looking image, like the one listed below for our read this article for the step-by-step tutorial .
What It Does: This is a relatively fundamental tool that permits you to move individual aspects of your graphic. The Move tool works on individual layers, and on the graphic as a whole-- if (keep in mind how to do this?) you highlight all of your layers - how to use actions in photoshop cc. It is available in convenient when you're trying to rearrange images, text, and other style aspects.
Photoshop Basics Tutorials For Beginners - Learn Adobe ...
Click the Move Icon from the left hand menu bar and simply drag the things( s) you want to move - photoshop how to use clone stamp. To move all objects in one layer, just highlight the layer and utilize the Move tool. You can also right click the things for additional choices. The Free Transform tool lets you scale, turn, move, and turn any element in your choose layer or layers.
Hold the SHIFT secret while transforming to keep the proportions of your components. What It Does: The Zoom tool lets you zoom in near to specific locations of an image, and zoom out to get more of a bird's eye view of what's taking place. Where It's Found: In the top menu bar, choose View > Zoom In or View > Zoom Out.
To utilize the keyboard shortcut, hold ALT (PC) or Command (Mac) and press + to zoom in, and ALT (PC) or Command (Mac) and press - to zoom out. What It Does: The Fundamental Eraser works a lot like the brush tool. You can alter the size and firmness of the eraser tip to achieve a range of impacts, like mixing and fades.
The eraser is among the most beneficial tools in Photoshop. Yes, I understand it's technically simply an eraser, however you have actually never utilized an eraser like this (how to use clone stamp photoshop). Where It's Found: The toolbar on the left. As soon as you click the Eraser icon, all of the settings will pop up at the top of your screen.
Like most tools in Photoshop, the eraser works only on a particularly chosen layer. how to use magic wand in photoshop. Ensure you have actually got the layer you desire picked prior to you start removing. This tool is a time-saving wonder. You can see how quickly it removes background colors from images. This is especially useful if you need a things with a transparent background.
Select "Background Eraser." Now you're ready to do some severe eliminating. Change the size of the Background Eraser, and simply click the color you would like erased from the chosen layer. Remember to select the layer you wish to erase on. Pro Suggestion: Don't be scared to utilize an oversized eraser tip for the Background Eraser.
To read more about how to get rid of the background of a photo in Photoshop or Power Point, have a look at this detailed guide . What It Does: The Crop tool lets you crop an image. It works like any crop tool you've ever come across: Merely choose your area and crop it out.
Where It's Located: The toolbar left wing. Select the icon suggested in the screenshot from the side menu bar, and drag the box over the area you would like to crop. how to use the clone stamp tool in photoshop cc. To adjust the crop box, just click and drag the small anchor boxes on the sides and corners of the crop box.
20 Best Photoshop Video Tutorials To Watch In 2020
check out this post from Digital Photography School . What It Does: The Fill tool, formerly the Paint Container tool, fills any strong location with the color of your choice - how to use layers in photoshop. It's excellent for strong backgrounds or coloring large areas. It can likewise be utilized to use patterns to your images. The Gradient tool within the Fill tool lets you create a great, faded background impact of the color of your option.
From there, you have the option to pick "Solid Color," "Gradient," or "Pattern." Initially, select the layer you want to fill with a strong color. Then, from the top menu bar, select Layer > New Fill Layer > Strong Color ... From there, a "New Layer" window will appear and trigger you to name the brand-new color fill layer.
Here, you can pick which strong color you wish to fill. Because I 'd selected my background layer to complete (i.e. the color of the sky in my graphic), the color I choose in the Color Picker determines the color of the sky: These patterns can be by hand developed if you have the time and perseverance, or you can discover a variety of royalty-free patterns readily available for download through a standard Google search.
Then, from the top menu bar, pick Layer > New Fill Layer > Pattern ... From there, a "New Layer" window will appear and prompt you to name the brand-new color fill layer (how to use layer masks in photoshop). Don't stress over selecting the color you desire best then and there-- simply call the layer and press "OK." Next, you'll see the "Pattern Fill" window pop up.
Since I 'd selected my background layer to fill in (i.e. the color of the sky in my graphic), the pattern I choose in the Pattern Fill modifications the sky: To apply a gradient, first select the layer you 'd like to fill with a pattern. Then, from the top menu bar, choose Layer > New Fill Layer > Gradient ...
Do not stress over selecting the color you want best then and there-- just name the layer and press "OK (how to use templates in photoshop)." Next, a "Gradient Fill" window will turn up. Play around with these alternatives, consisting of the style, angle, and scale. To select a various gradient than the one used by default, click the arrow on the right-hand side of the default gradient to open the Gradient Editor, revealed listed below: What It Does: This convenient little tool lets you extract and use any color from any image in Photoshop.
Select the icon from the sidebar. Next, locate that color you would like to extract, and simply click that location to clone the color. As soon as you have actually extracted the color, you'll see it showed both in the Color module at the top right of your screen, along with the bottom of the left sidebar.
***
Categories
Copyright© How To Use Photoshop All Rights Reserved Worldwide